
Learn two keys the normal approaches to knee valgus exercises miss that will help fix it for good. Then follow up with three exercises targeting the root cause.
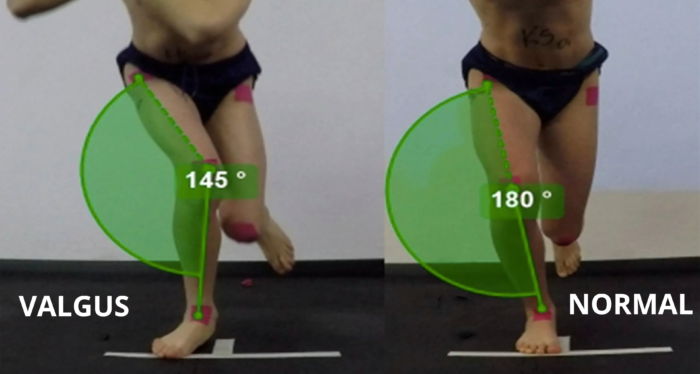
Dynamic knee valgus happens when your knee caves in. When you go up or down stairs, run, jump, or do exercises like squats and lunges. If you have this, you’re at a greater risk of suffering from general knee pain, tendonitis, meniscus tears, and ACL tears – especially if you play sports that involve cutting or jumping, like soccer, volleyball, or basketball.
Now this is different than structural or congenital knee valgus, which is when you’re born with a certain shape in your bones that has you in this knock-knee position.
If you want to follow along with the video, click here to watch 2 Missing Keys & Exercises to Fix Dynamic Knee Valgus (Knock Knees) on YouTube.
What is Dynamic Knee Valgus?
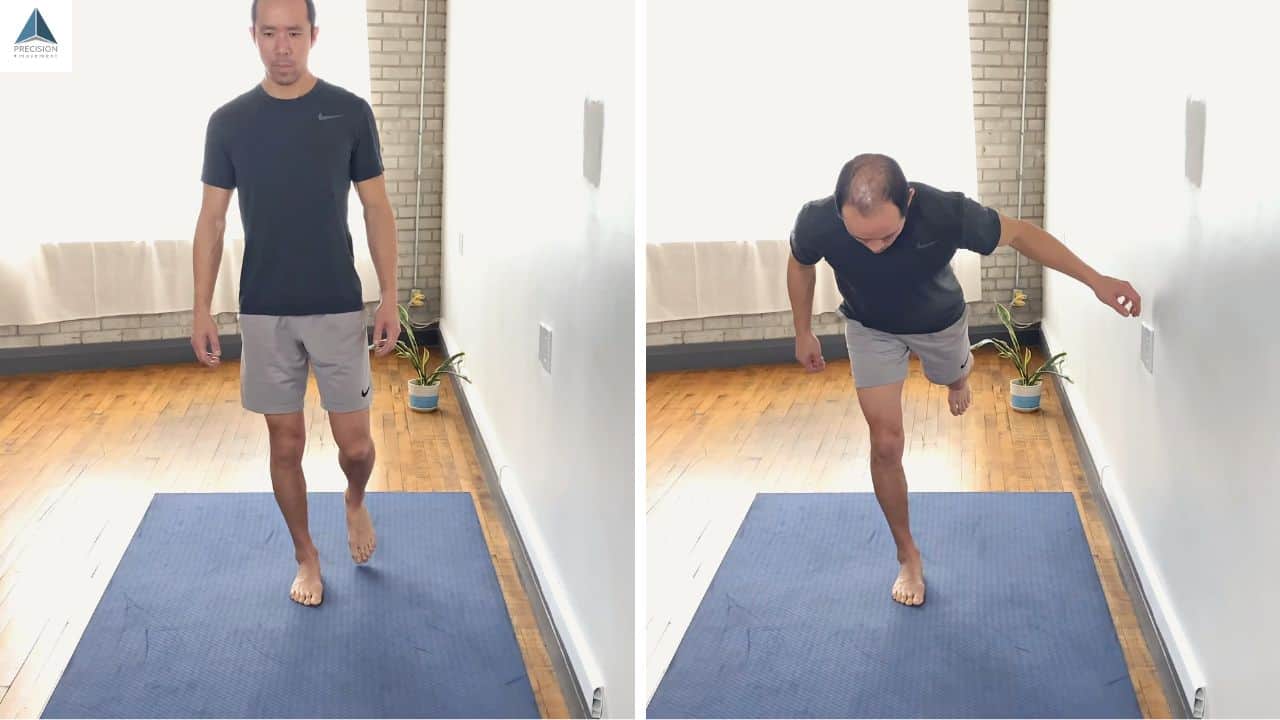
Dynamic knee valgus (also called knock knees or genu valgum) looks like the knee caving in, especially when you’re doing single-leg exercises, like a single-leg squat. The knee moves closer to your midline, while your ankle remains in place.
It’s characterized by a number of different movements.
Number one, starting at the hip. It’s the hip will shift and shoot out laterally. Because of the hip shifting and shooting out laterally, it’s also going to go into adduction and internal rotation. That means the hip is going to turn in.
Other compensations that are very common with knee valgus include tibial external rotation. The tibia (the lower leg) will rotate out. Foot pronation also compensates for knee valgus. The foot will flatten out and the foot will evert, meaning the bottom of the foot will turn outwards.
All of these movements are common when knee valgus occurs. This is why the standard approach basically tries to give you knock knee exercises that do the opposite movements. For example, instead of your hips shifting out, adducting, and internally rotating, the exercises are all for hip abduction and external rotation.
That’s why you see a lot of glute medius and glute maximus exercises in a valgus-style program.
However, this standard approach misses two key elements that will help you to get to the root cause to fix your values and knees for good. That’s what we’re covering today.
Key #1
The first key is addressing the foot and the ankle.
There are two pieces to this puzzle. For the foot, we’ve got to wake up and ensure the intrinsic foot muscles are strong. The intrinsic foot muscles create what we call the active arch. The active arch helps to maintain the stability of the foot so that it doesn’t go flat, because when the foot goes flat, the knee automatically caves in.
Right away, we’ve got to make sure that those muscles are working well. To do that, (our go-to exercise to start with is called the Short and Skinny Foot.
The Short & Skinny Foot
Basically, what you’re doing is you’re balancing on one foot or putting more pressure on one foot.
Start off by spreading the toes, and then you make the foot skinny across the metatarsals between the big toe and the little toe. Make the foot short by putting the metatarsals towards the heel.
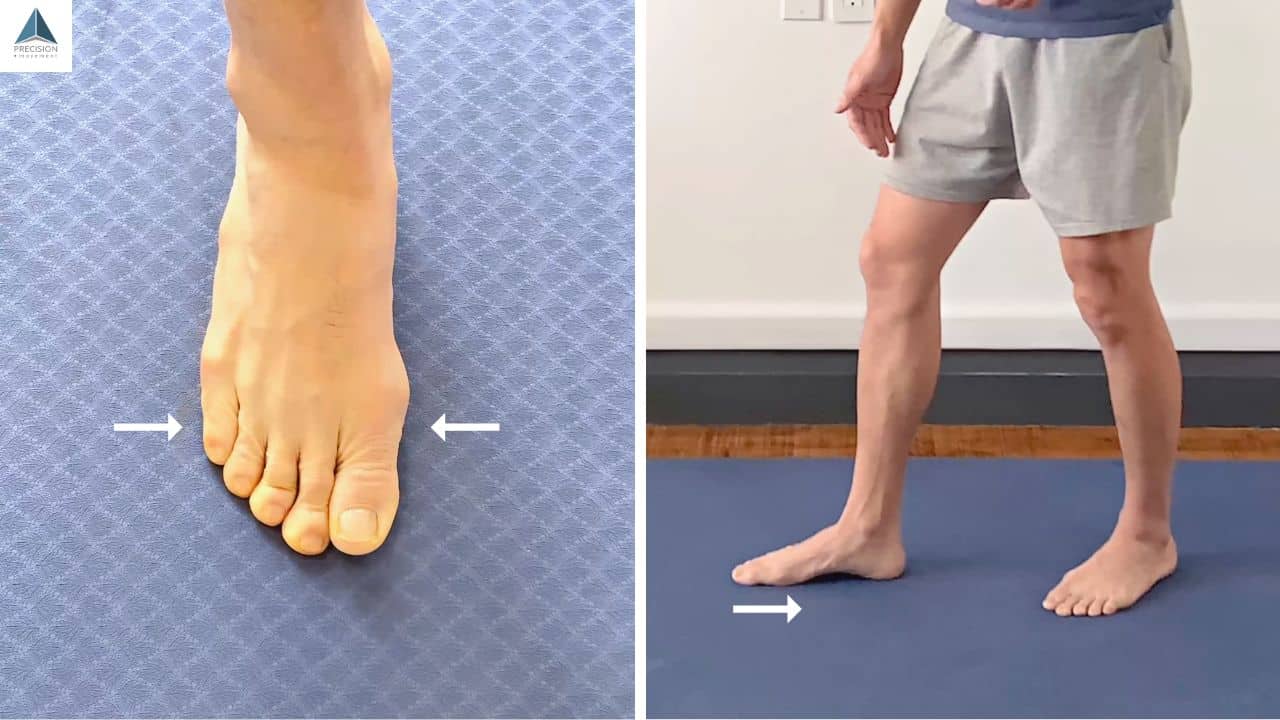
That’s the short and skinny foot.
We’ve talked about this in many previous articles, and we also go into more depth with this and other exercises in an article specifically on the intrinsic foot muscles.
But right now, we want to focus on valgus knees, but you can come back to that afterward if the foot muscles and creating that active arch is a problem for you.
The other way that the active arch and strengthening and waking up these muscles up helps is that these muscles are really important for proprioception.
priorioception = perception or awareness of the position and movement of the body
There are a lot of sensory receptors in the muscles of the bottom of the foot, particularly in the skin at the bottom of the foot, that tell the brain basically how to organize movement to ensure balance, alignment, and stability.
If these muscles aren’t working well, you won’t get good proprioception and you won’t know how to balance. Your brain won’t know how to deal with the terrain and movements you are performing.
The Active Arch
Now one point I will make in this article that’s relevant to valgus knee and standing on one leg is that active arch.
Imagine fine lines between each toe and the center of the heel.
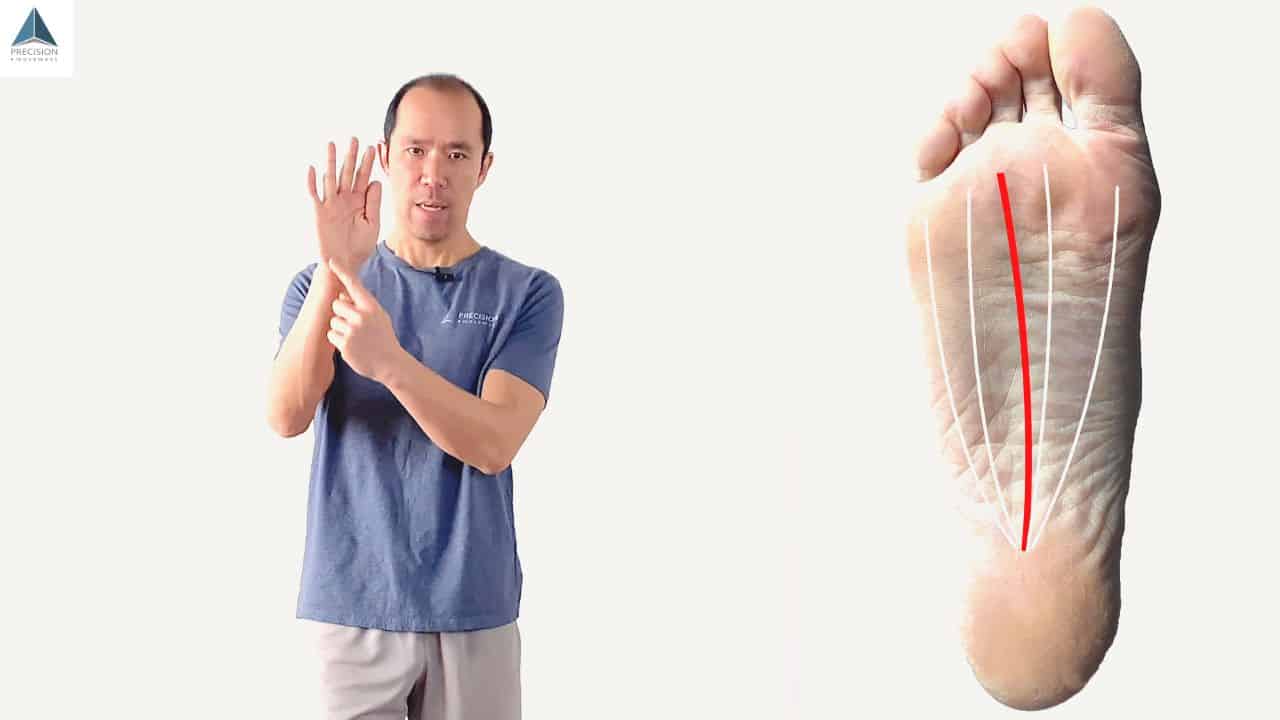
In each metatarsal between that and the center of the heel, there’s an arch. There are muscles that can create that arch. For the purposes of single-leg balance, you want to focus on the middle toe.
From that metatarsal (so the base of the toe, to the heel, you focus on pulling that metatarsal towards the heel and creating that arch.
The reason why is because it’s like driving. If you’re driving down the street, you want to stay in your lane. You’re making micro-adjustments to drive in a straight line. You’re not holding the wheel locked into one place.
The same goes for balancing on one foot. Balancing on one foot is a series of micro-adjustments. If you’re in on the middle arch and you’re centered over the middle of the foot, you can make those micro-adjustments, left and right. But if all of your weight is over on the medial or lateral aspect, you’ve only got one direction to go.
That’s where you can get into over-correction and quickly lose your balance. This focus on pulling the third metatarsal towards the heel and creating the arch, and balancing over that line is going to be taken through all of the exercises that we’re going to cover today.
Ankle Dorsiflexion
With respect to the ankle, the key here is ensuring that you’ve got sufficient ankle dorsiflexion range of motion. Ankle dorsiflexion is when you’re pulling your toe towards your knee, or if your foot’s on the ground, the knee is going forward over the toe.

If you’re lacking this range of motion and you’re performing a movement that needs it, like a single leg squat or going up or down stairs, then to compensate for this lack of dorsiflexion, you’re going to pronate (aka turn your foot out.) Your knee is going to cave in, and that is basically recreating valgus.
Ensure that you’ve got proper ankle dorsiflexion range to do any of the movements that you need to do where you’re balancing (even briefly) on one foot.
We’ve got another article that covers ankle dorsiflexion and more, so click here for that. I just want to highlight dorsiflexion for you so that you can understand and learn if this is something that you need to work on.
I’ve called out the foot and the ankle as key number one because they form the foundation for which all of your movement occurs.
If your foot and your ankle aren’t correct, then nothing from there up is going to be correct. So that’s where you need to start.
Key #2
The second key is kinesthetic awareness, and this basically refers to your awareness of where your body is in space and your body positioning. I discovered just how important kinesthetic awareness is after I did an exhaustive review of the research.
Most of the studies in my review were focused on hip abduction and glute medius strengthening, and some of their studies showed positive results. Some of the studies showed no results.
So what’s happening here?
Then I came across one study titled “Knee Valgus during Jump Landing is Related to the Inaccuracy of Knee Position Recognition in Health Young Women.” [1]
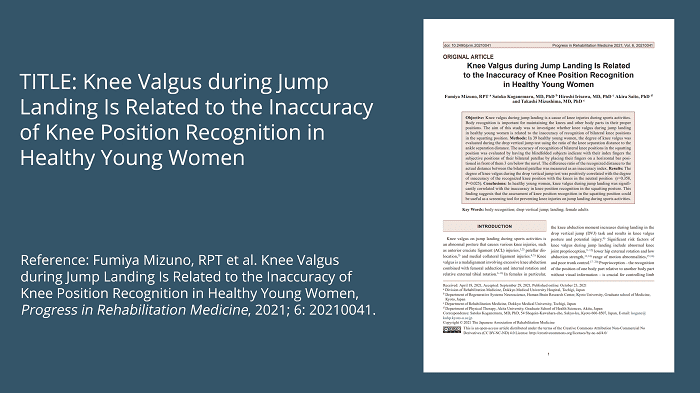
There were 39 healthy young women in the study, and the researchers had them stand on a 31-centimeter high platform with feet shoulder-width apart. They jumped off and were instructed to land on the floor equally on both feet. Then immediately perform a maximum vertical jump from the squatting position.
For the jump, the subjects were instructed to land with their knees in a neutral position, and it was during this test that the researchers measured the amount of valgus.
The researchers also measured the inaccuracy of knee position recognition by having the subject blindfolded, then stand against a wall and squat down to 70 degrees of knee flexion and touch a bar to indicate how far apart they thought their knees were. They also measured hip abduction strength, internal rotation range of motion, and external rotation range of motion.
The only positive finding in this study was the degree of knee valgus during the drop vertical jump test was correlated with the degree of inaccuracy of the recognized knee position with the knees in the neutral position, not hip abductor strength or hip internal or external range of motion.
This study showed just how important joint position sensory (kinesthetic) awareness is to your ability to maintain good alignment and avoid caving the knees when you’re doing exercises like jumping or single-leg squats.
Kinesthetic awareness plus addressing your foot and your ankle is how you’re going to fix your knee valgus for good.
3 Best Knee Valgus Exercises
That brings us to what I call our anti-valgus training exercises.
Exercise 1: Hip Hitch Exercise
Anti-valgus training part one is the Hip Hitch Exercise.
This exercise wakes up and integrates muscles from the foot to the hip that are needed for one-leg stability.
You stand on a step or a plate and create the short and skinny foot, focusing on that middle arch between the third metatarsal and the heel.

- Keeping both knees straight, slowly lower the foot wards the floor by dropping the pelvis
- Lift the foot away from the floor by hiking the pelvis
- Hold at the top for 5 seconds.
Perform 1 set of 5 reps, holding for 5 seconds at the top.
Move slowly and under control. When you do this exercise and ensure that you’re balanced on the center of your foot around that third arch, that middle arch
This will wake up and integrate muscles from the foot to the hip that are necessary for maintaining alignment.
Exercise 2: 1-Leg Hinge
Part 2 of anti-valgus training is the one-leg hinge exercise.
Again, the focus is on staying centered on your short and skinny foot and maintaining alignment, not reps, sets, or how far over you can hinge.
- Start by creating the short and skinny foot, focusing on the middle arch on one foot and lift the other foot off the ground
- Bend the knee slightly and slowly hinge at the hips with good posture
- Look at your leg to ensure you’re maintaining alignment from your hip to your leg
- Slowly hinge and return for 1 minute
- Switch sites
Start off doing this for one minute on one side and then go to the other side.
Pause if you feel like you’re losing your alignment and restore it. You may have to reactivate and center yourself over your foot, turn your shin out, or engage the hips more.
Throughout this exercise you can use a wall for balance to ensure that you’re not falling over. You can also use it to restore alignment and restore activation in those ranges where you’re losing it.
Once you’ve corrected your alignments and activation, continue to your end range of motion and then slowly return to the standing position, maintaining your alignment the whole time.
Performing the one-leg hinge will help you to start to integrate this alignment training and these muscles into a functional movement pattern. Staring at your leg and making those adjustments when you see that you’re off is how you’re going to build your kinesthetic awareness.
Exercise 3: 1-Leg Squat
Part three of your anti-valgus training is the One-Leg Squat.
All the cues we just went through for the one-leg hinge apply here. It’s just a more challenging exercise.

- Start by creating the short and skinny foot, focusing again on the middle arch on one foot
- Lift the other foot off the ground
- Maintain good posture while you squat down
- Look at your leg to ensure you’re maintaining alignment
- Continue to your end range of motion and slowly return to the standing position
Start off doing this for one minute on each side, just to train and learn how to fix your alignment and your positioning.
I like to use my fingers as a guide to help me see if I’m maintaining alignment. I point down from my kneecap as a visual guide to where my knee is in relation to my foot.
Pause if you feel like you’re losing your alignment.
To restore it, you might have to reactivate and center yourself over the middle of your foot. Turn your shin out or engage the hips more.
Use a wall for balance.
You’re not trying to just work balance. You’re trying to restore and activate the muscles when you lose your alignment to teach your brain how to perform this movement without the knees caving in.
It’s not about the reps. It’s not about the sets. You might do two reps, or you might do just one rep within that minute. That’s totally fine.
For the one-leg squat, you’ll want to do two sets, starting off at one minute for each set, so it doesn’t matter how many reps you get in there. You’ll probably do anywhere from one to three repetitions because the key is going slowly so you can discover what range of motion that causes you to lose your balance in and your alignment.
Then fix it.
Because when you fix it there, and you pause there for a second, you’re training those muscles, and you’re restoring those movement patterns. You’re training your brain. This is how we want to move, and this is how we want to stabilize our body. This way, we can prevent knee valgus and the knees from caving in.
Now, when you do the one-leg squat and the one-leg hinge, you might feel certain areas of your body fatiguing quickly, or you might feel blocked in certain areas. The common ones are the bottom of the foot. That indicates your intrinsic foot muscles need more training.
It could be the front of the ankle. That indicates you need more ankle dorsiflexion.
You might feel burning and lots of work happening in the outer hip. That’s the glute medius or the piriformis. We have articles for all of those.
Click here for an article on building glute medius strength.
Click here to read more about how to strengthen your piriformis.
If you need to focus on any specific area, check out the links above.
Next Steps
These two key concepts that we just walked through today are getting to the root cause of functional or dynamic knee valgus. Yes, you might need hip abductor exercises, and they can be beneficial, but without joint position sense training and without a proper foot and ankle foundation, they’re not going to do much for you, so that’s our approach.
Do the knee valgus exercises a few times a week for four weeks and see how you feel from there.
If you want to make sure you’ve got everything in one package that’s easy to follow, check out the Knee Pain Solution.
We cover from foot to hip and everything in between to make sure that everything is working right. That way, we get to the root causes of movement issues. Check that out, and I hope to get the opportunity to coach you through that.
“My favourite activities are skiing and running. I was hoping to help my recovery from a meniscectomy earlier this year so I can get back to being active at the level I want to be at.
I was looking for something to help with recovery I could follow on my own My mobility has increased, the pain has decreased and I feel stronger.
When I did the exercises regularly I noticed the pain level decreased dramatically. I thought the program was laid out really well, easy to follow, and has a good progression and I like how you can schedule it.
This program allows you to learn about what your body needs and figure out how to treat your symptoms best.”
– Becky