
If your gluteus medius is weak, it can lead to problems like TFL pain, trochanteric bursitis, lateral meniscus issues, patellar tracking problems, and more. So let’s get into some background on key pointers and then exercises for building gluteus medius strength.
In this article, we’re going to share four exercises for weak glutes and integrate them into movement patterns that you can use in the gym, recreational activities, and everyday life.
If you want to follow along with video instructions, Coach E will walk you through these exercises in our YouTube video Weak GLUTEUS Medius? 4 Exercises to Strengthen It & Decrease TFL Pain.
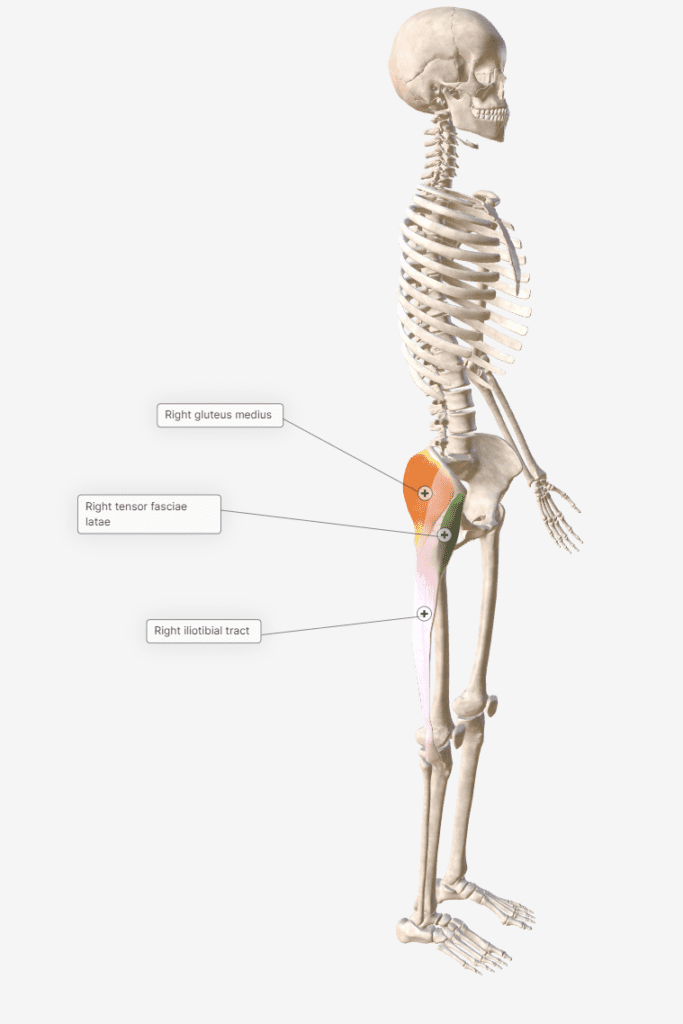
What Does the Gluteus Medius Do?
Now, this muscle lies on the upper side of the back of the hip. It can often be confused with another muscle called the tensor fasciae latae, which is a little more to the front of the hip – the anterior portion.
The thing with these two muscles is that they both perform the function of hip abduction. That means lifting the leg out to the side. The tensor fasciae latae (TFL) can often compensate for a weak gluteus medius, and that’s why you can get pain and trigger points in the TFL.
It’s also why you can get IT band syndrome because the TFL inserts into the IT band on the outside of your thigh. The IT band then inserts into the knee. So if you have that lateral knee pain, it could be due to an overactive TFL compensating for an underactive gluteus medius.
You can run into other problems if you’ve got a weak gluteus medius. If the gluteus medius muscle is weak, when you load your leg with weight lifting, or jumping and running activities your knee can fall into valgus. The dynamic valgus will overstress structures in your knee and predispose you to ACL tears, patellar maltracking and meniscus injuries. This will all be exacerbated if the TFL is compensating for the weak glute med because the IT band will be tight.
Valgus knee can also lead to patellar tracking issues.
Now, when it comes to strengthening the gluteus medius, you want to get the muscles activated properly first. One of the biggest problems that Doctors observe with their patients, is they think that they are doing the right exercise to strengthen the gluteus medius BUT the compensation pattern and TFL overuse persists. That will happen when we do the first exercise, the side-lying hip abduction.
Exercises for Glute Medius Strength and Stability
But there’s one more thing you need to know first.
The other function of the gluteus medius is pelvic stability whenever you’re on one foot. Anytime you’re walking, running, balancing, or doing exercises on one foot, that gluteus medius has to be functioning properly. But it has to be functioning properly in that whole movement pattern from the ground up.
Many people forget that the foot and the foot arch are critical for proper alignment to set you up properly. Then the gluteus medius can co-contract with the other deep hip muscles to stabilize that pelvis and balance you on one foot.
So we’re going to go through all of that with the four exercises today.
Exercise 1: Side-Lying Hip Abduction
The first one we’ll start with is the side-lying hip abduction. For this exercise, it’s good to line up about a foot away from a wall.
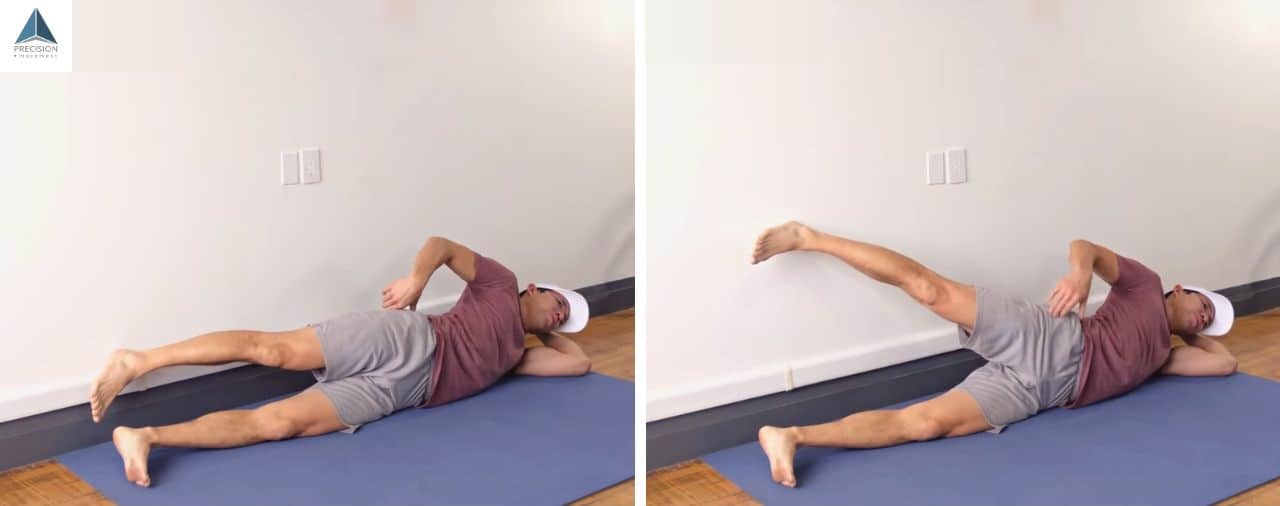
- Get into the sideline position
- Straighten yourself out
- Extend the hip by lifting the foot back behind you toward the wall
- Slowly lift your leg up, you’ll feel the glute medius firing
- Hold for 5 to 10 seconds
- Slowly lower your leg down, keeping the muscle on
Repeat for 2 sets of 4-6 reps with a 5-10 second hold.
Use the wall as a guide to make sure that you’re in a slight bit of hip extension. Don’t drive into the wall too much. A little bit is OK to get the glute max activated as well. But the wall is there as a guide for maintaining the foot behind you, so the hip is in an extension, which biases the gluteus medius over the TFL muscle (which often creates problems causing a lot of people TFL or outer hip pain.)
We cannot overstate how important this is. Lay one foot away from the wall. Get out a measuring tape if you have to. Keeping your leg slightly behind you keeps you from accidentally training your TFL to compensate for the glute medius.
Breathing and slowly lowering your left are key since that keeps the glute medius on the whole time, so we strengthen that over the TFL. Try this article for more information on eliminating TFL pain.
Now that we’ve woken up your glute medius, we can start reintegrating it into movements of everyday life.
Exercise 2: The Banded Side-Step
The second exercise focuses on the function of hip abduction, but this time in a closed chain fashion, with your feet on the ground and your body moving.
For this technique, you’ll need some kind of stretchy brand that provides you with resistance. If you’ve got access to a functional trainer, that’s perfect. We typically use a strength band looped around something sturdy.
Whatever you loop it to, keep the band at about belly button height. Hold it in front of you with both hands. Step out to the side. You want a little bit of tension when you’re standing up nice and straight.
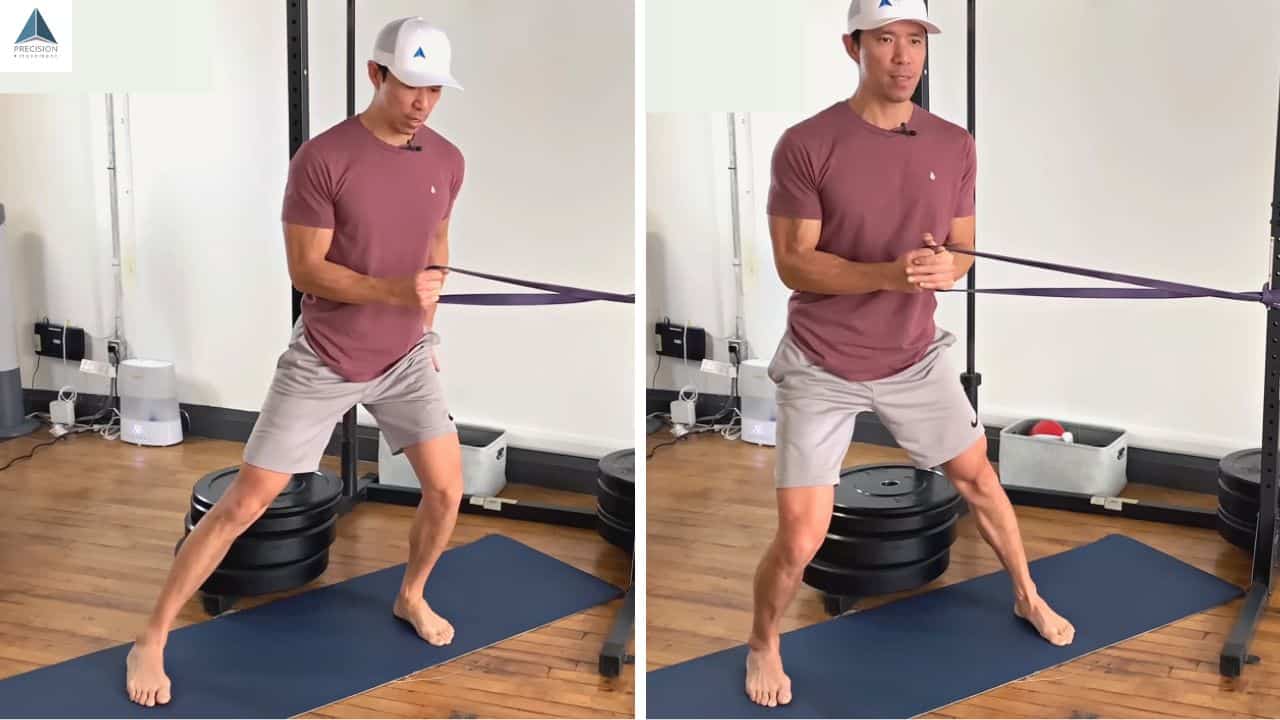
- Hold the band with a little tension and bend your knees and hips slightly, so you’re in a slight squat
- Extend the leg on the opposite side of the band anchor out to the side, foot on the floor
- Keep all of your weight on your band-anchor side foot
- Slowly use your hips to shift your weight to the extended leg, keeping bent knees
- Hold for 5 seconds
- Slowly shift your weight (using your hips) to the starting leg
Repeat for two sets of 4-6 reps, holding them for five seconds.
Keep your back nice and straight (think good posture) throughout the movement.
The real key is maintaining metatarsal pressure throughout the exercise. That’s weight distribution across the ball of your foot to create that active foot arch.
The bend at your hips loads up the hips so you can feel the glute medius and glute maximus activate. Use those muscles to drive you from side to side.
Exercise 3: Midline Muscle Activator – Hinge
The last two exercises are both based on the same concept of integrating and ensuring that everything is working properly from the foot up to the hip.
We’re going to do the Midline Muscle Activator in the hinge pattern, a one-and-a-half leg hinge. Then we’re going to do it in the lunge pattern.
For this technique, you’ll need the strength band again. Set it up just above knee level.
Now, a lot of time, when people try to work the glute medius, they’ll step into the band, and the band will be pulling their knee in. They’ll have to force their knee out to maintain alignment. This is okay, but we typically work the tension the other way.
Step into the band so the tension pulls your knee outward, rather than across your body.
One of the key points here is to keep the mid-foot flat on the ground. Maintain that metatarsal pressure which helps build that active arch. The arch, in turn, creates alignment and strengthens the arch in this functional pattern.
Plus, a lot of times, people with valgus knees over-pronate. They have flat feet and this is going to help restore that strong arch.
What we need to do is have co-contraction between the hip adductors and the hip abductors to maintain alignment. So keep your leg straight up and down with good alignment.
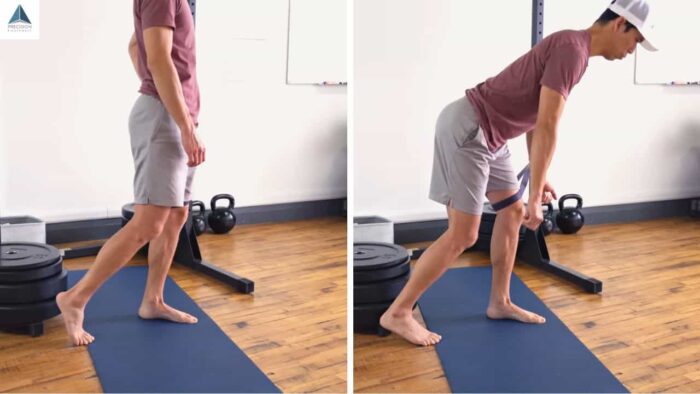
- Step into the band so the tension pulls your knee out to the side
- Step slightly away from the anchor to create a little more tension
- Step the other foot back
- Hinge at the hips, keeping the spine straight
- Slowly straighten up
Repeat for 2 sets of 6-8 reps. Switch sides between sets.
Most of your weight will be on your front foot. The back one is mostly for balance. You could do it on one foot if you wanted, but it’s generally best to have that backup balance there.
Go nice and slow, so your muscles are active throughout your whole range of motion.
This will wake up muscles in the medial hip (we called it the deep six), muscles like the gemellus obturator. All of those muscles function together to give you pelvic stability.
Exercise 4: Midline Muscle Activator – Lunge
Now, the hinge pattern is great because you can work that single-leg balance. But the lunge is good as well because then we’re integrating a knee bend with hip flexion.
For the lunge pattern, same thing, maintain alignment and metatarsal pressure.
You can either do this in a split squat or a lunge. The latter will give you more of an opportunity for single-leg balance.
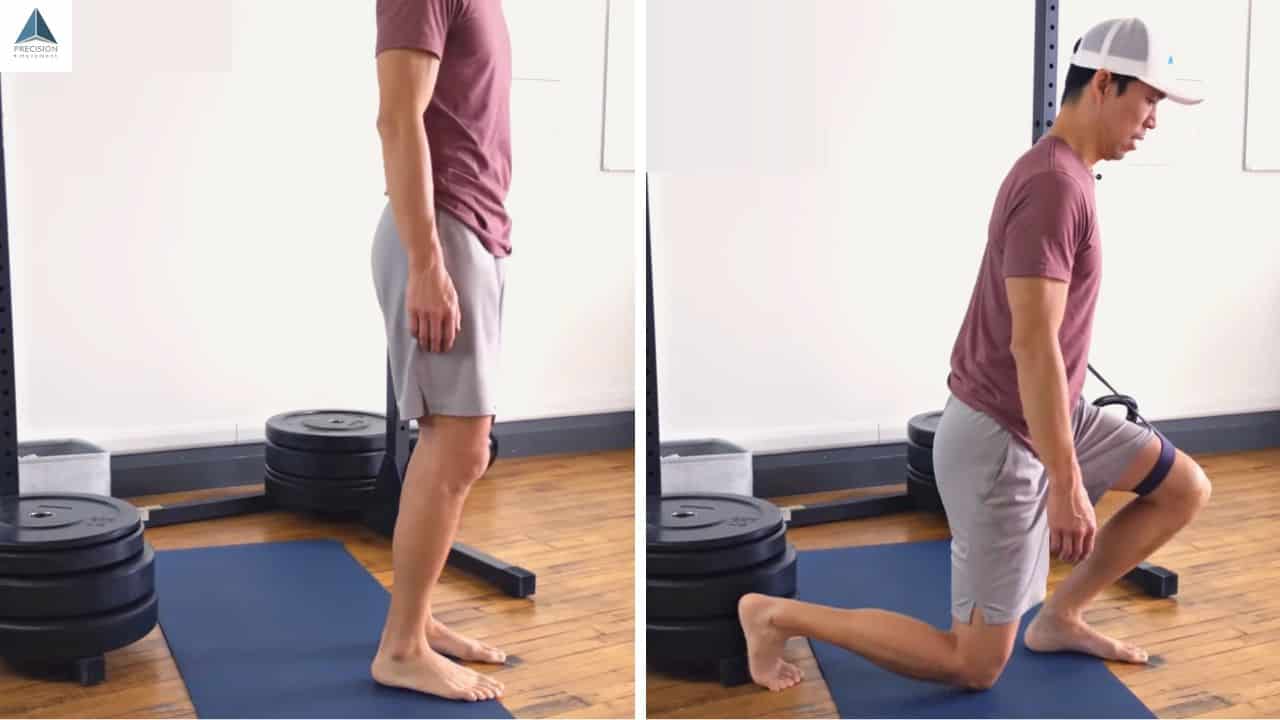
Split Squat Lunge
- Step into the band so the tension pulls your knee out to the side
- Step slightly away from the anchor to create a bit more tension
- With your other leg, step back using this leg for balance
- Slowly lower yourself straight down, keeping your spine neutral and upright
- Slowly straighten your leg to push back up
Lunge Variation
- Step into the band so the tension pulls your knee out to the side
- Step slightly away from the anchor to create a bit more tension
- With your other leg, step back and distribute your weight between your feet
- Slowly lower yourself straight down, keeping a neutral, upright spine
- Slowly straighten your leg to push back up
Perform 2 sets of 6-8 reps per side.
What All This About Integration?
Those two final exercises strengthen that weak glute medius, but it’s not just about building gluteus medius strength. It’s about integrating your glute medius function into patterns that you need for healthy movement patterns. That way, you can keep moving freely and without pain.
Keep at this 3 to 4 times a week for a few weeks until the movement patterns that brought you here don’t cause you any stiffness or pain.
If you’re still feeling pain or tightness in your hips take a look at the Hip Pain Solution, which is going to take all of the concepts that we touched on here and progressively strengthen you to get everything working properly.