
In this article, you’re going to learn all about what happens when you have a weak piriformis, and four piriformis strengthening exercises to get more stability in your hips and reduce pain.
The piriformis is often seen as a tight muscle, so people stretch it. The problem is that the piriformis is often tight because it’s weak.
As always, you can watch the video on exercises for a tight piriformis here.
Now the piriformis is a deep hip muscle. It runs horizontally around the back of your hip. It has two functions depending on the position of your hip. The first function is external rotation, turning the toe and thigh out when the hip is neutral.

When your hip is flexed, the function changes. Now it controls internal notation and horizontal extension.
When we train it, it’s important to keep these different functions in mind, depending on the position of the hip. When it comes to the piriformis, oftentimes people just think stretch. So they’ll be hanging out in the pigeon pose or doing these lying-on-your-back stretches where you’re pulling it up and pressing down on the knee to target the piriformis.
They do that because, again, conventional wisdom is that when a muscle is tight, we need to stretch it – hold it for 30 seconds or a minute to get it to release. The problem here is that the muscle is tight for a reason.
Neuromuscularly, your brain is telling a muscle to tense up because something else probably is not working properly. So the tight muscle is compensating and working harder than it should without any relaxation. Then, over time, it would be like doing bicep curls every day – sooner or later, that soreness will turn into tension.
You know when you see guys walking around, and they can barely straighten out their elbows because they’ve done so many bicep curls?
That is why the piriformis is tight.
Now we’re not going to get into the root causes of why the piriformis might compensate. We covered that with SI joint exercises in this article.
But stick around because we’re going to go through exercises to strengthen this muscle. It gets weak because we don’t use it. We’re sitting on our butts all day, so we don’t need it.
It’s a use-it-or-lose-it scenario. Simple as that.
Piriformis Strengthening Exercises
The last thing to remember before we get into the exercises is the question, “what is a muscle designed for?” A muscle’s job is to contract – to generate force. If all we’re doing to a muscle is stretching it, then we’re not treating it for what it’s designed for.
Next, we’ll go through four exercises to strengthen the piriformis and restore its function.
Exercise 1: Side-Lying Hip External Rotation
The first exercise is the Side-Lying Hip External Rotation.
When the hip is in neutral, the role of the piriformis is external rotation. So all we’re going to do here is ensure our hip stays in neutral.
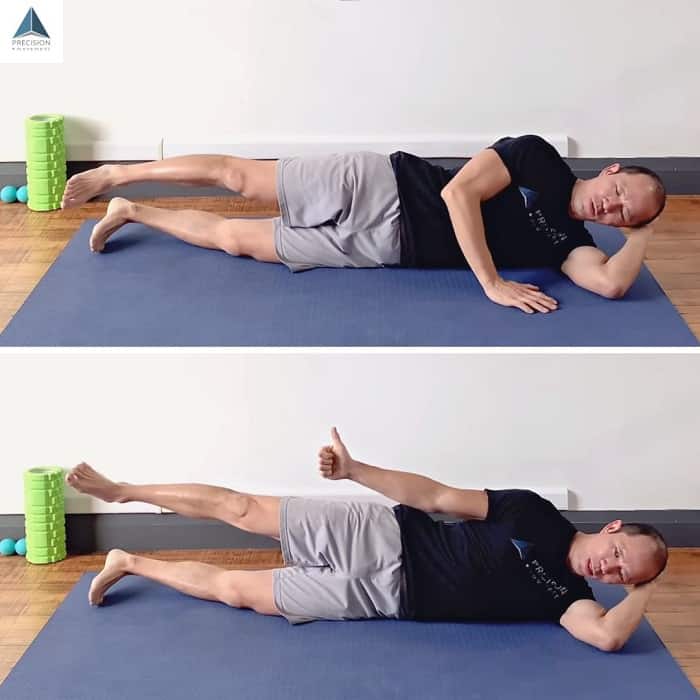
- Lie on your side
- Life the top leg off the other leg, just a little
- Rotate the thigh up (out away from your midline) to the end range
- Hold for 5 seconds
- Slowly release
Do 2 sets of 4 – 6 reps.
When you get to the end range, keep trying to get deeper into the range. Really activate the muscle.
Don’t let your pelvis open up to the ceiling. Keep it square in front of you.
One important cue when you do this is to think about sucking your leg into the pelvis. That will help activate these deep hip muscles like the piriformis, that are often inactive and weak.
This exercise is going to wake up the piriformis in a gentle way. It’s gentle on the hip joint, but it really isolates and targets the piriformis, getting it activated.
Exercise 2: Standing Closed Chain Hip External Rotation
The second exercise to strengthen the piriformis is the standing closed chain hip external rotation.
So the first exercise we did was lying on the ground with a leg moving in the air. Now, the leg that we’re working on is going to be stuck on the ground, and we’re going to activate and move the body around that leg.
It’s a very simple technique.
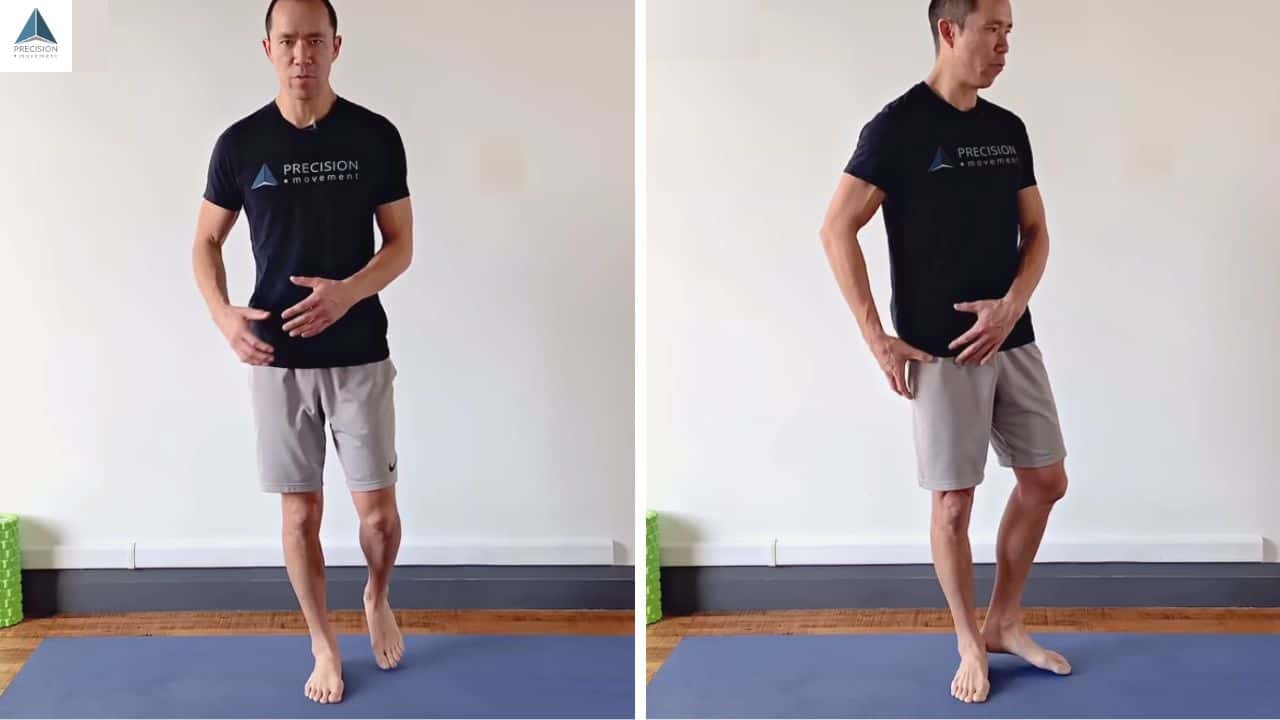
- Stand with your feet about hip-width apart
- Lift one foot off the ground
- Staying tall and aligned, rotate the body around
Do 2 sets of 4 – 6 reps, holding for 5 seconds.
Think of turning the foot out so that you’re generating the force of external rotation through the hip. Like the previous exercise, think about sucking your leg deep into the hip and then coming back to neutral again. Generating that force from the hip, turning out.
You can have the other foot on the floor just for a little bit of balance. It’ll help you to activate it a little better. We don’t want to turn this into a balance exercise yet.
When coming back to the starting position, make a mental note about your feet. You want active feet. We talk about this in a lot of articles and videos where we’re standing.
Making that active arch takes a lot of stress off the rest of the kinetic chain up your legs and hips. That active arch means you’re making your foot short, so pulling the toes/metatarsals/forefoot towards the heel. Then the skinny foot, pull the metatarsals (the bones in the ball of your foot) together. Just keep thinking of creating a short and skinny foot.
Keep trying to get deeper into this range of motion (external rotation) with the active arch. Use your foot for balance if you need it, and then bring it back under control.
This is a closed-chain exercise, so it differs because it’s not as targeted to the piriformis. In the previous exercise on the ground, you’re really targeting the piriformis and isolating it. Here, we’ve got the feet on. We’ve got the other hip muscles on to maintain balance along with core activation. Lots of stuff going on, so the pattern is a little more complex.
It’s not better or worse, but you might find waking up the muscle first with the first exercise and then coming here becomes really beneficial.
Exercise 3: 4-Point Hip Abduction
The third exercise is the 4-point hip abduction. For this technique, go into the 4-point position. That’s hands right under the shoulders and knees right under the hips. Maintain a neutral spine, which means a little bit of lumbar extension, neutral through the thoracic spine (or a little curve), and then head in line, like you’re standing straight.
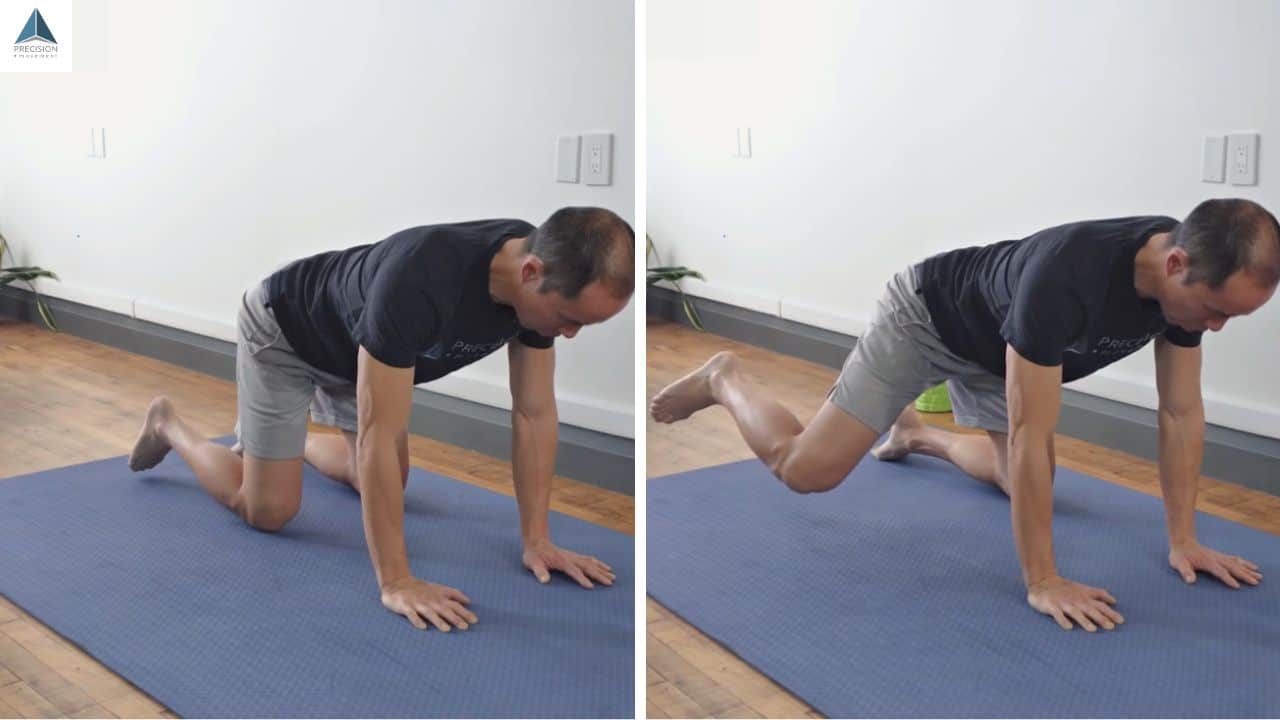
- From the 4-point position, activate the pelvic floor (Kegels)
- Slowly raise your knee out to the side without moving your spine or hips
- Hold for 5 seconds
- Bring down under control
Do 2 sets of 4-6 reps.
Now, some people might feel a lot of cramping when they do this exercise. It’s very normal, and often it’s another muscle (the TFL) that’s trying to get in there and do the work.
It also may be the piriformis itself cramping from relearning stability at the end range of motion. It’s not used to working in this range, so it’s weak. It’ll cramp because it doesn’t know what to do. By training it and holding the activations even a little bit longer, you’ll teach it what it’s supposed to do. Once it learns, it’ll stop cramping.
If you find that the cramping is just way too much when you lift your leg out to the side and you’re just not going to do the exercise, bring your knee down a little bit. Then lift it out to the side from there. That will help you to get a little bit less hip flexion and activate the muscle in a range it’s a little more comfortable with.
The range you’re comfortable with now gives you a good baseline to start with when you’re strengthening the piriformis. You can also use the same idea for any other muscle that hasn’t been working for a while.
Pay attention to your hold to really develop that kinesthetic awareness, and then you’ll be able to use that in movement patterns, like when you’re doing squats or lunges.
Exercise 4: Standing Hip Opener
The last exercise is the standing hip opener. This exercise works that hip flex position again.
In this position, the piriformis controls horizontal extension, bringing the knee out to the side, also known as horizontal abduction.
Here we’re going to add a little more psoas activation to the mix. Now we’ll be working this pattern that helps you to work the hip joint in this other range of motion and strengthens two muscles that need it, the piriformis and the psoas.
For this technique, you can use a wall for balance again. We don’t want to turn this into a balance exercise, so use a wall if you need it.
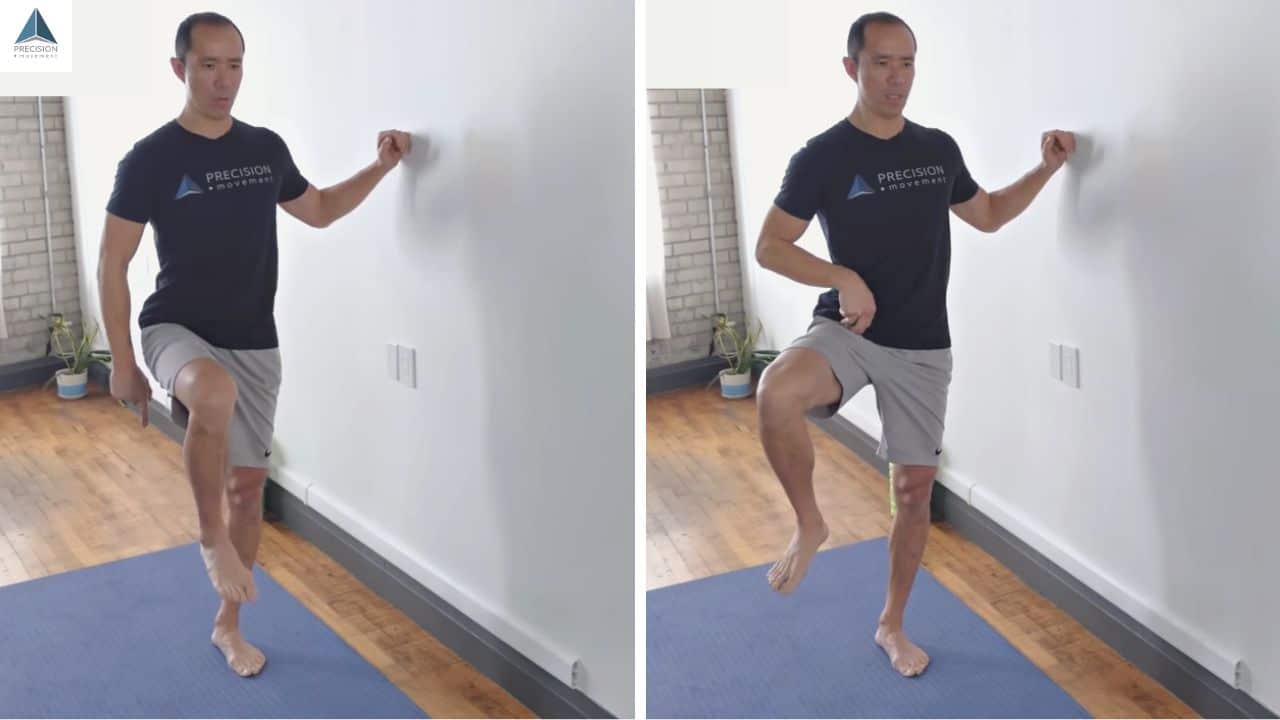
- Near a wall for balance, flex the hip by bringing your knee up to a 90-degree angle
- Drop the sit bone down towards the floor to get just about 90 degrees if you can
- Move your knee out to the side, keeping your pelvis square to the front
- Hold for 5 seconds while trying to drive the knee out while keeping the knee relaxed
- Bring it in, then down
Do 2 sets of 4-6 reps. Work your way up from there if it gets too easy to build further strength and endurance.
Make sure you’re not hiking the hip sideways using the obliques.
This is another exercise where it’s helpful to think of sucking your leg into your hip and the short and skinny foot.
Putting It All Together
Those four exercises should get you in good shape as far as strengthening the piriformis.
If you get a lot of cramping, start by picking one exercise from each group. One of the neutral hip and one of the flexed hip. Do those for two to four weeks, then switch to the other two exercises for two to four weeks.
This way, you won’t overload the muscle since you just want to wake it up.
Do these piriformis strengthening exercises two or three days a week, and you’ll find the piriformis will get stronger. You might notice that you have better balance or more stability in your hips. When you’re standing on one leg, you can find that muscle just releases without any stretching and without the pitfalls that come along with stretching, like joint instability.
For more ways to combat sitting, try this article on snapping hips.
For a comprehensive solution to building hip health, take a look at Hip Pain Solution. It wakes up the often sleepy muscles in your hips (including the piriformis) to ease knee, hip, and even lower back pain.