
A lot of people come to me confused because they have pain in one area of the body, but it seems to travel to other areas. One day it’s your low back, the next it’s your hip flexors, then it might shift again.
Here’s the thing – tight hip flexors don’t usually start the problem. They get stiff and sore because they’re picking up work that another muscle isn’t doing.
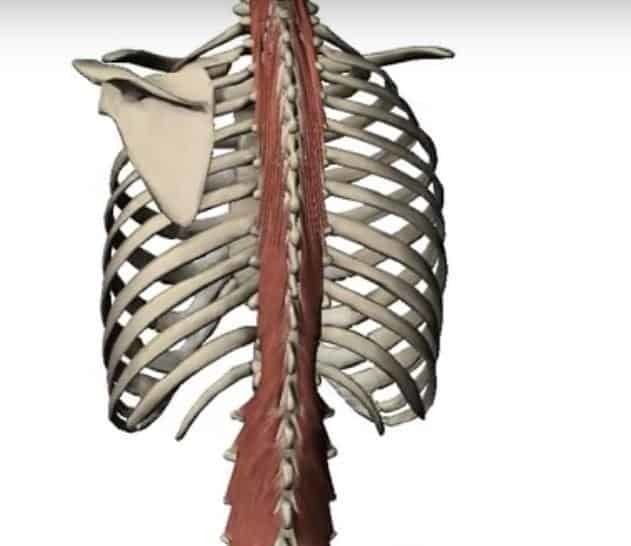
One of those muscles is the multifidus, one of the deepest stabilizers of your spine.
When the multifidus isn’t doing its job, the psoas muscles, a key hip flexor, steps in to stabilize your spine – and over time they get overloaded. That’s why people often feel tight hips along with low back pain.
Can Tight Hip Flexors Cause Low Back Pain?
I see this pattern all the time because of something I call a compensatory MAP. That’s basically when one muscle tries to pick up the slack for another that’s not firing correctly.
A simple example I use is the elbow: the biceps brachii and the brachialis both flex the elbow. If the brachialis isn’t working, the biceps has to work extra, and eventually it gets sore and tight. The same thing happens around the low back and hips. Sitting weakens key stabilizers, misaligns the pelvis, and creates compensations.
With low back pain, the multifidus is commonly weak and small. It’s supposed to stabilize your spine segment by segment, both in static positions and while moving.
Research confirms this: the multifidus shows smaller cross-sectional area and higher fatty infiltration in people with low back pain compared to those without. This basically means it’s weaker and doesn’t function as it should. [1]
At the same time, the psoas muscles and back pain are linked through compensation
One study looked at fatty infiltration patterns in the multifidus and psoas and found an inverse relationship: as multifidus fatty infiltration increased (weaker muscle), psoas fatty infiltration decreased. This suggests that the psoas is compensating for a weak multifidus, taking over the stabilization work that should have been shared. [2]
When the psoas is forced to stabilize the spine, it becomes stiff, sore, and overworked. That’s why so many people with low back pain also complain about tight hip flexors. The problem isn’t just the hip flexors – it’s the imbalance between deep stabilizers and compensating muscles.
How to Fix the Root Cause (Not Just the Symptoms)
If you want to stop the pain from bouncing back and forth between your low back and hips, you need to fix the underlying problem – not just stretch what feels tight.
The first step is waking up the multifidus so it can actually stabilize your spine. Then you practice controlling the lumbar spine while the hips move. Finally, you reintegrate proper hip flexor function in a standing position.
This sequence retrains your body to activate the right muscles in the right order, instead of relying on compensations. Let me show you exactly how to do it.
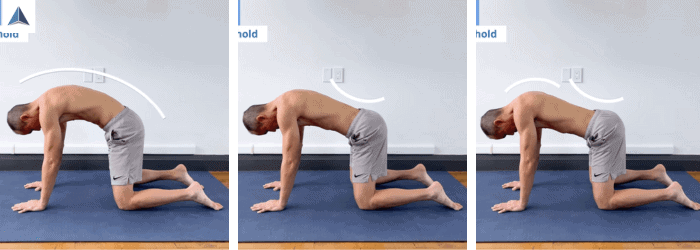
Exercise 1: Multifidus Activator
This first drill is all about teaching the multifidus how to fire again. You start in a quadruped position, but instead of doing a full cat-cow, you focus entirely on moving the lumbar spine segment by segment. The thoracic spine stays flexed the whole time, your head stays down, and the only motion you’re thinking about is slowly moving from a flexed lumbar position into a controlled, subtle extension.
The goal is not to create a big movement – it’s to create a precise one. Most people feel nothing the first few attempts. That’s normal. As I often say, you “keep picturing where those muscles are and what you’re trying to do,” and eventually the multifidus begins to wake up. Once it does, you’ll feel a very small but very distinct contraction deep along the spine, not in the big back muscles that usually take over.
Holding the end position for 10–15 seconds reinforces the activation pattern, and repeating it trains consistency. This drill reestablishes the foundation your lumbar spine needs so the psoas can stop compensating for it.
- Get on all fours with your thoracic spine flexed and your head down.
- Slowly move your lumbar spine from a flexed position into subtle extension, segment by segment.
- Keep your thoracic spine flexed and your head down — nothing else should move.
- Focus on precision, not big movement; imagine activating each segment of the lumbar spine.
- Hold the end position for 10–15 seconds to reinforce the activation pattern.
- Reset and repeat 3 times, keeping attention on deep multifidus contraction rather than range.
Benefits:
- Reactivates the multifidus, the spine’s deep stabilizer
- Reduces overload on the psoas, helping hip flexors relax
- Lays the foundation for proper lumbar control in other exercises
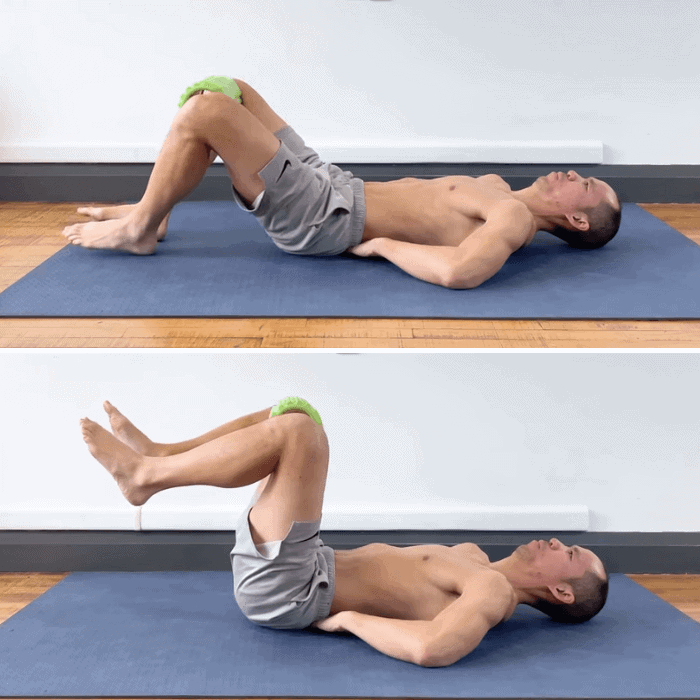
Exercise 2: Lumbar Control
This drill teaches your spine how to maintain stability while the hips move. You lie on your back with a foam roller lightly held between your knees. The key is keeping your PSIS and low back pressed into the floor at all times. From here, you slowly flex your hips and lift your knees, maintaining constant pressure on the roller, your fingers under the lumbar spine, and the PSIS on the ground.
Move super slowly. At the bottom, your heels lightly touch the floor; at the top, hold for five seconds. This isn’t about how high your knees go — it’s about maintaining control and reinforcing the multifidus and psoas working together. It’s okay if you lose the position sometimes; just adjust and keep going. Breathing naturally throughout the movement is important — don’t hold your breath.
- Lie on your back with a foam roller lightly held between your knees.
- Press your posterior superior iliac spines (PSIS) and low back firmly into the floor.
- Place your fingers lightly under your lumbar spine to monitor slight pressure.
- Slowly flex your hips and lift your knees while maintaining constant contact and pressure.
- At the bottom, lightly touch your heels to the floor; at the top, hold for 5 seconds.
- Move in slow, controlled motions, adjusting if pressure or lumbar position is lost.
- Focus on coordinating multifidus and psoas activation together while breathing naturally.
- Complete 2 sets of 3–5 reps, emphasizing control rather than height of movement.
Benefits:
- Teaches multifidus and psoas coordination
- Prevents compensations from obliques, lats, or quads
- Reinforces lumbar stability while hip flexors work properly
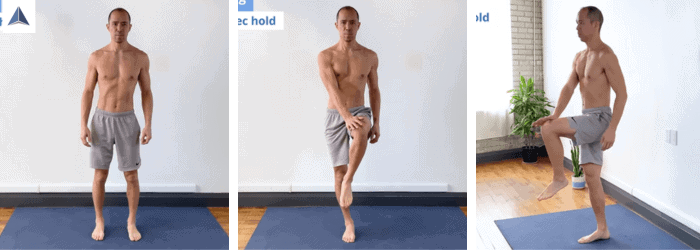
Exercise 3: Standing Dead Bug
This exercise brings the activation into a functional, standing position. Start by standing tall and lifting one knee while keeping your pelvis level. Externally rotate the hip slightly and “suck the leg into the socket” to engage the psoas muscles and back pain stabilizers. Apply gentle pressure with the opposite hand to cue stabilization.
As you lower the leg, maintain the psoas activation – do not let your hip hike or your rib flare. The goal is slow, precise control while keeping the pelvis level. Switch sides, repeating 3–4 reps per side. The standing dead bug teaches your hip flexors and deep stabilizers to work together during real-life movement patterns, like walking, stepping, or lifting.
- Stand tall with a neutral spine, feet hip-width apart.
- Lift one knee, externally rotate the hip slightly, and “suck the leg into the socket” to engage the psoas.
- Keep the pelvis level and avoid hiking the hip or flaring ribs.
- Apply light pressure with the opposite hand to cue spinal and pelvic stability.
- Slowly lower the leg while maintaining psoas activation and control.
- Breathe naturally throughout the movement, keeping upper body relaxed.
- Repeat 3–4 reps per side, alternating legs with precision and slow tempo.
Benefits:
- Reinforces proper hip flexor activation in functional, standing positions
- Prevents overuse of quadratus lumborum, obliques, or other compensating muscles
- Ensures new patterns carry over to daily movements
Why These Exercises Actually Work
When the multifidus isn’t firing, the psoas steps in to stabilize the spine, and it eventually becomes stiff and sore. By activating the multifidus first, then practicing lumbar control, and finally integrating hip flexor work in a standing position, you restore the natural sequence of muscle activation. This stops the cycle of pain and prevents your hip flexors from being overworked.
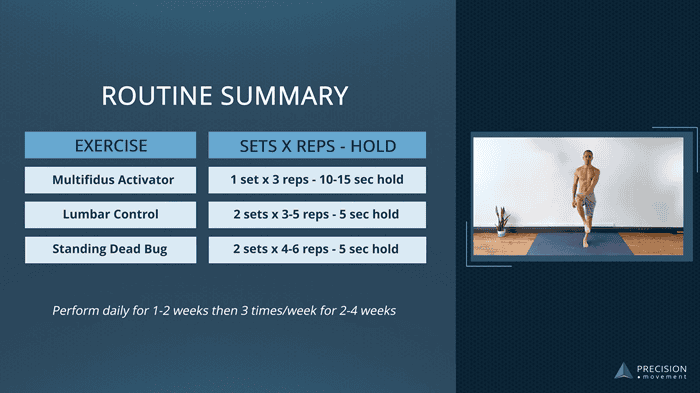
Routine Summary
Perform this routine daily for 1-2 weeks, then go down to 3 times/week for 2-4 weeks.
Multifidus Activator: 1 set x 3 reps, 10–15 sec holds
- Focus on lumbar movement only
- Thoracic spine flexed
- Deep activation, not range
Lumbar Control: 2 sets of 3–5 reps, 5 sec holds
- Light pressure on low back and PSIS
- Foam roller between knees (do not squeeze)
- Pause at top and bottom
- Slow, controlled movement
Standing Dead Bug: 2 sets of 4-6 reps per side, 5 sec holds
- Keep pelvis level
- Gentle hand pressure
- Slow lowering with psoas engaged
- No hip hiking or rib flare
Goal: Restore multifidus activation → improve lumbar control → normalize psoas workload → reduce low back pain
If you want long-term relief from low back pain, this routine is a great start.
For a comprehensive plan addressing all compensatory patterns and building spinal resilience, check out the Low Back Pain Solution inside the ROM Coach app.
KEY TAKEAWAYS
- Tight hip flexors and low back pain often come from a weak multifidus.
- Restoring multifidus activation reduces overload on the psoas.
- The three-exercise sequence retrains lumbar control and functional hip flexor use.
- Performing these exercises consistently can break the pain cycle.
- For long-term improvement, a structured program like the Low Back Pain Solution is ideal.