
Are you looking to build strength in your hip internal rotator muscles, but when you do exercises, you run into problems with impingement?
If so, this is for you.
I’m going to break down why that can happen and show you an exercise that’s designed to strengthen your muscles, increase your range of motion, and help decrease the amount of impingement you experience.
The problem I’m talking about is femoroacetabular impingement, also known as FAI.
Basically, when people lift their leg up into hip flexion, they can feel a sudden block and a pinching sensation at the front of the hip.
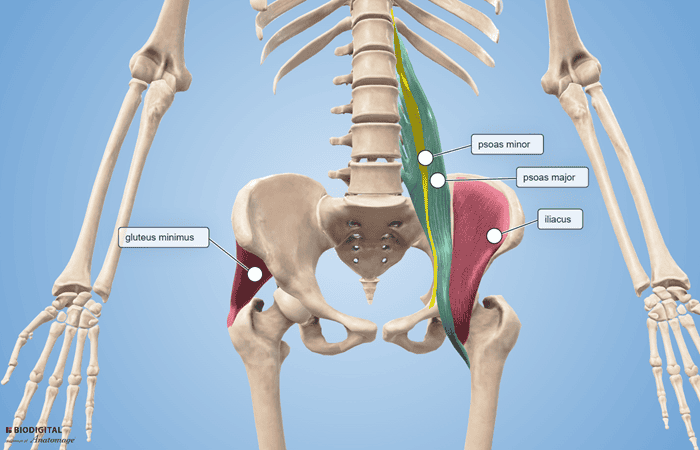
There are a lot of different theories about why this can occur. One approach I use focuses on dysfunction and weakness in various muscles around the hip, specifically the psoas and the internal rotator muscles such as the gluteus minimus.
And there’s a reason I like to target those muscles.
Why Does Hip Impingement Happen?
The psoas is a deep muscle that helps flex the hip. If the psoas isn’t functioning properly and we’re not using that deep muscle to flex the hip, we can over-rely on a more superficial muscle such as the rectus femoris.
When we use superficial muscles over deep muscles, we can decrease the good alignment of the joint, which I call centration.
When we decrease that good alignment and centration, the bones can come closer together and the pinching sensation at the front of the hip can occur.
So the psoas is one issue I want to focus on.
The gluteus minimus is another muscle that contributes to good centration and dynamic stability.
And dynamic stability is important because I’m not just talking about holding the joint still, like when you’re standing on one foot. I’m talking about stability while you’re moving.
We need multiple muscles to fire at different times as the hip moves, and the gluteus minimus is one of the muscles we need for decreasing this impingement in the front of the hip.
What Does the Research Show?
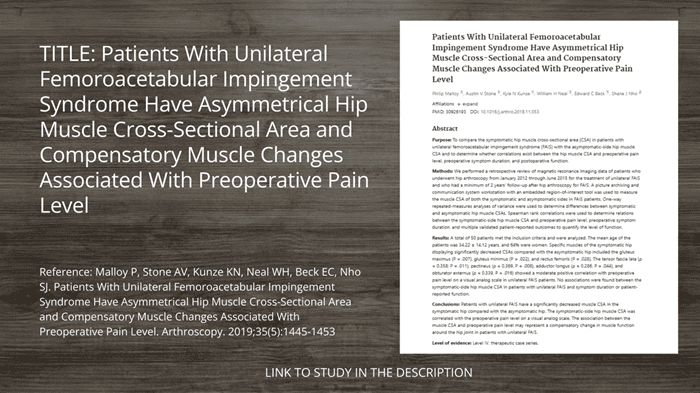
I found a study that specifically looked at muscle differences in people with unilateral FAI.
The study, Patients With Unilateral Femoroacetabular Impingement Syndrome Have Asymmetrical Hip Muscle Cross-Sectional Area and Compensatory Muscle Changes Associated With Preoperative Pain Level, compared the symptomatic hip’s muscle cross-sectional area with the asymptomatic side. In other words, the researchers were looking at the size of the muscles on each side [1].
They found that several muscles on the symptomatic side had significantly smaller cross-sectional areas than the asymptomatic side, including the gluteus maximus, gluteus minimus, and rectus femoris. The study included 50 patients and was a retrospective Level IV therapeutic case series.
So, we know these muscles are weak.
Now, which came first, the chicken or the egg?
We don’t know.
But what we do know is that I want to get those muscles stronger. If one side is weaker than the other, then we’ve got a muscle imbalance, and that’s going to create further problems in addition to the impingement.
How to Fix Hip Impingement: Train the Range You Control
Now, there’s one problem with exercises that train the psoas and gluteus minimus.
We can get out of good alignment of the spine and pelvis while we’re doing them.
A common example is floor-based 90/90 exercises, where you’re rotating the hip into internal and external rotation. It’s possible to lose good spinal alignment while doing those exercises.
And when we lose that alignment, we’re also losing good activation and training of good posture, which is what we want for optimal movement in everyday life.
But I’ve got an exercise that lets you train good alignment of your spine and pelvis while working the psoas and gluteus minimus.
The goal is to build strength in the ranges of motion you can currently control, and then expand that range as you gain control and range of motion.
The exercise is called hip axial rotation.
And all you need is a wall.
Hip Axial Rotation
The hip axial rotation exercise is a simple way to work on hip rotation while maintaining good posture and pelvic alignment.
I like to use about three different levels: low, medium, and high.
The low level is about activating and waking up the muscles. As you move higher, you gradually get closer to the range where you experience the impingement.
The key is that you don’t force into the impingement.
Instead, you work just below it.
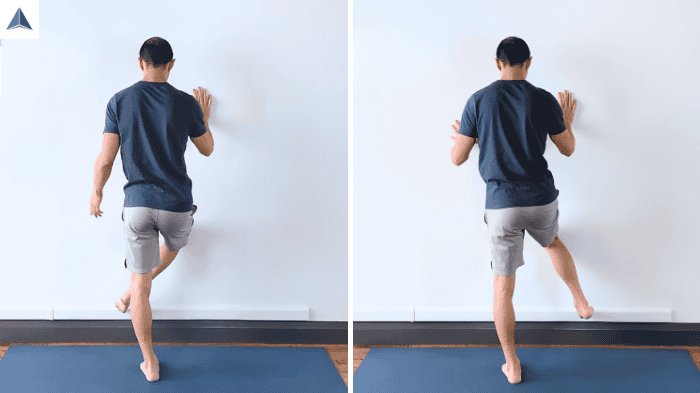
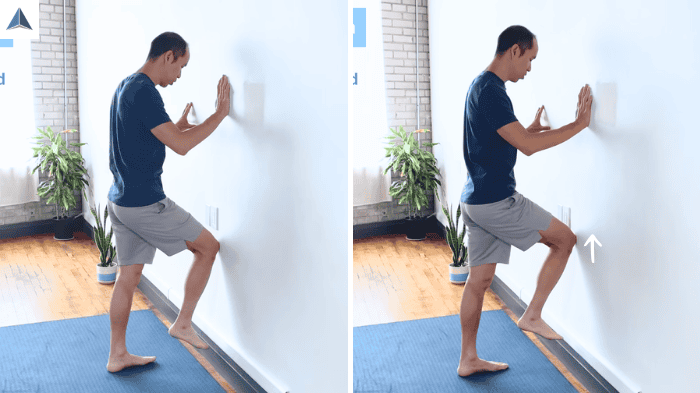
- Stand about a foot away from a wall and lift one knee slightly off the ground, lightly pressing into the wall.
- Keep your pelvis level and parallel to the ground. Think about dropping that butt cheek down toward the ground.
- Lightly press into the wall rather than pushing hard.
- Rotate the thigh into external rotation, bringing the foot across your body, and hold for 5 seconds.
- Then slowly rotate into internal rotation. Go as far as you can while maintaining your posture and alignment.
- Hold for 5 seconds, then return to neutral under control.
As you’re rotating, think about the thigh rotating, rather than trying to lift your whole body or hike your hip.
You may feel the gluteus minimus working hard during internal rotation. You may also feel some TFL, which is okay in this case.
Keep your breathing natural and your ankle relaxed.
Do a couple of controlled repetitions before moving to the next level.
Medium Level
Next, raise the knee a little higher.
You can choose how far you go. The important thing is that you maintain good alignment and don’t feel the impingement or blocking sensation yet.
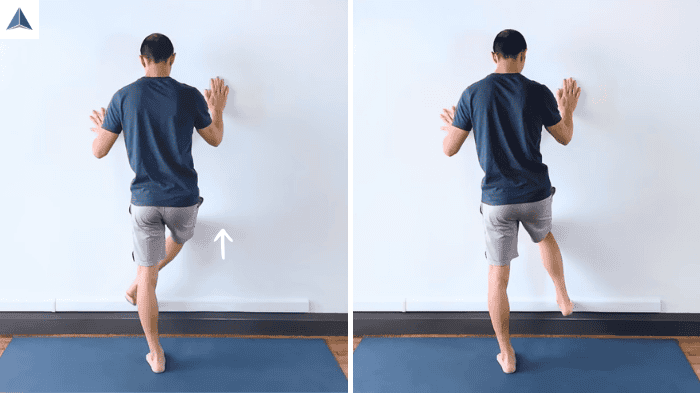
- Raise the knee to your medium level while keeping the pelvis level.
- Think about dropping the hip toward the ground rather than hiking it.
- Rotate into external rotation and hold for 5 seconds, trying to get deeper into your available range.
- Slowly move into internal rotation and hold for 5 seconds.
- Keep your posture, breathe naturally, relax the ankle, and think about the thigh rotating.
At this level, you’re working multiple muscles, not just the gluteus minimus. You’re also working the psoas, gluteus minimus, and adductors a little bit.
Again, do a couple of slow, controlled repetitions and rest before moving to the final level.
High Level
For the final level, maintain good posture and lift the knee as high as you can control.
Once you feel the impingement or blocking sensation, go just a little bit below it.
That’s the range we’re going to train.
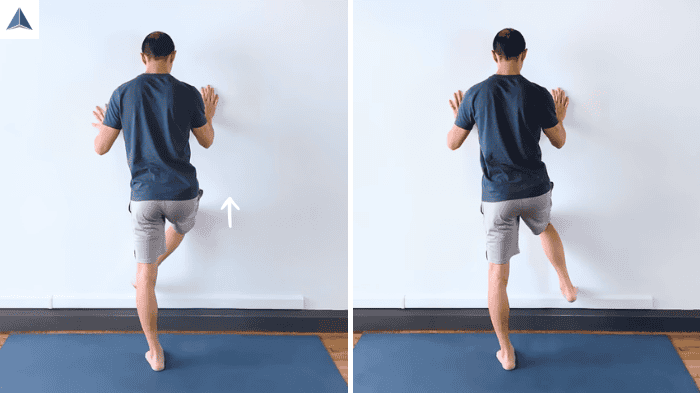
- Lift the knee as high as you can while maintaining good alignment.
- Stop just below the impingement or blocking sensation.
- Keep your pelvis level and think about dropping that butt cheek toward the ground.
- Now focus on sucking the leg into the pelvis.
- Maintain that feeling as you rotate into external rotation and hold for 5 seconds.
- Slowly rotate into internal rotation while continuing to suck the leg into the pelvis.
- Keep the pelvis level, breathe naturally, and keep the ankle relaxed.
- Return to neutral and lower the leg under control.
Don’t just let the leg flop down.
The control on the way down is part of the exercise.
Exercise Benefits
- Build hip muscle strength: The exercise targets the psoas, gluteus minimus, and other muscles involved in controlling the hip.
- Improve dynamic stability: You’re training the muscles while the hip is actually moving.
- Train better alignment: You practice maintaining good spinal and pelvic posture during the movement.
- Build strength in your available range: You progressively challenge the ranges of motion you can currently control.
- Work toward greater hip flexion: As you build strength and control, the goal is to gradually increase the range you can flex your hip while maintaining that control.
Why These Hip FAI Exercises Work
What we’re doing here is gradually increasing the challenge.
At the first level, we’re activating the muscles we want to activate. We’re waking them up and priming them.
Then, as we go higher, we’re getting closer to the impingement range.
By dropping just below that range and building strength, control, and alignment there, we’re working toward avoiding the impingement and increasing the range that you can flex your hip while keeping control of those muscles.
There’s another important principle here.
When you strengthen a muscle in a certain range of motion, you build strength above and below whatever range you’re strengthening.
So if I’m working a muscle right here, I’m going to build maybe 5, 10, up to 15 degrees of strength below and above that range of motion.
That’s the strength and control we need from these muscles, along with the coordination between all the different muscles, to avoid the impingement and maintain good centration of the head of the femur.
The head of the femur is the ball at the top of the thigh bone, and it sits in the hip socket on the pelvis.
So we’re not just trying to move the hip farther.
We’re trying to build the strength and control that allow you to move through the ranges you can safely control.
Using Hip Axial Rotation for FAI Pain Relief
If you’re looking for FAI pain relief, you may be tempted to simply stretch the hip or force yourself into more range.
That’s not the approach I’m taking here.
Instead, we’re gradually working on the range that you can control.
At the low level, we’re waking up the muscles.
At the medium level, we’re challenging them in a little more hip flexion.
At the high level, we’re getting close to the impingement range, but staying just below the point where you feel the block.
The goal is to build strength in the ranges you can safely do without that discomfort and impingement feeling.
Then, as you repeat the exercise over time and build that strength and control, you can gradually increase the range and the amount you can flex your hip while maintaining those muscles and that control.
The goal is to build strength in the ranges you can safely do without that discomfort and impingement feeling, and then gradually increase the range as you build strength and control.
Key Takeaways
- FAI exercises can focus on improving hip strength and control around the range you can currently tolerate.
- The psoas and gluteus minimus are key muscles in this approach, helping with hip flexion, centration, and stability.
- Start with hip axial rotation at a low level, then progress to medium and higher levels just below your impingement range.
- Keep the movement slow and controlled: think “dropping that butt cheek down to the ground” and rotating the thigh rather than hiking the hip.
- As your control improves, gradually expand the range without forcing into the impingement sensation.
More Hip Mobility Exercises
If you want to work specifically on hip internal rotation, check out these related Precision Movement resources:
3 MUST DO Hip Internal Rotation Exercises
How to Improve Hip Internal Rotation (Fix Knee Pain!)
And if you’re looking specifically for techniques related to femoroacetabular impingement:
3 Techniques to Decrease Femoral Acetabular Impingement Pain
Next Steps
I’ve got other little variations of this technique that I use to improve the way the hips function, improve range of motion, and help you move freely and without pain.
And if you like this exercise and this approach, you can get more exercises like this inside the ROM Coach app.
The app is free and includes the Daily Movement Tuneup, along with new exercises that help you activate your muscles and mobilize your joints in just a few minutes a day.
I hope you grab the app, learn some new exercises and movements, wake up all the muscles in your body, and get back to—and keep doing—the active things you enjoy.