
In this article, you’ll learn three exercises showing you how to improve hip internal rotation to build strength and mobility. So let’s keep you (or get you back to) doing the active things you love.
The hip internal rotators are a neglected muscle group. Most people’s hip internal range of motion is poor because of our modern lifestyle and exercise habits. Unfortunately, this can lead to knee pain and injuries.
If you want to follow along with a video of the exercises, click here to head over to YouTube and watch You Poor Hip Internal Rotation is WRECKING Your knees.
Why Hip Internal Rotation Gets Neglected
First, we’re going to talk about the movement of hip internal rotation, then targeting and strengthening those muscles.
It’s in the neglected range, not just because a lot of our lifestyle habits contribute to losing strength and range of motion. For example, when you cross your legs or manspread/mansplay, your hips are in external rotation, which means you will lose that range of hip internal rotation because our muscles and the body adapts to what you do most of the time. But also, who goes to the gym and says to themselves, “Today I’m going to work hip internal rotation?”
Pretty much nobody, that’s who.
Even standing can deteriorate the internal rotation range of motion. A lot of people stand with their toes out or even walk with their toes pointed out rather than forward.
So if we’re always using external rotation, whether we’re sitting, standing, or walking, the external rotation muscles are going to get strong, and we’re going to lose the hip internal rotation.
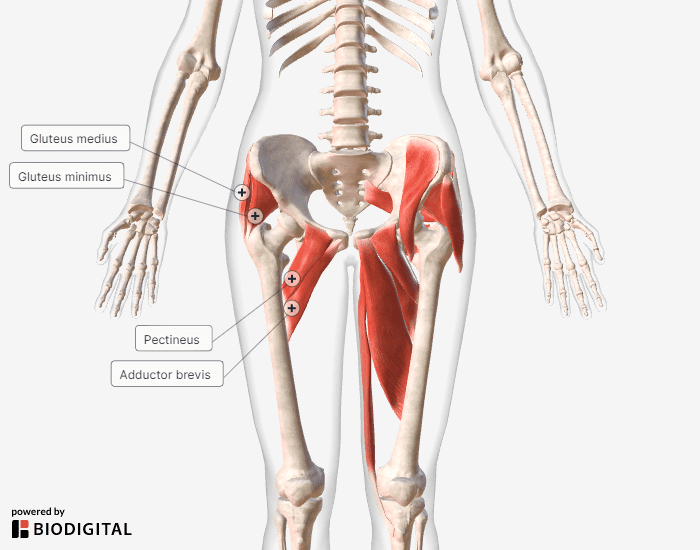
Now, with respect to the muscles, many different muscles are involved that can contribute to hip internal rotation. But what’s most important to know is where you’ll be feeling the exercises.
You want to feel the movements deep in the outer hip. That’s the anterior (front) fibers of the glute medius and glute minimus. It’s also the high and short adductors, so the pectineus and the adductor brevis. You can activate those muscles with hip internal rotation.
So focus on those areas while you’re doing these exercises.
How Can Tight Hips Cause Knee Pain?
Now, why is this such an important topic?
Coach E says:
The knees aren’t designed for hip rotation. They’re designed more as a hinge joint – flexion, extension. The hips are supposed to do all of the rotating. If they’re not doing it, then the knees are going to take the brunt of that missing strength and mobility.”“I’ve been working with a bunch of tennis players with knee pain right now and one common factor is a lack of hip rotation. So if you have knee pain, the hip rotation range of motion is an area that you really want to take a look at because if you have to rotate, like tennis players are always rotating when they’re hitting and even when they’re serving, they land on that leg. There’s that internal rotation force they have to absorb. If you don’t have that rotation, all of those forces are going to go through the knees. And the knees are the victim of a lack of hip rotation.
That’s the big reason why hip rotation is so important if you’ve got knee pain. It could also contribute to hip and lumbar spine problems. The knees are a common area that gets damaged when you lack hip internal rotation.
Hip Exercises for Knee Pain
What we’re going to do with the exercises in this article is train them with three different exercises. We’re going to go through different positions (between 0 and 90 degrees) of hip flexion. That’s really important because the muscles we mentioned earlier have differing degrees to which they can exert force on the hip joint, and those change to the degree of hip flexion that you go through.
This is illustrated nicely in a study that we refer to often titled “Kinesiology of the Hip: A Focus on Muscular Action,” published in the Journal of Orthopedic and Sports Physical Therapy in 2010. [1]
What they do in the study is they show the moment arms (fancy physics/biomechanics term for rotational force on a joint; get a proper explanation here) of different muscles and how much force they could potentially exert on the hip joint during different movements. [2]

In this image, you can see a graph showing the difference from zero degrees to 90 degrees of hip flexion and how much moment arm the gluteus medius anterior fibers have. (The anterior fibers are the internal rotators of the gluteus medius.)
As you can see from zero degrees, the moment arm is very low. Whereas at 90 degrees deflection, the moment arm is very high, indicating that it couldn’t exert a much greater force at 90 degrees. They show that it’s almost an 8x increase in leverage at 90 degrees of flexion.
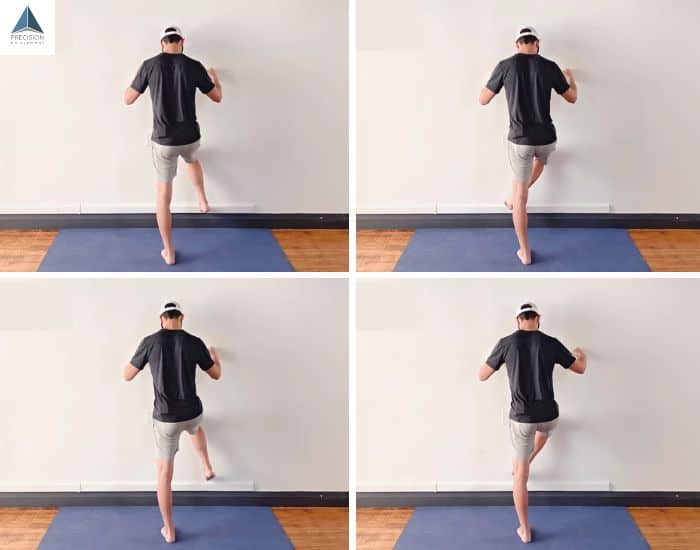
Exercise 1: Hip Axial Rotation
The first exercise we will train our hip rotators with is the Hip Axial Rotation.
With this one, we’ll do both internal and external rotation, and we’re going to do it in three positions: low, medium, and then high, which is about 90 degrees of hip flexion.
All you’re going to do is put your knee in the wall. Now you don’t really lean into the wall, just place the knee on the wall to keep it at about 90 degrees of flexion.
We’ll start with internal rotation and focus on the area we just discussed. Picture the thigh rotating. Keep the support leg strong, hold it for 5-10 seconds.

- Face a wall and lean slightly into it using your hands for support
- Raise your leg to the low position (~45 degrees)
- Keep your knee at a 90-degree angle
- Internally rotate your hip by twisting the top of your raised thigh toward your midline
- Hold for 5-10 seconds
- Externally rotate your hip by twisting the top of your thigh away from your midline
- Hold for 5-10 seconds

- Raise to the mid-position (~70 degrees)
- Repeat steps 4-7
- Raise to the high position (~90 degrees)
- Repeat steps 4-7
Do 2-4 cycles side.
Don’t hike the hip here, they should be level. Your foot and ankle should move in the opposite direction of how you’re twisting your thigh.
Also, think about sucking the thigh into the pelvis. That’ll help you get a better range of motion and better, more aligned movement.
The key here is to try and get deeper into the range. Keep activating those muscles. Keep sucking the thigh into the pelvis, and that’s how you’ll build strength.
Don’t worry about how much your foot moves out. It’s the feeling of the right muscles and not hiking the hip too much.
Stay tall. Control the muscles as you put your foot down. Letting it drop doesn’t help you out at all.
This exercise is great for waking up the hip internal and external rotators and start restoring their strength and their range of motion.
Exercise 2: 90/90 Liftoff
The second exercise we’re going to go through is the 90/90 Liftoff.
You may have seen this one before, but we improved it. A lot of people do this rotation switching back and forth. That’s okay, we’re trying to target the muscle to build strength and get a clean movement pattern, so we adjusted it a bit.
Now, why is this more beneficial?
One, we’re going to be in this hip-abducted position. So your knee is outside of your midline when you’re in the 99% activation range.
Again, we’re training these muscles in different positions of the hip to help build a full range of strength and control.
To get into the 90/90 position, you’ll need to sit on the ground. Twist your leg so the outside of one knee touches the ground. Twist your other leg so the inside of your knee touches the ground. Both knees should be at a 90-degree angle. Your thighs should also be at roughly a 90-degree angle. You can put a hand behind you to support yourself.
Some people have trouble getting into the starting position for this exercise. Once you do, take a moment to settle down in it. Breathe. Relax. Move around a little bit of your upper body. Lean back and just try to settle the muscles.
You might feel some cramping and some discomfort when you do these exercises. That’s because they’re at the shortened range of motion, and they don’t know how to work properly. So we just have to work them and teach them how they should function in this range of motion.
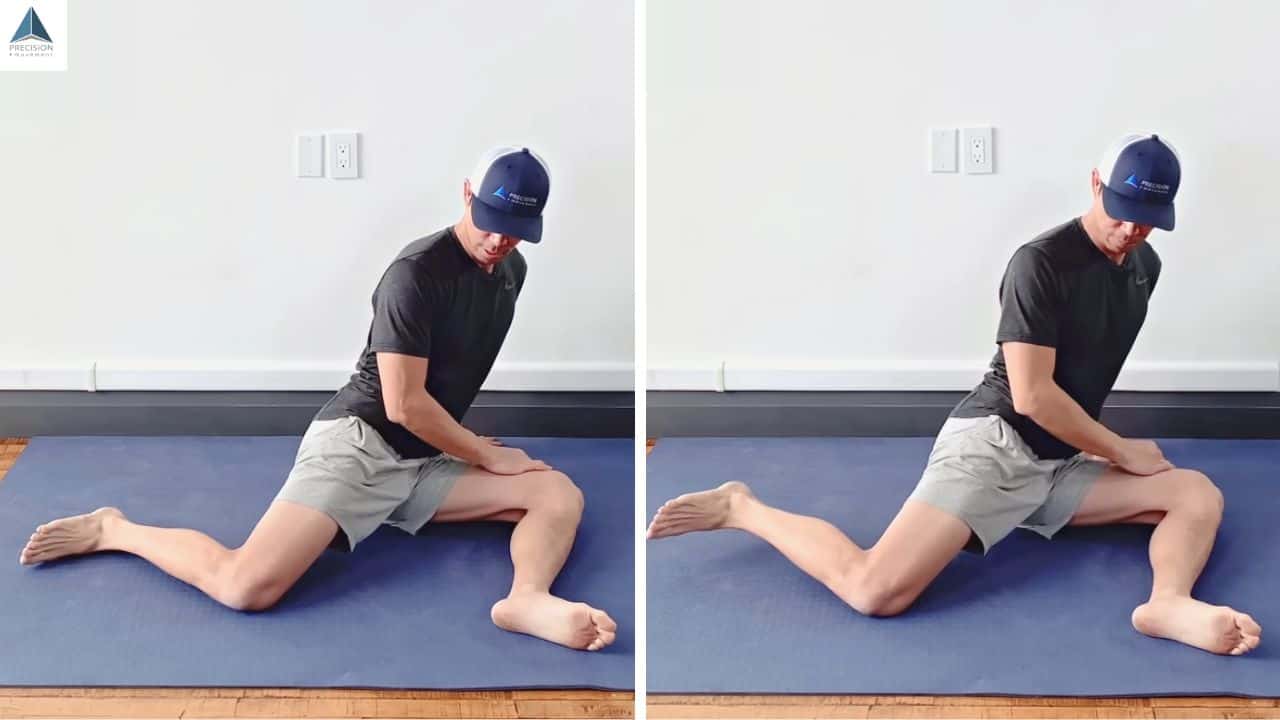
- Get into the 90/90 position
- Drive the back ankle toward the ceiling (the one where the inside of your knee touches the ground)
- Rotate from the thigh
- Hold for 10-15 seconds
- Slowly return the foot to the ground
- Gradually relax the hip muscles
Perform 2 sets on each side, with 3-6 repetitions.
Slowly contracting and relaxing the muscle is what we call camping. We teach that all the time. That slower control lets you build strength and control through every degree of that range of motion.
Remember to suck the thigh into your pelvis.
For each repetition, try to get deeper into the range and keep breathing naturally.
If you feel pain in the knee while attempting this exercise then you are learning exactly why improving your hip internal rotation is important. First of all, stop the exercise, and then be sure that you are connecting with the deep muscles of your hip and generating the movement from the hip. Start slowly and build your intensity over time.
Exercise 3: Cable Hip Internal Rotation
The third and final exercise we’re going to go through today is a closed-chain exercise.
All you do is stand on the ground and internally rotate the body over a stable leg. It’s called the Cable Hip Internal Rotation.
For this technique, you will need an exercise band (or rope or sweatpants) set up at approximately belly button level. You want to take an athletic stance with your feet a little bit wider than shoulder-width apart, plus a small partial squat. Your spine should be nice and tall, as always.
This setup also lets you train a stance that you would take in a sport. If you’re a tennis player, soccer player, or whatever it is you do on your feet, you need to be in somewhat of an athletic stance.
You also want to create a strong foot arch in your athletic stance. That’s the short and skinny foot we’ve covered if many other articles and videos.
For the short and skinny foot, pull the metatarsals (bones in the ball of your foot) closer together. That’s the skinny part. Then pull the metatarsals back toward your heel — the short foot. Your toes should be fairly relaxed.

- Hold the exercise band at about belly button level
- Get into the athletic position
- Start activating the internal rotators on the hip on the far side from the band anchor
- Use the internal rotators to pivot your entire body around the anchored foot
- Hold for 5 seconds
- Slowly return to the starting position
Do 2-3 sets of 4-6 reps.
Putting It All Together
If you’re an athlete, whatever sport you play, if you do it on your feet, you want this internal rotation to come from the hips so that it doesn’t go through your knees. Because it will wreck your knees.
Those are the three exercises for today. Hopefully, they’ve been illuminating, and you now understand how important it is to have good hip mobility, specifically rotation, to keep your knees healthy.
We have a few more exercises that you might find helpful. Click the links to go to our articles for more about how to improve hip internal rotation:
If you have knee pain, the thing that may help you the most is the Knee Pain Solution program. Because Coach E will walk you through a progressive, multi-phase program that includes exercises like this, but in the right order and with the right volume of sets and reps.
Learn more about Knee Pain Solution here.
“I bought the program because I was having pain on the inside of my right knee. The pain had been there on and off for a couple of years e.g. after playing soccer with my kids without warming up, but during the last year, I was feeling pain almost every day and sometimes also during the night.
I had tried all kinds of exercises to strengthen the knee but nothing really helped with the pain. After 1 week of doing the program, I was already feeling better and my knee had stopped hurting at night. After 1 month I only occasionally felt pain in the knee and when I finished the pain was gone.”