
Core strengthening has extraordinary carry over into virtually every facet of physical activity, whether it’s sports or carrying shopping bags. Moving your body well depends on having stable core muscles.
Core stabilization exercises will teach the muscles of your hips, pelvis, abdomen and lower back to work efficiently together; resulting in improved balance and stability.
Read further to learn why we train the core differently from other muscle groups, and the three most effective training protocols and exercises you can do for a powerful, back-saving core.
Why we Train Core Stabilization Exercises
Let’s start with the function of your core musculature; to remain stiff so the force can be transferred between the shoulders and hips. The core muscles also act to stabilize the spine and prevent lower back injuries [1].
You need to build a foundation of core strength to safely and powerfully perform dynamic movements.
An example of this is seen in sprinters; during a sprint the core stiffens, limiting torso rotation so the hips can transfer force across the body to the opposite shoulder and then back down to the hip [2].
Another sport where a strong core packs a punch is baseball. When a pitcher throws the ball energy is being transferred from the bottom up; his legs, hips, core, shoulders and throwing arm act in concert to create the whipping motion needed for a fast pitch. A weak core can place excessive strain on the shoulders and lower back; increasing the odds of getting injured.
Finally, contact sports like football and rugby rely heavily on core strength. During a tackle, you must sustain the shock from legs to torso and arms. If your core isn’t up to it; you’ll bend or twist too far – injuring your lower back.
Adapting Standard Training Protocols to the Core
When training the core, people commonly use high reps (think endless reps of Bicycle Crunches) or try to hold as long as they can (2 minute + planks).
However, with a little creativity we can adapt the programming intelligence we use to train dynamic movements for the core.
For example, antagonist supersets are a method that allow you to save time by pairing exercises that work opposite sides of a joint, such as bicep curls with tricep extensions (oooh the pump).
With the core, we simply pair the anterior core muscles with the posterior.
The Anatomy of the Core
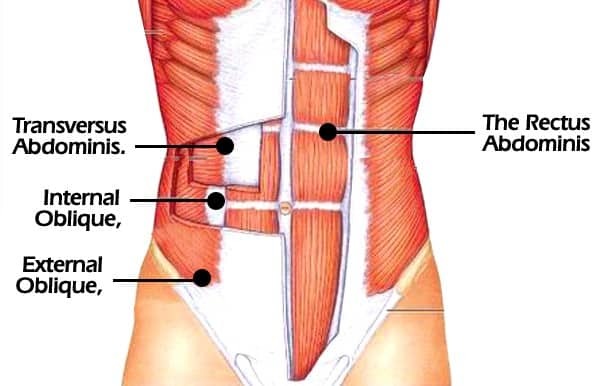
You core muscles are comprised of:
- Pelvic floor muscles: support your internal organs
- Transversus abdominis: compresses the ribs and vertebrae and provides thoracic and pelvic stability
- Multifidus: plays a vital role in stabilizing the spine
- Internal obliques: acts as an agonist to the diaphragm muscle (helps with breathing)
- External obliques: pull the chest downward and compress the abdominal cavity and stabilizes the vertebral column
- Rectus abdominis: the “abs,” function to flex and stabilize the lumbar spine
- Erector spinae: a bundle of muscles that extends from the lumbar to the cervical region of the spine, it acts to stabilize the spinal column
- Longissimus thoracis: the longest subdivision of the erector spinae and extends all along the spinal column.
Also, even the lats, traps and glutes [3] are considered “minor” core muscles. As you can see every muscle in the core area has as one of its functions: stabilization of the spine.
The weakest point in the core region is your lower back, specifically the lumbar and sacral vertebrae. The last thing you want is to flex the bones of your lower back repeatedly with resistance training.
The core muscles; front, back and side are designed to maintain spinal stability because those bones aren’t meant to flex or rub against each other any more than necessary. An appropriate core training protocol keeps your lower back safe with core stabilization exercises [4].
Luckily when I started training, I was never caught up in the idea of getting six-pack abs. I guess Mike Chang took all of the universe’s energy for that topic.
I was more interested in pecs, biceps, and triceps, so while I’ve had to deal with the resulting fallout and mobility restrictions at the shoulder, I never had to undo any self-inflicted damage from doing thousands of crunches and sit-ups to get a washboard stomach.
And when I started gaining real knowledge on how to train the body, I realized the low value from an athletic perspective that traditional ab training provides and instead focused on core stabilization exercises like you see in this article.
I’m sharing some advanced techniques here that require a focus on technique, so while anybody can “kinda” do these exercises, to do them properly requires not only great strength but also body awareness to know what muscles to fire, what to relax and what your body’s position is in space.
With that being said, definitely try the exercises on your own first just to get a feel but an even better plan is to get a buddy (or even hire a trainer) to watch this video and then coach your form (or vice versa).
3 Training Protocols and the Core Stabilization Exercises To Use with Them
1) Antagonist Supersets
Antagonist supersets are a variation on traditional supersets. While conventional supersets involve two movements for the same muscle group (pre-fatiguing a muscle before finishing it off with the second movement), with antagonist supersets; muscles are paired between opposing muscle groups.
Traditionally; antagonist supersets use exercise pairs like biceps curls/triceps presses or leg presses/hamstring curls. This training method can increase training efficiency (i.e. back and chest done in the same workout instead of separate days) with no decrease in training intensity.
Here’s how we’re going to use antagonist supersets to create granite-like core stability.
3 Reps Each of Superman Planks/T Lateral Ball Roll

Begin by placing your hands in the push-up position – then slide them ahead of you as far as you can. Push your palms down firmly to maintain stability, and tighten your glutes while holding your body off the floor. Hold for 5 seconds, and then switch to T lateral ball rolls.

You’ll need a stability/Swiss ball for this one, and then you’ll:
- Lay your upper back firmly on the ball
- Form a straight line from knees to shoulders by raising your hips
- Extend your arms to each side (the “T” part)
- Taking small steps sideways with your feet, roll across the ball as far as possible (keeping your upper back somewhat on the ball) then roll back as far as you can the other way
Hold for 5 seconds on each side and switch back to superman planks. Perform 3 total antagonistic supersets of both exercises for rock-like core stability.
2) Reverse Pyramid
The conventional pyramid style of training consists of performing an exercise for a certain number of reps and working your way up in weight while decreasing reps. Pyramids are intended to fatigue muscles while maintaining intensity levels.
This training protocol can be used to increase weight/decrease reps or reversed (the reverse pyramid, duh) decreasing weight/increasing reps. Either way, pyramids are an awesome way to push muscles past their limits for new gains.
Get ready to barbecue your core with this reverse pyramid, core stabilization exercises routine. You’re going to do 3 sets starting with the first exercise then onto the next in the series as you fatigue.
- Prone rollup: lie flat on the floor, legs together and knees straight, arms straight and pointing up. Now, exhale as you curl your chin to your chest and “roll” up off the floor (keep your legs together and on the floor) until you’re looking at your thighs. Slowly reverse the movement until you are flat on the floor again
- Stability ball plank with rolls: assume the plank position with your feet on top of the SB and hands in push-up position. Now pull your knees in and push them out, rolling the ball back and forth with your feet
- Stability ball plank: just what the name says, hold the plank position with your feet up on the SB
If you see smoke coming out of your midsection: you did it right!
I’ve saved the best for last; get ready for Tabata.
3) Tabata
Tabata training was invented by a Japanese scientist named Dr. Izumi Tabata and researchers from the National Institute of Fitness and Sports in Tokyo. Any exercise done Tabata style will only last for four minutes.
You’ll know that you’ve done it right if the first thing you want to do afterward is vomit, and the second thing is drop. Here’s the protocol as set out by Dr. Tabata:
- Workout as hard as possible for 20 seconds
- Rest for 10 seconds
- Repeat 8 more times
Like I said: first you puke, and then you drop.
Let’s tear your core up like a prom dress after the dance.
- Stability Ball 1-leg Jackknife: assume the plank position with your feet on the SB. Now keep one leg straight and pull your other knee in then straighten it out. Alternate legs every 20- second interval
- Begin normal SB jack knife when you’re too fried for the 1-leg version
- Go nuclear on your core with these medicine ball exercises after you’re done:
You can use these methods at the end of a workout, or dedicate a day to core stabilization exercises and use 2 or all three training methods to utterly nuke your core.