The supraspinatus is most commonly involved in rotator cuff pain and tears. Without these two keys, all of your time and effort spent on rotator cuff and supraspinatus tear exercises might be wasted.
In this article, we will take you through two critical keys when you perform supraspinatus exercises or rotator cuff exercises. You’ll learn proper exercise techniques you might not have seen before. Remember, an ounce of prevention is worth a pound of cure.
As always, you can also follow along with the video here.
What is the Supraspinatus?
A quick anatomy lesson.
The supraspinatus goes through a space between the shoulder blade (scapula) and the upper arm bone (humerus.) It’s called the supraspinatus because the top of your shoulder blade is referred to as the spine of the scapula, so supra (above) spinatus – above the spine of the scapula.
It inserts into the bone at the top of your humerus.
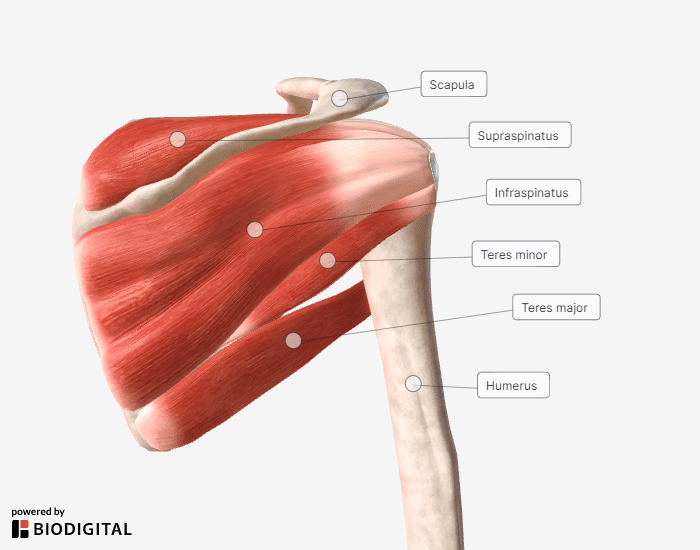
Anything that causes the space to be smaller, such as bone spurs, swelling, or the position of your shoulder blade can affect the amount of stress on the tendon, predisposing to tears over time. The insertion of the supraspinatus tendon is vulnerable to wear and tear as it has a poor blood supply, so regeneration and repetitive injuries are harder to heal.
Why does that get damaged?
Well, when we move our arm around, if we don’t have a lot of space where the tendon inserts, also called subacromial space (space underneath the acromion), then every time you move your arm up, especially when you’re reaching up overhead, whether it’s for an exercise like an overhead press or grabbing something from the top shelf in the kitchen, it’s going to get pinched.
That’s called shoulder impingement.
If you do that enough times, over and over, over months or years, eventually, this tendon will wear down. It could result in a tear.
That’s why we call these issues wear and tear injuries. It’s not just one movement that causes the injury. It’s those repetitive motions over time when you don’t have the keys in place that we’re about to introduce.
The 2 Keys Explained
The first of the two keys is scapular positioning.
Suppose you don’t have proper stability and positioning of the scapula. In that case, it’s going to decrease the space where your tendon and supraspinatus should go and cause more frequent pinching and more intense pinching on that supraspinatus tendon.
The two movements you need to understand are the tilting of the scapula.
There’s anterior tilt. Imagine you have a cup of water balanced on your scapula. If you tilt the glass forward, water spills down your front. That’s anterior tilt. If you dump the water in the cup backward, that’s posterior tilt.
Whenever we move our arms around, we want posterior tilt of the scapula, not necessarily the cue we’re always told (down and back, aka retraction and depression) but posterior tilt. That’s the most important movement and activation because that creates the space between your scapula and your humerus so the tendon doesn’t get pinched.
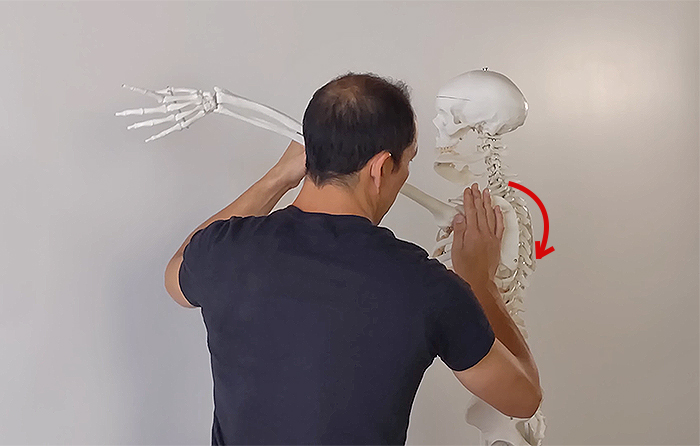
Now, how do we create posterior tilt?
We use a muscle known as the serratus anterior. This muscle is underneath the scapula, but when you activate it, the bottom edge of your shoulder blade gets sucked into the rib cage, causing posterior tilt.
We’ve got another article on the serratus anterior that teaches you how to wake up that muscle. Click here to read 5 Serratus Anterior Exercises for Health Shoulders.
So number one, whenever you perform supraspinatus or rotator cuff exercises, you need that posterior tilt and that serratus anterior activation.
Key number two relates to the spine.
You need good posture, especially through the thoracic spine (the upper back where people tend to hunch over.) If you don’t have good posture, you’re going to be a little rounded, and that’s already going to anteriorly tilt the scapula, so you won’t even be able to posteriorly tilt because you’re starting (and maybe stuck in) anterior tilt.
When you have poor thoracic posture (remember that anterior tilt is going to cause pinching and decrease that space), you’ll get wear and tear on that supraspinatus tendon.
We have another article that teaches you the keys to getting thoracic spine extension and maintaining good posture long-term without having to think too much about it. Click here to learn how to activate the multifidus (and correct forward head posture as a bonus.)

If we just try to pinch the shoulder blades together down and back, like you probably had a teacher or parent tell you, we’re just going to tire out. We’re not going to be able to hold that all day. But when we get the deep muscles in the thoracic spine working (the multifidus), there are slow-twitch fibers designed for endurance. That’s when we can maintain that posture effortlessly.
Those are the two keys to doing the supraspinatus and rotator cuff exercises properly.
Next up comes an important medical study and different supraspinatus exercises. We’ll talk through them in the context of pain so you know when to do certain exercises.
Rotator Cuff Repair Research
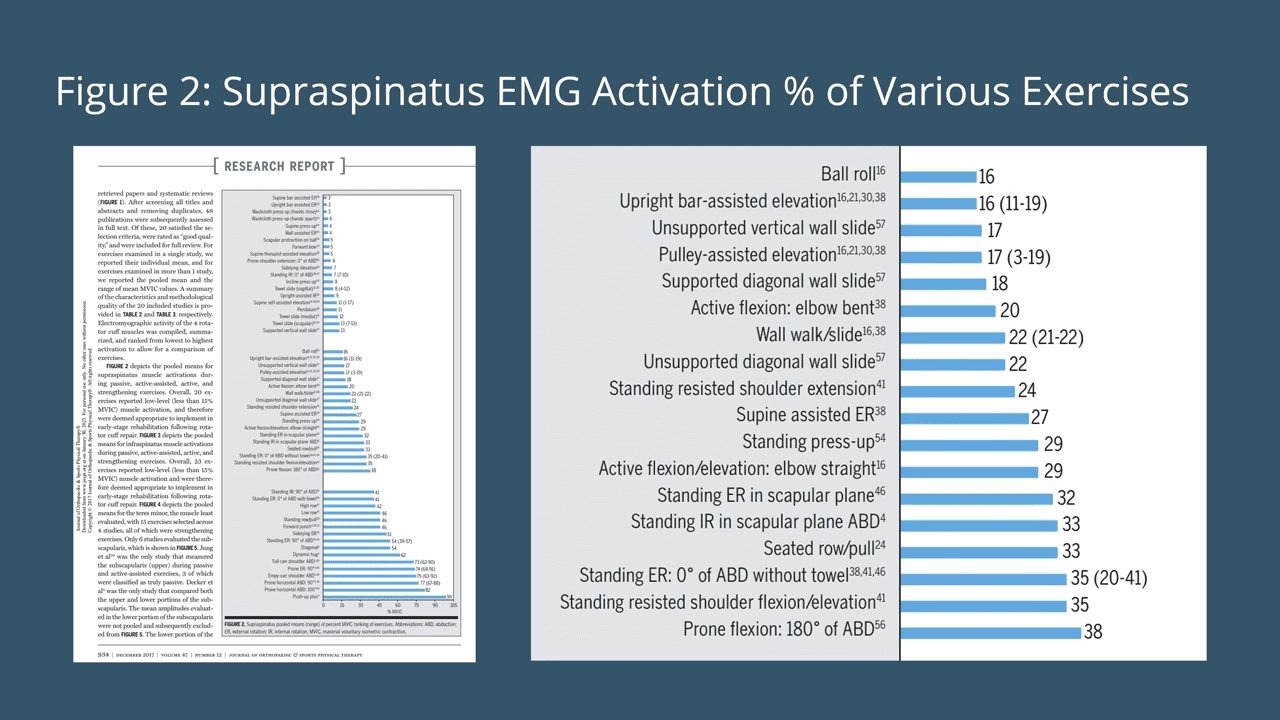
The study we’re going through today is “A Systematic Review of Electromyography: Studies in Normal Shoulder to Inform Post-Op Rehab Following Rotator Cuff Repair.”
It was published in the Journal of Orthopedic and Sports Physical Therapy in 2017. It’s a systematic review that included 20 studies. They showed the following table outlining the EMG activation percentage. That’s the medical jargon for the percentage that a muscle is activated relative to its max during various exercises.
Supraspinatus Tear Exercises
You won’t need to do all seven of these exercises. Pick which ones you do (or start with the first ones if you’re doing this the first time) based on your pain level.
- 7+ out of 10 – Exercise 1
- 4-6 out of 10 – Exercises 2-4
- 3 or below out of 10 – Exercises 5-7
Putting the exercises into the context of when to do them with respect to how painful your shoulder is can help to guide you through the rehab process. That way, you know how to progress from one simple exercise or gentle exercise (because you’re in a lot of pain) to more complex and difficult exercises (when your pain is closer to a 0/10.)
We will go through seven supraspinatus exercises for shoulder pain from this study. The study originally covered 30, but that takes up a lot of time, so we’re putting together the best seven to give you a range based on your pain level.

Exercise 1: Pendulum
The first one we’re going to go through is the pendulum exercise. It activates the supraspinatus to about 11% of its max.
This is a very common exercise for rotator cuff rehab. It’s a very gentle one, getting the muscle activated without putting too much strain on it.
It’s particularly great during what we call the acute phase of pain, which is if your pain is severe. Severe is usually a 7 or higher on a scale from 0 to 10.
If you have a pretty painful shoulder, you want to keep it moving. This will cover the why after the how of this exercise to get that pain settled down a little bit first.
- Support yourself on a table or your knee and let your arm hang
- Do 10 big circles in one direction
- Do 10 big circles in the other direction
Do 10 to 20 big circles in each direction.
If your shoulder is so painful that you find it difficult even to start the circles, bend over and just use your body to get it moving. Once you get it moving, you should be able to continue that circle. Just keep the momentum going.
The reason why we’re doing this is to get the joint moving as quickly as possible. We don’t want the shoulder joint to seize up. We want the muscles active so that they don’t atrophy. The movement helps to decrease any inflammation. It also gets blood flow into the area and gets rid of waste products. It also facilitates and speeds up healing.
All good reasons to get moving as soon as possible. The pendulum is a great way to start doing that.
Rehabilitation Phase: Supraspinatus Exercises for Shoulder Pain
Once your pain level is below a seven and lands in the four to six out of ten range, that’s when you’re in what we call the rehab phase.
Some exercises that are great for that pain level are isometrics, which means there’s no movement.
Isometrics are great because we can get the muscle activated to a fairly high level and decrease the amount of wear and tear on the tendon. It’s a little bit safer because there’s no movement, and it’s more controlled.
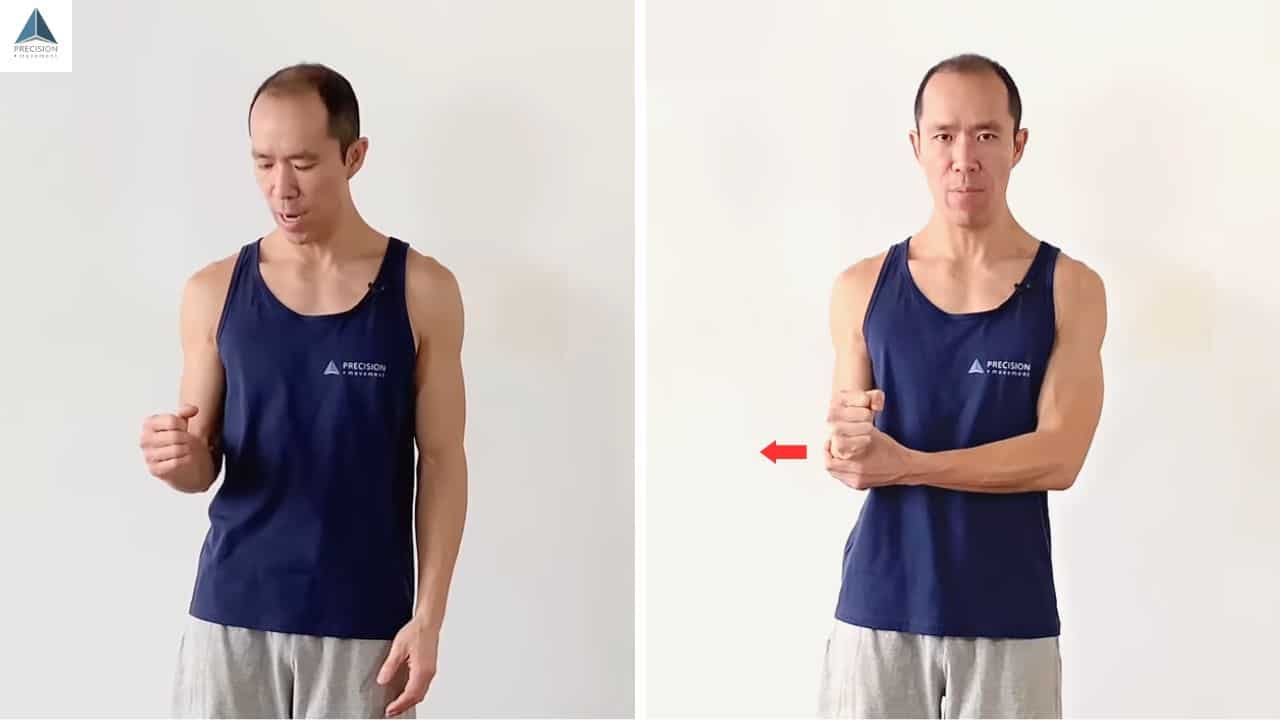
Exercise 2: ER ISO at 0 Degrees
The second exercise (or first rehab phase exercise) is an isometric and external rotation isometric at zero degrees. It activates the supraspinatus to 35% of max. It’s a very simple technique.
- Start with your arm by your side
- Bend your elbow to 90 degrees
- Grab your wrist and push it out away from your body
- Hold your wrist in place with your grabbing hand, so it doesn’t move
- Hold for 5 – 10 seconds
Perform 2 sets of 4-8 repetitions.
You’re trying to rotate your arm but without moving it. That’s why it’s called an isometric. There’s no movement.
Remember those two keys we talked about? You don’t want to do this exercise hunched over with your shoulder rounded forward, and your scapula anteriorly tipped. You want to posteriorly tilt the scapula. Suck that bottom edge of the scapula into your rib cage. Stand tall and extended through the thoracic spine. Then when you grab the wrist to perform the isometric, you’re going to get that supraspinatus activated in a good position.
This exercise will start to strengthen that supraspinatus.
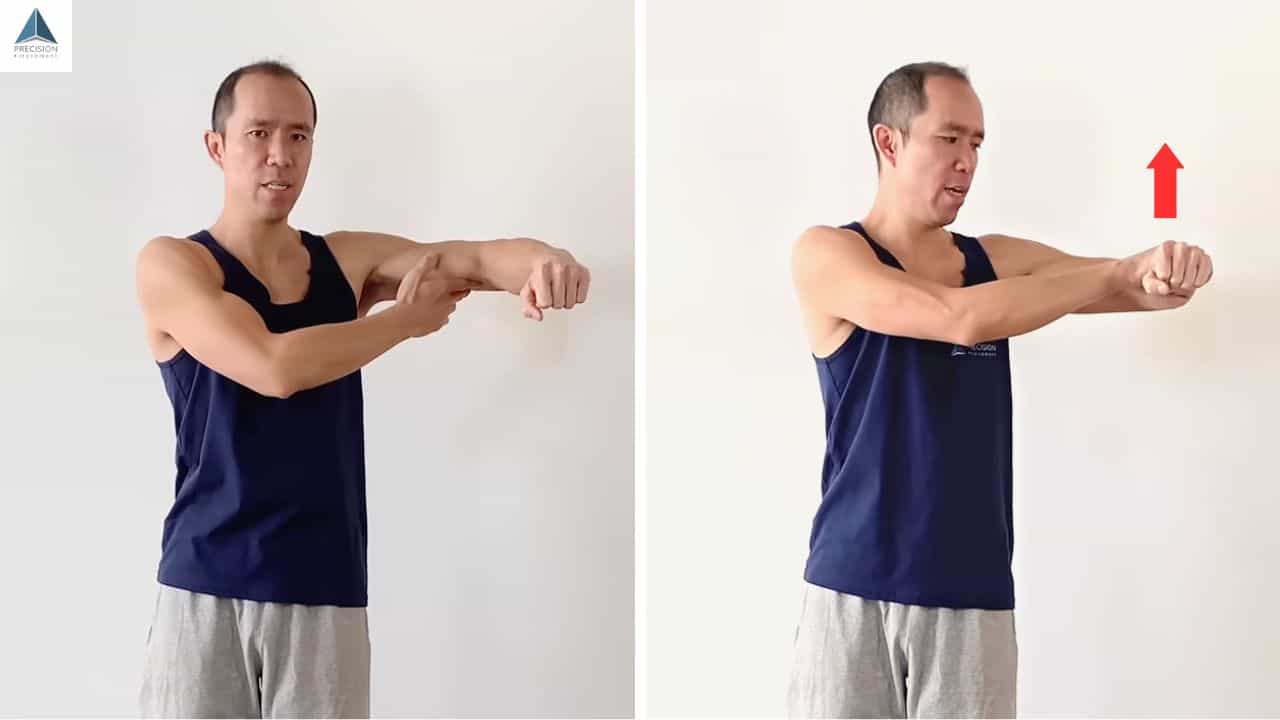
Exercise 3: ER ISO at 90 Degrees
The next exercise is very similar. It’s an external rotation isometric at 90 degrees of abduction. This gets the supraspinatus activated to around 54% of its max.
For this technique, again, keep those two keys in mind – good posture and posterior scapular tilt.
- Abduct your arm to 90 degrees with your elbow also at 90 degrees
- Grab onto your wrist again and try to rotate (activate the muscles to raise your fist up)
- Hold the isometric rotation for 5 – 10 seconds
- Gently release the activation
Perform 2 sets of 4-8 reps.
If you can’t lift your arm up that high, get your arm up there with your other arm and then hold it. That can help you to get the arm into the position you need without going through a painful range. If you’re in too much pain, go back to the first exercise to settle it down and get the muscle activated.
When rotating, picture rotating your upper arm (humerus) and not your forearm. That helps to get the shoulder muscle activated.
The other thing you can do to help activation is make a fist. That’s been shown in research to increase activation of the rotator cuff muscles.
This is a good stepping stone up from that zero-degree position.
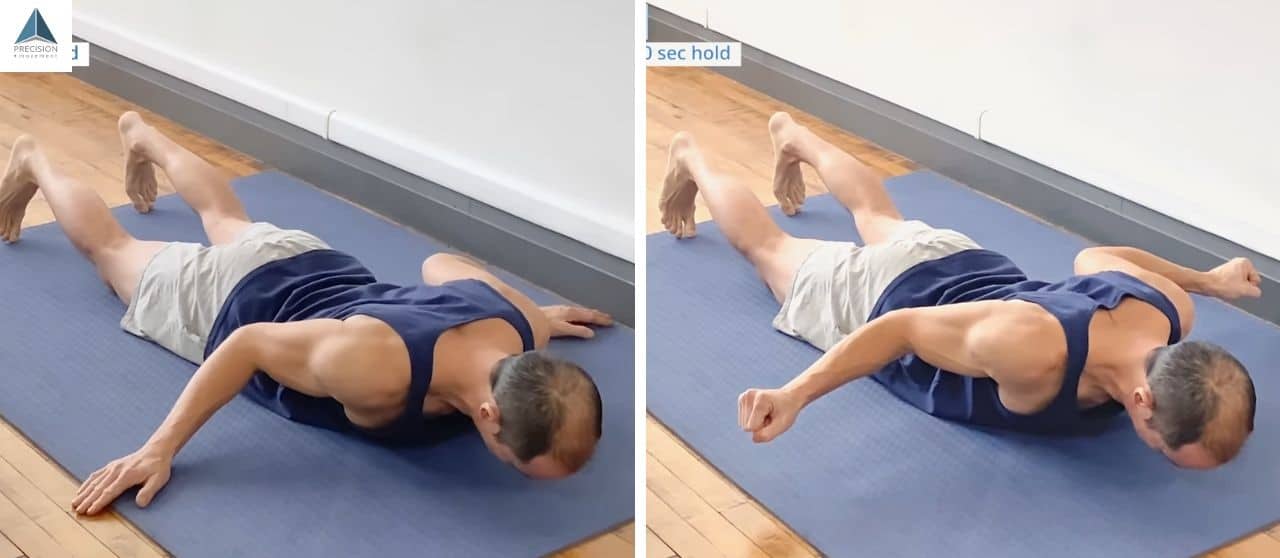
Exercise 4: Prone ER (L’s)
The last exercise in the rehab phase from the study is the Prone External Rotation, also known as the L.
It activates the supraspinatus to 74% of its max.
- Lay on your stomach (prone position) on the floor, over a stability ball, or a bench
- Bend your elbows at 90 degrees keeping your upper arms close to your side
- Externally rotate your upper arm (lift your arms up toward the ceiling)
- Hold for 5 – 10 seconds
- Gently release the activation
Do 2 sets of 4-8 reps.
Keep the scapula in a posterior tilt with good posture. Making fists like in the last exercise helps here too. These cues help you get maximum rotator cuff activation without causing excess wear and tear on the tendon or muscle.
In the rehab phase, we typically spend anywhere from three to eight weeks. Taking that time gets the pain down below a 4/10. We also want to build strength and endurance in those muscles so that we can start to use them in functional and compound movement patterns.
Resilience Phase: Exercises to Avoid Rotator Cuff Injury
Once your pain is at a 3/10 or below, we call that the resilience phase. We use this in all of our pain solution programs.
When you’re in that resilience phase, choose exercises where you start to move more and begin incorporating compound movements. Compound movements are where multiple joints are moving, exercises like pushups, squats, and lunges.
The next exercises will be movements that transfer to everyday life or sports.

Exercise 5: Side-Lying ER
The first resilience phase exercise (or 5th overall) from the study is the Side-Lying External Rotation. It activates the supraspinatus to 51% of its max.
For this technique, you’ll need a dumbbell. Start with a light weight.
- Lay on your side and elbow with a neutral wrist
- Grab the weight with a good strong grip
- Rotate up to the top
- Hold for 1-2 seconds
- Slowly lower over a count of 4
- Touch the ground lightly, pause
- Raise back up slowly over a count of 4
Do 2-3 sets of 8-12 reps.
Going slowly is important. You’re teaching your body to control the muscles through the entire range of motion.
It may be more comfortable to lay on a towel. Try that if laying on your side is uncomfortable. Don’t forget the posterior tilt of the scapula. Also, make sure you aren’t in the fetal position. You still want good, tall posture.
This exercise works through dynamic movements. We’re not doing isometrics any longer. We need to start on dynamic movements because they build strength in a way that we can transfer them over to everyday life and sports.
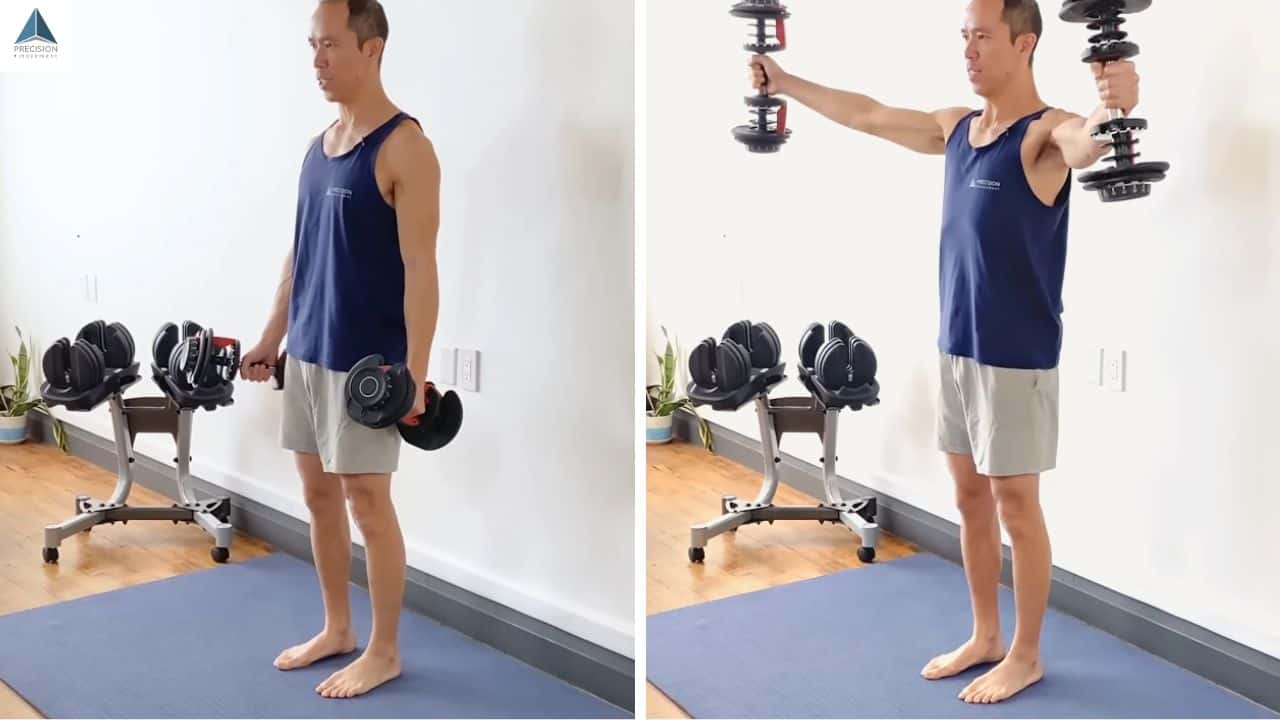
Exercise 6: Full Can
The next exercise we recommend from this study for the resilience phase (pain is 0-3 out of ten) is the Full Can. The Full Can activates the supraspinatus to 73% of its max.
You’ll need two dumbbells this time.
- Stand up nice and tall, sucking the bottom edge of your scapula into your rib cage
- Hold the dumbbells with palms facing each other
- Slowly lift the dumbbells away from your body 30 degrees forward of sideways
- Pause briefly
- Slowly lower the dumbbells back to your sides
Do 2-3 sets of 8-12 reps.
That’s known as the scapular plane. It helps to decrease that impingement and maximize the subacromial space in the shoulder, so your supraspinatus tendon doesn’t get worn down.
Go nice and slow. No momentum! Keep the weight under control because if you swing the weight around, you could be doing yourself more harm than good. If you have to use momentum to get the dumbbells up, you’re using too much weight.
People often wonder about how much weight to start with. First of all, if you cannot do the movement with perfect form without a weight in your hand, then you should not be adding resistance. Start small, 1 lb weight and progress a pound at a time until you reach 5 lbs, which should be more than enough for every day life activities.

Exercise 7: Pushup Plus
The last exercise from this study is the Pushup Plus. The Pushup Plus gives you 99% activation of the supraspinatus muscle. That gets the supraspinatus working almost as hard as it can in a functional movement pattern.
The Pushup Plus is very simple. You should have minimal pain in your shoulder, so getting into the pushup position shouldn’t put you in extreme pain if it does revisit the acute and rehabilitation phases for a couple more weeks.
As you do the pushup, keep sucking that bottom edge of the scapula in posterior tilt, keeping good posture, and then as you go up to the top, make sure you protract that scapula and push through the heels of your palms. That helps activate the serratus anterior a little bit more.
Keep your thoracic spine tall, not rounded.
- Assume the pushup position
- Lower down to touch your chest to the floor, focusing on posterior scapular tilt
- Hold for a few seconds
- Push up through the heels of your palms, protracting your scapula
Do 3-4 sets of the maximum reps you can do with good form.
This is an exercise that you can work up and continue building reps. You might only be able to do one, maybe four reps at first. That’s 100% okay. Just keep doing multiple sets, at least three, every time you do this exercise. Over time, if you’re doing this two or three times a week, then you’re going to build your endurance and your strength. You also get that supraspinatus, and everything else integrated in a functional movement pattern.
“I came from the injury camp myself – I had an acromioclavicular ligament partial tear about 3 years ago. I’ve seen great progress from the program. Previously the overhead movements were painful, now they are not.” – Mikhail Balakhnov, Software Engineer
More Helpful Resources
Those were the seven exercises from this study that we wanted to demonstrate in the context of the two keys to performing them properly and how to use them with respect to the level of pain in your shoulder.
Now, there are a couple of resources that you might also find helpful. Click through to the articles below to get your shoulder in fantastic shape to keep doing the active things you love.
- The Fastest Way to Rehab a Strained Rotator Cuff
- Top 6 Supraspinatus Exercises for Rehabbing an Injured Shoulder
Finally, the most important is the Shoulder Pain Solution because we walk you through these three phases based on your pain level. You have many different exercises (including more supraspinatus tear exercises) to get things working properly.
Check that out if you have shoulder problems. We hope to see you there!