
Shoulder pain can stop you from doing the things you love, from working out to lifting groceries – or even reaching up into a cupboard. If you’ve been diagnosed with a rotator cuff tear or are dealing with a strained rotator cuff, the first question that likely came up is: “Do I need surgery?”
But here’s what many don’t realize: not all tears or strains are painful – and not all pain comes from tears.
Over the past few years, I’ve worked with elite athletes, mechanics, and young gymnasts suffering from shoulder pain. The key takeaway? Pain often results not from structural damage, but from dysfunctional movement and muscle imbalances. If you’re searching for effective strained rotator cuff rehab, this article is for you.
Let’s dig into what the rotator cuff actually does, what really causes pain, and the exact exercises you can do to start feeling better fast.
Basic Shoulder Anatomy
The rotator cuff is a group of four muscles:
-
Supraspinatus
-
Infraspinatus
-
Teres Minor
-
Subscapularis
Traditionally, they’re known for producing internal and external rotation of the shoulder. But their main job is to stabilize the head of the humerus (the upper arm bone) in the socket during movement.

When this alignment is off, your shoulder can experience “pinching” pain – often when reaching overhead or to the side. This is commonly labeled as impingement, but it stems from a loss of proper centration of the shoulder joint.
Poor centration leads to excessive stress on the rotator cuff tendons and irritation of surrounding structures like the bursa. Over time, compensations from other muscles like the upper trapezius or levator scapula can create a negative feedback loop of pain and limited movement.
The Real Role of the Rotator Cuff
The name rotator cuff implies that these muscles are all about rotation. And yes, that’s true – but only to an extent.
Your rotator cuff muscles do work to rotate your arm both internally and externally, and to lift it.
But their real function is DYNAMIC stabilization of the humeral head in the socket. [1].
Without the stabilizing force, there would be no point to rotation, as it wouldn’t take much movement of the humeral head in that shallow glenoid cavity to dislocate your shoulder joint.
Your rotator cuff is at work during overhead movements of all kinds – including the swing of a tennis racket, the stroke while swimming and the overhead lift of a set of weights [2].
It isn’t only working to stabilize, rotate and lift your arm during these activities – it also works to accelerate and decelerate your arm during high velocity movements, like pitching [3].
Root Causes of a Strained Rotator Cuff
If you train heavy overhead movements, the Olympic lifts or play sports like baseball, volleyball and tennis with any of the following issues…
- Poor posture, especially kyphosis and rounded shoulders
- Any of the 3 types of scapular dyskinesis
- Winged scapula
- Shoulder mobility restrictions
- Consciously or not moving with improper movement patterns (especially keeping scapulae retracted and depressed during overhead movements!)
… you’re at risk for a strained rotator cuff or tear.
Not All Tears Cause Pain
You might be surprised to learn that rotator cuff tears are common – and often pain-free. Research shows that the presence of a tear doesn’t always correlate with symptoms . In fact, a systematic review published in the Journal of Shoulder and Elbow Surgery found a high prevalence of asymptomatic tears, particularly as people age. [4]
A systematic review showed that:
- 10–30% of people have partial tears
- 5–20% have full tears
- Many of these people have zero symptoms
So, if not the tear itself, what’s causing your pain?
Another study compared people with symptomatic and asymptomatic rotator cuff tears and found key functional differences.[5]
Specifically, those with shoulder pain showed reduced scapular upward rotation and elevated activity in compensating muscles like the levator scapulae and upper trapezius.
These findings highlight that poor movement patterns and muscle imbalances – not necessarily the tear itself – are what lead to pain. It found that those with pain had:
- Less scapular upward rotation
- Overactive levator scapula and upper trapezius muscles
These findings reinforce that movement dysfunction – not just the tear – is the real issue.
Pain often arises because the body is trying to work around an inefficient movement pattern, creating tension and overload in supporting structures. Correcting these imbalances is essential for recovery – whether or not a tear is present.
When To Consider Surgery?
Not all rotator cuff tears are created equal.
First off, the tendon is about one centimeter thick. A full-thickness tear means that the full depth of the tendon is torn.
Partial tears only go through 25% to 50% of the tendon. Generally, these tears don’t require surgery.

Image by www.wjgnet.com
Anyone with tendinosis does not need an operation.
The main consideration for choosing surgery is a full-thickness tear AND pain.
Now, that doesn’t mean that you can forget about a partial tear or rotator cuff strain, even if there is no pain. Monitoring your rotator cuff tear is part of focusing on preventing a full tear and minimizing pain down the road.
Say, for example, you’re doing exercises to get to the root cause of why your tendon is tearing in the first place. You have a documented ½ centimeter tear. Six months after you’ve had the diagnosis, you should have a repeat ultrasound to check if the tear is getting bigger.
But most of the time, you’ll know that you have a problem because the pain will persist.
ALWAYS consult with your doctor. If you fall into the surgery category, you have a full-thickness tear of the rotator cuff tendon, then work with your doctor and your surgeon to make sure you’re taking the appropriate next steps.
3 Keys to a Healthy Functional Rotator Cuff
Each key focuses on proper alignment and its common dysfunction.
These are perfectly normal to have. Dysfunctions develop over years of activity and inactivity. While many rotator cuff issues develop in people who were active in their younger years, they can develop in anyone as part of the aging process.
![3 Keys to Rehab a Rotator Cuff Tear & AVOID Surgery [UNIQUE EXERCISES]](https://www.precisionmovement.coach/wp-content/uploads/2017/05/3-Keys-to-Rehab-a-Rotator-Cuff-Tear-AVOID-Surgery-UNIQUE-EXERCISES-17-58-screenshot-e1651173345191.png)
Key #1 The posture and alignment of the shoulder girdle.
If you have poor posture, say you’re hunched over in front of your desk, it affects the space that your rotator cuff travels through. That rounding of the shoulder decreases the space of the rotator cuff, and you’re leading to increased chances of wear of your rotator cuff tendon.
It’s super important that you mobilize your thoracic spine and get your forward head posture corrected.
The capsule that joins the humerus ball and the glenoid (the saucer) is made up like a shirt sleeve. If the back of that capsule gets too tight, it changes the alignment of the shoulder.
So when you go to lift your arm over your head, the tight posterior capsule actually pushes the humeral head up and leads to impingement of your rotator cuff. It literally shuts off your rotator cuff.
You can’t even activate the rotator cuff when you have this posterior capsular contracture.
You can test this by having a friend put their hand on top of your scapula (shoulder blade). The goal is to hold your shoulder blade in place to check how much it can actually move your shoulder without compensatory mechanisms.
Have your friend lift your arm out to the side until it’s even with your shoulders, then move it in front of you. When the posterior capsule is tight, your arm won’t be able to move in front of your body without your shoulder blade moving to give it the extra range of motion.
Don’t worry if you aren’t perfectly symmetrical. Most people aren’t. You’re good as long as your arm can move in front of your body.
If you find that you do have a tight posterior capsule, click the link to the YouTube video below. Do the exercise for the next 4 to 6 weeks to correct it, but you’ll start feeling better right away.
Key #2: Maintaining your scapula (shoulder blade) in the correct position.
The most common problems with scapula position are:
- Anterior tilt
- Too low
- Protracted
Anterior tilt means that the top of your shoulder blade is tipped too far to the front. Having your shoulder blade too low is self-explanatory.
A protracted shoulder blade is pulled toward the front – typically from a rounded shoulder posture.
The position of your shoulder blade is in large part affected by the mobility of your thoracic spine. If your goal is rotator cuff rehab, paying attention to what your shoulder blades are doing throughout the day is a good place to start before moving on to the exercises.
Key #3: Strengthening the rotator cuff and ensuring it’s active throughout the full range of motion
When there is pain in the shoulder, particularly if there is poor scapula or glenohumeral joint alignment, the rotator cuff can’t turn on. That leads the brain to find compensatory mechanisms, and it gets in the habit of using those instead of the rotator cuff.
Undoing those compensations is key to solving the tendinosis and tears. Getting the rotator cuff to work with the muscles around your shoulder and scapula will take time because you’re replacing bad habits in your neuromuscular patterning.
The more activity you want to do, the stronger you have to be – no time like the present to start.
How to Rehab a Strained Rotator Cuff
Whether you’re dealing with a mild strain or recovering from a diagnosed tear, the key to effective strained rotator cuff rehab is following a phased approach. Start by managing pain and inflammation, then gradually progress to exercises that restore alignment, mobility, and strength. Be consistent, listen to your body, and focus on quality movement patterns. Let’s break it down step-by-step.
Phase 1: Reduce Pain (7/10 Pain or Higher)
If you’re in high levels of pain, you need relief before jumping into more complex rehab.
1. Ice Therapy
Use for 15 minutes, up to 3x/day. Helps reduce inflammation and sensitivity.
Cold therapy works by constricting blood vessels and slowing nerve conduction, which reduces pain signals sent to the brain. It’s especially useful after activity or at the end of the day when inflammation tends to peak. Make sure to use a barrier like a towel between the ice and your skin to prevent irritation or frostbite.
It’s not just about numbing the area – ice provides a neurological reset that can lower your pain threshold and make it easier to perform therapeutic exercises in later phases.
2. Contrast Showers
Alternate 30 seconds hot, then 30 seconds cold. Repeat 3–5 rounds.
Contrast therapy creates a pumping effect by alternating vasodilation (from heat) with vasoconstriction (from cold). This helps move fluid through the lymphatic system and flush out waste products from the inflamed tissue.
Doing this consistently can dramatically reduce localized swelling and improve your body’s ability to self-regulate inflammation. It’s a great tool to use before mobility work or stretching because it wakes up your nervous system and prepares muscles for activation.
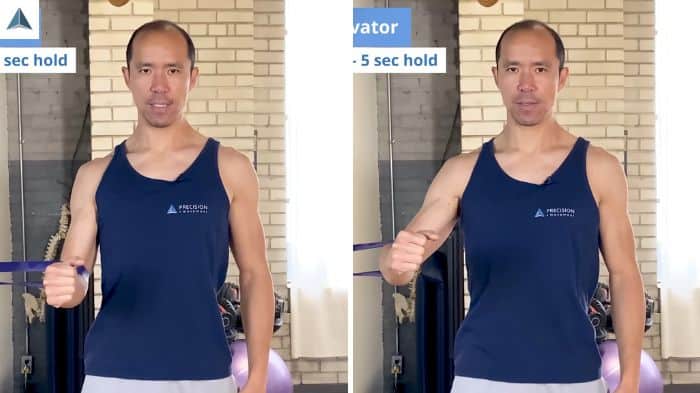
3. Four-Way Shoulder Isometrics
Isometrics reduce pain while activating key muscles without movement.
These exercises stimulate muscle engagement around the shoulder joint without putting strain on irritated tissues. By holding contractions without actual motion, you send signals to the nervous system that promote stability and pain modulation.
-
Set up with elbow at your side
-
Contract without letting your arm move
4. Isometric Movements (Hold each for 5 seconds, repeat 3x):
-
External rotation: Push out against your opposite hand
-
Internal rotation: Push in
-
Shoulder flexion: Push forward
-
Shoulder extension: Pull back
Gradually ramp up and down intensity to avoid irritation.
These help reactivate dormant stabilizers and start the neuromuscular retraining process. They’re also safe for early-stage rehab when movement is limited or painful.
Phase 2: Restore Function (Pain Under 7/10)
This phase builds the foundation for pain-free movement with four pillars:
-
Tissue quality
-
Muscle activation
-
Alignment
-
Active range of motion
1. ASMR: Shoulder Blade/Rhomboids
Use a massage or tennis ball to release tight tissue in the rhomboids and shoulder blade.
SMR helps reduce excessive tone and trigger points in the surrounding musculature. Tightness in the rhomboids and scapular muscles can pull the shoulder into poor positions, contributing to impingement and restricted mobility.

-
Lie on the ball, targeting two spots:
-
Rhomboids (beside spine)
-
Shoulder blade (more lateral)
-
-
Relax fully into the ball
-
Move arm in big pain-free circles:
-
3 in each direction per spot
-
-
Total: 2 spots on rhomboid, 3 on shoulder blade
Do this for 1–2 minutes per muscle area, once daily.
This reduces restriction and prepares the area for functional movement. Over time, consistent SMR helps normalize tone, improve range of motion, and relieve pain caused by chronic tension.
2. Wall Neck Side Bend
This move releases overactive traps and levator scapula, while engaging stabilizers.
Neck and shoulder tension often go hand-in-hand. When the levator scapula and upper traps are dominant, they elevate the scapula and disrupt proper shoulder mechanics. This exercise addresses both muscular tension and postural dysfunction.
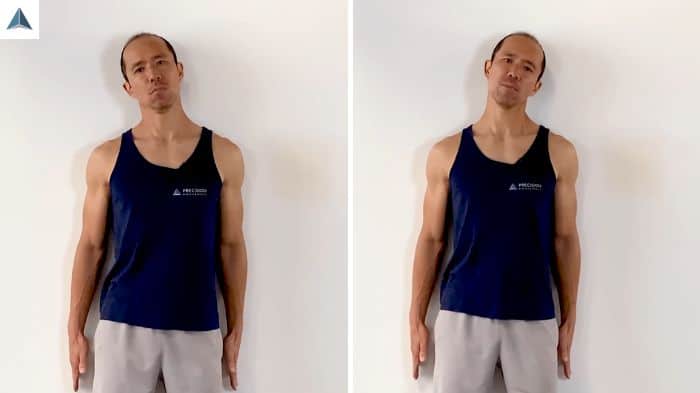
-
Stand with shoulders and arms against the wall
-
Posteriorly tilt shoulder blades and press hands into the wall
-
Side bend your neck toward shoulder, then take a deep diaphragmatic breath
-
Repeat side-to-side
Complete 1 set of 4 reps per side, holding each stretch for one deep breath. Perform daily or as part of your warm-up.
This movement is subtle but powerful, improving neck-shoulder alignment and reducing compressive forces on the upper traps. It encourages proper scapular depression and reinforces breathing-driven spinal stability.
3. Lower Trap Activator
Targets the lower trapezius to promote proper scapular upward rotation.
The lower traps are often underactive in people with shoulder pain. Strengthening them rebalances scapular control and reduces reliance on the upper traps during movement.
-
Use a band or belt anchored at elbow height
-
Keep elbow bent and at side
-
Perform subtle movement: posterior tilt scapula and bring entire shoulder girdle back
-
Do not row or move elbow behind the body
Do 2 sets of 4 repetitions per side, holding each contraction for 5 seconds. Aim to complete this drill 3–4 times per week.
Most people overuse the upper traps and underuse the lower traps. This corrects that imbalance to restore proper mechanics. With consistent practice, this will significantly improve scapular positioning during overhead and reaching activities.
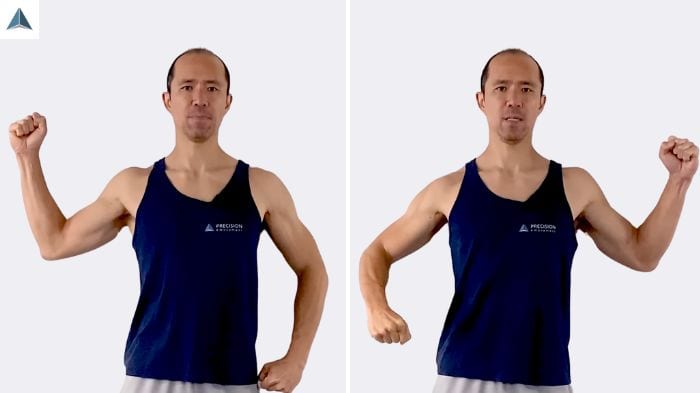
4. Shoulder Rotation Robot
Reinforces stable scapula with rotational movement, great for athletes.
This drill teaches your body to move the humerus independently from the scapula – a crucial skill for healthy shoulder function. It reinforces coordination, strength, and joint centration across dynamic motion.
-
Stand against a wall with arms bent at 90°, fists up
-
Slightly raise elbows
-
Alternate rotating arms:
-
One fist up, one fist down
-
-
Hold each end-range for 5 seconds
-
Keep shoulder blades stable the entire time
Complete 2 sets of 4 reps per side, focusing on slow, controlled movement. Do this 3–5 times weekly to build stability and coordination.
This dynamic motion ensures shoulder rotation occurs without compensation, training neuromuscular control and joint integrity. It’s especially beneficial for athletes and active individuals looking to return to high-demand activities.
![3 Keys to Rehab a Rotator Cuff Tear & AVOID Surgery [NEW EXERCISES] 17-39 screenshot](https://www.precisionmovement.coach/wp-content/uploads/2022/04/3-Keys-to-Rehab-a-Rotator-Cuff-Tear-AVOID-Surgery-NEW-EXERCISES-17-39-screenshot.png)
Next Steps
To make these exercises stick, consistency is key. Do this routine three to four times per week, adjusting the frequency depending on how your shoulder responds. Don’t worry if your pain doesn’t vanish right away – what matters is gradual, consistent progress over time.
If you’ve made progress with this rehab but feel like you’re hitting a plateau, it’s time to advance to more dynamic movement drills. That includes progressing toward overhead motion, load-bearing positions, and integrating the shoulder with thoracic spine and scapular mechanics.
For a complete path to shoulder health, including mobility, stability, and long-term function, check out the full Shoulder Pain Solution Program. Or download the ROM Coach App to follow your plan day-by-day.
Key Takeaways: Strained Rotator Cuff Rehab
-
Most rotator cuff tears don’t cause pain – poor movement patterns are often the real issue.
-
Effective rehab focuses on stabilization, alignment, and muscle activation, not just rest.
-
Start with pain relief (ice, contrast, isometrics), then progress to function-building exercises.
-
Do the routine 3–4 times per week to rebuild strength and prevent reinjury.
-
Long-term success comes from restoring shoulder function, not just eliminating symptoms.
—
This article was published on Apr 28, 2022 and updated on June 16, 2025