
If you’ve got nagging groin pain, this article will explain the root causes and four exercises for a strained groin that addresses those causes creating long-term relief.
First Steps to Solving Groin Pain
Groin pain tends to be a pain in the groin, upper thigh, or hip region. The pain worsens by pushing off something or lifting the leg to get in the car or go upstairs. Any change in direction can be very painful.
Most of the time, these nagging groin injuries are muscular in origin. It’s a muscle that’s experienced some strain. You can differentiate between the joint itself and the muscle by the location of the pain. You can also do resisted muscle tests to determine the specific affected muscles.
So what should you do first?
First, stop doing the aggressive activities that cause pain. Avoid activities like tennis, with quick stops and starts.
You can put ice on the tender area. We recommend an ice/heat contrast. A little bit of pain medication won’t go astray, either.
If the pain gets really bad, do isometric contractions to help settle any inflammation and get the muscle reprogrammed.
“You may be wondering how you can differentiate a pulled muscle from arthritis of the hip or a labral tear as both of these conditions can lead to groin pain. One of the keys will be limited hip range of motion. Patients with significant intra-articular pathology, e.g. cartilage loss or labral tears will have decreased hip flexion and rotation. If you find that you have limited mobility, see your Family Doc and get an x-ray. The exercises below will help even if you have arthritis or a labral tear, but if you have significant arthritis, the range of motion may not improve dramatically… but at least you can maintain what you do have!”
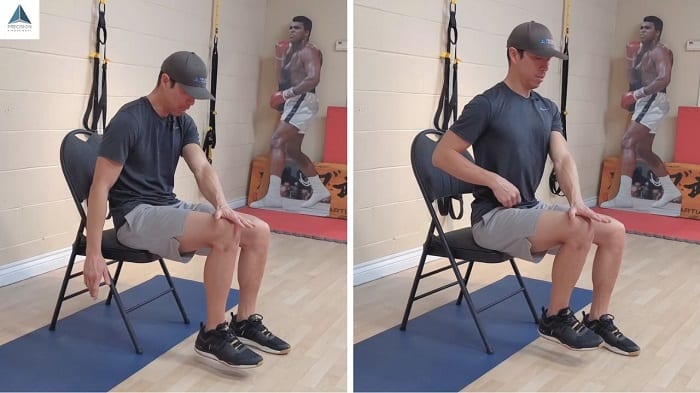
Isometric Pain Settling Exercise
Isometric activations tend to take the edge off the pain. If you’re feeling a 7/10 on the pain scale, doing this exercise may get you down to a four or five.

Image by orthonc.com
This one is super easy. All you need is a place to sit and a pillow for resistance, but not one of those feather ones that squish totally flat. It needs some stuffing to provide a little cushioning.
- Sit in your chair with a pillow between your knees
- Squeeze the pillow as hard as you can, stop when you start to feel muscle burn
- Hold for one slow breath
- Start slow, keep the contraction under control as you ramp up and release
Start with 3-5 reps once or twice a day.
You’re not trying to give birth here, so there is no need to bear down on the exercise. Gradually ramp it up.
Don’t push into any discomfort, or even when it feels not right. You may feel a little pulling or burn, but it shouldn’t be sharp. Avoid sudden movements because that can damage the already strained muscles.
Over a couple of days, you will be able to increase the intensity of that contraction. You’ll feel better during the ordinary course of your day too.
You can also use this isometric as a movement painkiller, so to speak. Any time you feel that stiff feeling or some nagging pain, do a couple of isometrics to help loosen it up.
This exercise only addresses the symptoms, not the root cause. So it’ll help you out in the moment, but you’ll need to do the exercises below to target the root cause.
Root Causes of a Pulled Groin
A lot of times, people will just massage their groins all day. They’ll ice or do this kind of lunge stretch. Definitely don’t do static stretches like that.
When you stretch a muscle during an acute painful phase, you’re pulling through a part of the body that shouldn’t be stretched. It may further damage any tears or strains.
Coach E rarely recommend static stretching. When he does, it’s for a very, very specific pain and reason.
The best thing you can do after isometrics is drop the static stretches where you’ve got your foot up on the couch or spread your legs out wide, trying to stretch out the adductors and groin muscles.
If you want to work on your adductors, try these three exercises to heal an adductor strain instead.
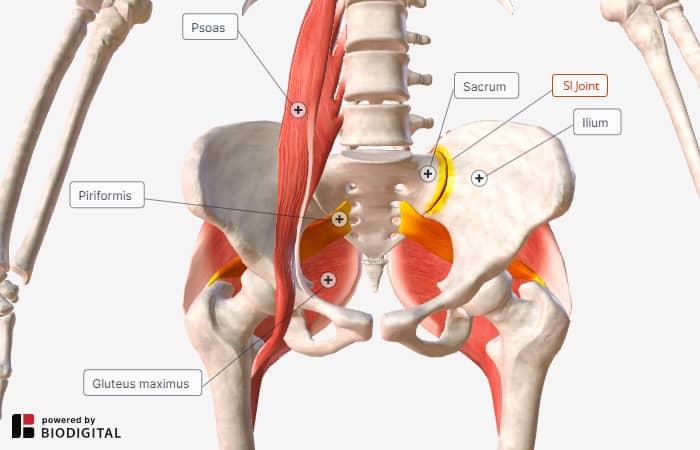
The SI Joint & Psoas
A study called “Groin pain associated with sacroiliac joint dysfunction and lumbar disorders” discusses SI joint pain and how that relates to nagging groin pain. It was published in the Clinical Neurology & Neurosurgery Journal.
They found that 46.5% of patients with SI joint dysfunction reported groin pain. Contrast that with 6.7% of patients with lumbar stenosis and only 8.1% with lumber disc herniation reporting groin pain. [1]
It’s clear that when patients who do not have hip disorders experience groin pain, SI joint dysfunction should be considered. The full study, if you want to read it, details how the SI joint relates to this nagging groin pain, but here’s the gist.
A little muscle called the psoas crosses the hip joint and the vertebrae. It helps maintain alignment of the hemipelvis. The hemipelvis (half the pelvis) is where the SI joint attaches to the spine. So if the psoas isn’t activated and supporting proper alignment, then the SI joint moves too much, becoming aggravated and painful.
For many people, the psoas doesn’t function so well. It gets short from long periods of sitting, then doesn’t stabilize properly, and leads to pain. So it’s vital to get it working correctly.
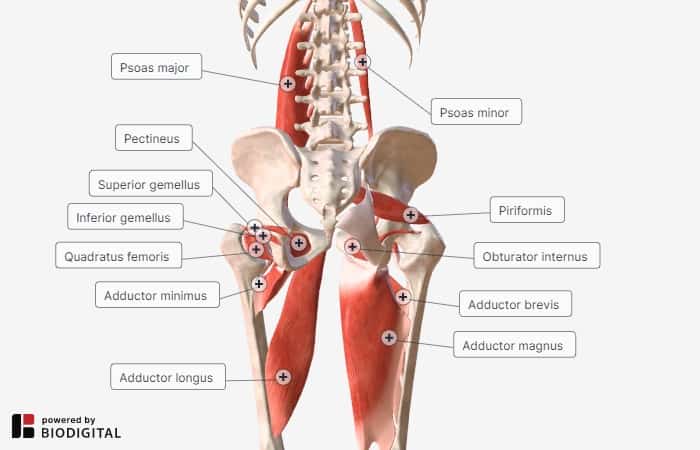
Deep Hip Stabilizers
Deep hip stabilizers cover a group of little muscles in the hip with names like pectineus, obturators, obturator internist, quadratus femoris, and gemelli.
These work to stabilize the hip. They allow the femur (thigh bone) to move around properly on a stable hip. We’re going to get into an exercise in the next section that helps get those guys fired up.
Total Hip Rotation
So this root cause deal with total hip rotation. It’s the same phenomenon that people complain about in their shoulders.
Doctor Example:
“We find [as team surgeons for pro teams] that players who have pain have a smaller arc of rotation. That includes internal and external rotation. Most throwers lose internal rotation but gain external rotation. But if they don’t have a complete large arc or range of motion, they’re prone to shoulder pain.
Similarly, in the hip, we can measure internal rotation and external rotation, and there needs to be a total amount of rotation that the hip can move in order to protect the structures around it. If you lose some of your rotation, you’re putting structures at risk. Tendons, labrums, and various soft tissues which can wear out too quickly (like the muscles in the groin) they’ll have to do more and compensate for this lack of rotation range of motion.”
There’s another study that illustrates this point quite well. The study “Is lower hip range of motion a risk factor for groin pain in athletes? A systematic review with clinical applications” found that there was strong evidence that total rotation of both hips below 85 degrees was a risk factor for groin pain development. [2]
The Hip Pocket
The final cause comes from a concept called the hip pocket.
“The hip pocket really is the key because it brings each of these factors, the function of the psoas, the deep hip stabilizers, and hip rotation, all into play. The hip pocket is really the space at the back of your hip that allows the femoral head to be seated properly in the socket.
I equate that to a baseball glove and the pocket in a baseball glove. If you don’t have a good pocket in your glove, the ball doesn’t sit there properly. Similarly, if the structures in your buttock, the muscles, and the deep hip stabilizers which will affect your hip rotation are too tight, then it decreases the space and makes a small hip pocket.
Creating a hip pocket and getting each of these factors functioning properly is critical to taking the load off of the groin muscles. If you have a poor hip pocket, then you can’t move properly. Other muscles have to compensate. They become overloaded and eventually break down. These are small muscles, so it doesn’t take a lot to overwork them.”
Those are the root causes. The hip pocket brings it together.
Next, we’ll take you through a bunch of exercises to address all of these root causes to help you get rid of any pain from a groin pull for good.
Exercises for a Strained Groin
Remember, all of these exercises will help you create a deep, stable hip pocket. Take them slowly at first, and you can always look at the strained groin Youtube video to follow along.
You can also find these exercises in the ROM Coach app. The premium version lets you build custom routines, so you could save these and add any of your daily favorites to keep yourself in the habit of working on your movement longevity a little bit every day.
Posterior Hip Mobilization
The first exercise is the posterior hip mobilization. This addresses the back of the hip, making sure that the hip joint capsule and all of the tissues back there give you the ability to get the head of the femur back into the pocket.
It will help activate the psoas, giving you better alignment, and activates the hip stabilizers to improve rotation.
First, you’ll need a long strength band and something to anchor it too. The leg of a table works great in a pinch.
- Anchor the band around a sturdy object and place it around your leg right where it meets your hip
- Start in the four-point position
- Kick your leg with the band out to the side, roughly 90 degrees away from the body
- Holding your leg straight, press your foot into the ground for 5 slow breaths
- Twist your leg, keeping your heel in place to point your toes toward the ceiling
- Repeat 5 times
- Drop back onto your kneeling leg, keeping the heel of your extended foot in place
- Hold for 5 slow breaths
- Rotate your toes toward the ground 5 times
Repeat on the other leg. That’s one rep. Do 5 reps.
This one exercise covers both internal and external rotation, and you’ll have mobilized your posterior hip capsule.
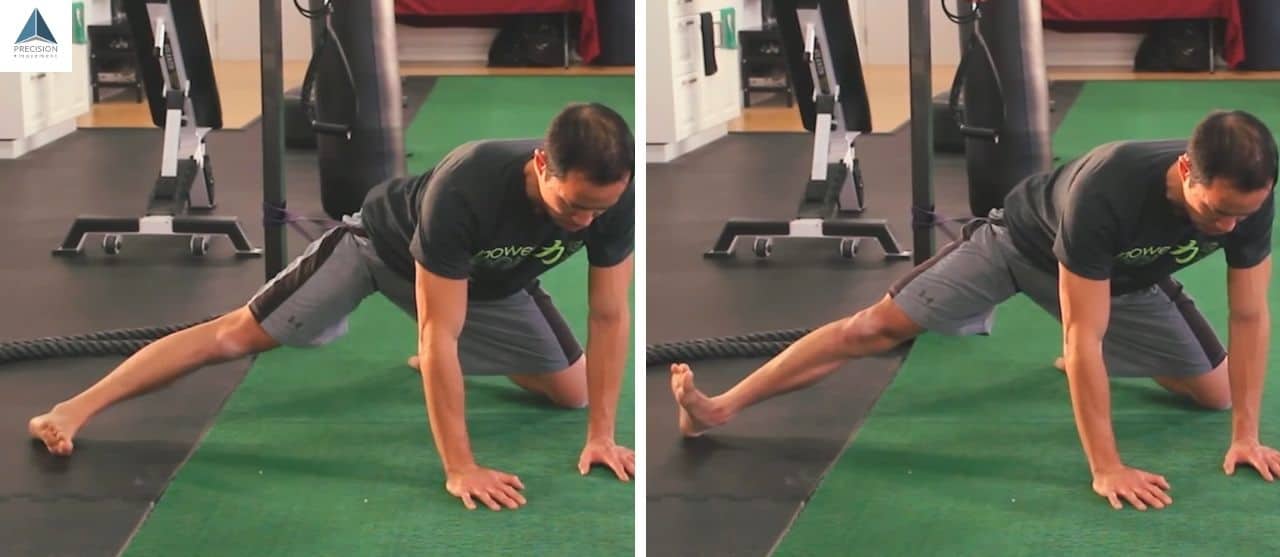
Slumpy Psoas Activator
Next up is the Slumpy Psoas Activator, which gets the psoas activated along with the SI joint to keep working on creating that stable hip pocket. It activates and strengthens the hip flexor muscles in the range where it’s weakest, sitting.
You can follow along on this exercise in the free ROM Coach app from the iTunes and Play stores.
- Start off with a slumped (flexed) spine
- Lift your foot and drive the knee into the opposite hand, activating the psoas
- Straighten into spine extension (good posture) and anteriorly tilt the pelvis (top goes forward)
- Hold for 5 -10 seconds while taking big deep breaths
Perform 2 sets of 4-6 reps, alternating sides.
A couple of tips to get the psoas firing is to slightly externally rotate the hip and slightly abduct the hip.
Hinged Knee Fl-Ex
The Hinged Knee Fl-Ex is a great one because it mobilizes the SI joint by activating the psoas and lengthening the hamstrings. It also works the deep hip stabilizers, especially when you’re straightening out the knee.
This technique is invaluable for SI joint pain because it restores proper SI joint function. By extension, it will help you deal with groin pain.
We categorize it as a mobilization technique because it mobilizes the hamstrings as well as the SI joint. It also works well to activate the quads, specifically the VMO or vastus medialis, which often gets sleepy in people.

- Hinge at the hips with a neutral spine and slightly bent knees
- Activate your quads to slowly extend each knee, straightening your leg
- Maintain quad activation throughout flexion and extension
- Hinge back to standing
Perform 2 sets of 4-6 reps.
Take the movement nice and slow. Make sure you’re breathing and maintaining a neutral spine.
This exercise is also in our ROM Coach app if you want something to reference on the go.
The Sign Post
The last exercise used to be called the Hip Horizontal Extension Dissociation Technique, but we changed that to The Sign Post because it was a lot of syllables to remember.
The Sign Post works your rotation. It really targets those deep hip stabilizers, and it gets the psoas and, by extension, the SI Joint. It breaks the movement of hip horizontal extension from spine rotation and gives your obliques a good workout.
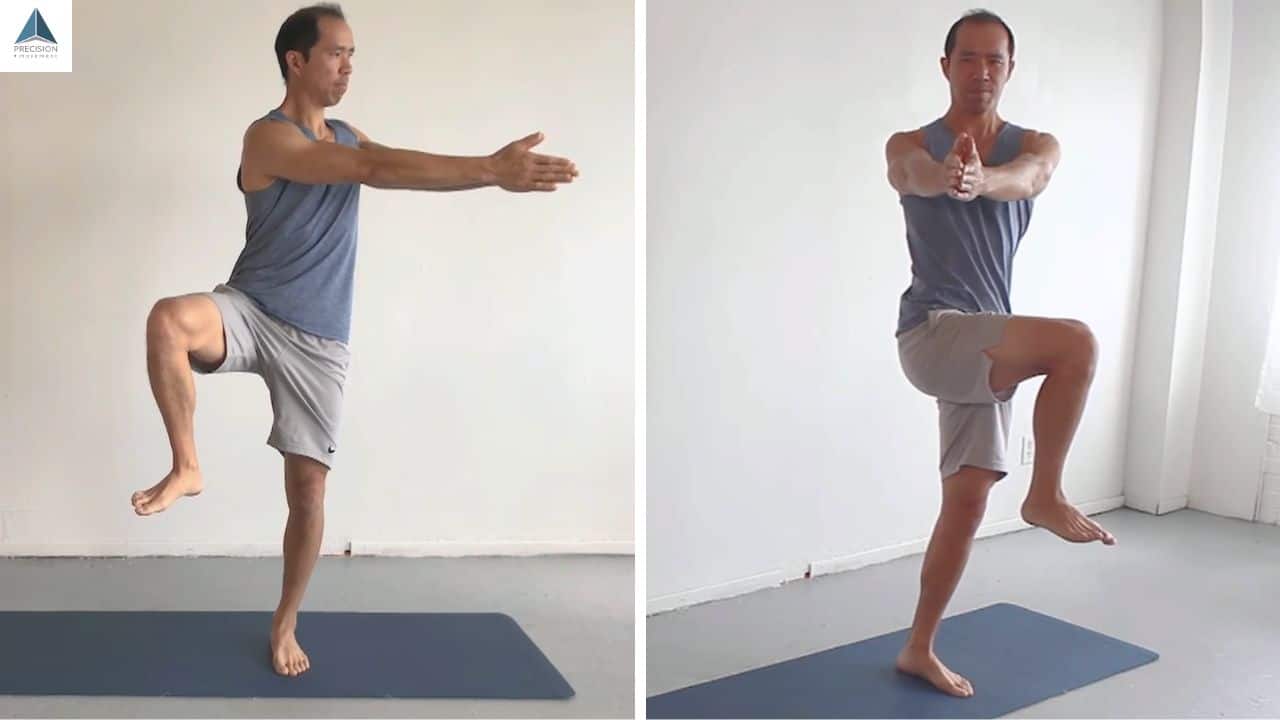
- Stand on one leg
- Place your hands together out in front of you
- Flex the hip to about 90 degrees, hold it there
- Horizontally extend the hip and rotate the spine in the opposite directions
- Hold for 5 seconds
- Move your hands and knees to the other end of your range of motion
- Hold for 5 seconds
- Release
Perform 2 sets of 3-5 cycles, alternating sides.
Remember to take big, slow breaths when holding at the end of your range of motion. Try to get a little deeper into the range each cycle, but don’t push it too much. Make sure you keep the knee high because that really gets the core firing and forces those deep stabilizers into activation.
Conclusion
There you have it, four exercises for a strained groin that will get you back to what you love in no time. Performing those exercises daily for a couple of weeks should give you a great start on building a deep hip pocket and activating any sleepy stabilizer muscles.
To take the next step toward movement longevity and prevent these painful mobility speedbumps, we developed a Hip Pocket routine. We talked earlier about the importance of a deep hip pocket, and this routine can get you there – preventing other issues like SI joint pain, impingement, and posterior pelvic tilt.
You can find it in our Foundation for Movement Longevity program. It also includes other routines that everybody should do if they want to move freely and without pain for the rest of their lives. You can download the Hip Pocket routine for free, via the link below.