
Learn how to prevent shoulder pain by mastering these five moves. They will give you strong, stable shoulders and a foundation for everyday movements.
Hey, it’s Coach E. Today, I’m going to talk to you about the shoulders. The shoulders are the area that I’ve been working with most recently. For instance, I saw a gymnast the other day who has been out for six or seven months. She can’t really train, couldn’t compete, and had a lot of issues. A volleyball player also came in recently who has had shoulder pain for 10 years. Then, a couple of baseball players who are out for various reasons.
So this article is going to be me sharing some really core fundamentals that I’ve seen necessary for all of these athletes to get back to their sports pain-free. Then, how to continue being pain-free while performing at that high level.
But because these are fundamentals, whether you’re an athlete or not, this information that you’re going to learn today applies to you. I hope you take it all in and put it to work, put it into practice.
This is going to help you develop strong, stable, and pain-free shoulders now and (most importantly) for the long term.
Let’s get to it.
Movement 1: Scapular Posterior Tilt
The first move to master is scapular posterior tilt. This is something that I’ve talked about many, many times, and there are a couple of different reasons.
One is because this move opens up the subacromial space in the shoulder so that the rotator cuff can pass through without getting impinged, aka subacromial impingement. Rotator cuff problems are the number one issue when it comes to shoulder pain.
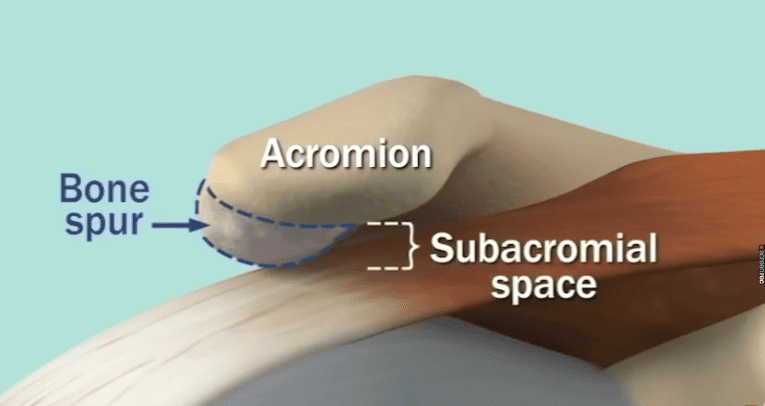
If we can create the proper space by opening up the shoulder joint so that the rotator cuff tendon doesn’t get worn down and pinched every time you lift your arm up overhead, throw a baseball, or serve a tennis ball, then that’s going to help you to move pain-free and to rehab injuries and prevent injuries in the future.
That’s why scapular posterior tilt is the first move you need to master. Basically, imagine that there’s a cup of water on top of your scapula (shoulder blade.) If you tilt it back, that’s posterior tilt. You’re dumping the water behind you.
If you tilt the water forward, that’s anterior tilt. You’re dumping the water forward.
Exercise 1: Slumpy Serratus Activator
If you want to follow along with these exercises on a video, click here to watch 5 Movement Everyone Shoulder Master for Pain-Free Shoulders on YouTube.
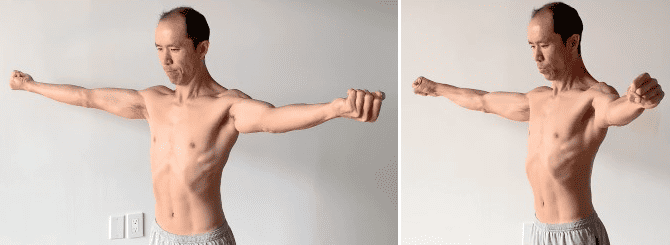
So, scapular posterior tilt is really, really important. Our favorite exercise for this is the Slumpy Serratus Activator.
This move has you starting off in poor posture, think rounded shoulders and spine. Then, you extend the shoulders back behind you, keeping the elbow straight.
As you straighten it, straighten up your posture. Think about how you’re holding an isometric at that end range. Think about posteriorly tilting the scapula while lifting the arms up as high as possible. Don’t hike your shoulders up into your ears. Keep the whole shoulder girdle down.
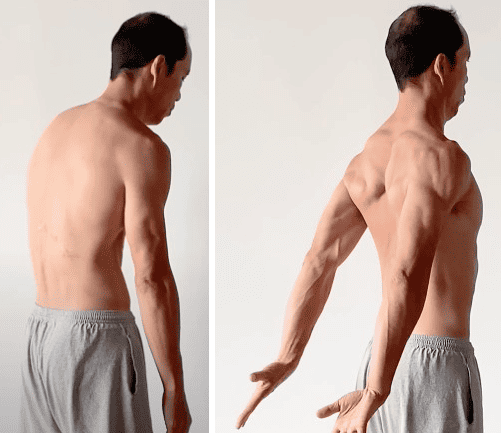
- Stand in poor posture
- Extend your arms straight back behind you, elbows straight
- Straighten your posture at the same time
- Hold your arms as far into your end range as you can for 10 seconds
Do 2 sets of 4-6 reps, holding for 10 seconds.
This move is very, very important for development strength in that serratus anterior, and it’s key that you fight yourself at the end range. When you’re holding, you’re fighting posterior tilt. Fighting against lifting the shoulders up, against hiking and shrugging the shoulders.
When you do that, fight, and you can get that battle going. That’s when you’re going to build strength.
Movement 2: Thoracic Spine Extension
The second move to master is Thoracic Spine Extension.
If you don’t have good thoracic spine extension, that puts you into poor posture, which will automatically anteriorly tilt your scapula. Every time you lift your arm up overhead, you’re going to pinch that rotator cuff tendon. You might pinch the bursa that’s in there. Either way, you’re going to pinch something, which will create inflammation, pain, and eventually wear down that tissue.
Thoracic spine extension is really important. It’s tough for many people to get because of the poor posture that’s so rampant in today’s society.
Exercise 2: Segmental Cat/Camel
One move to start with that can help to teach you this is the Segmental Cat/Camel.
Start off on all fours, hands and knees, and in full spine extension with anterior pelvic tilt – so stick your butt out. From there, you start from the bottom, posteriorly tilt the pelvis, and then flex the lumbar vertebrae one vertebrae at a time. Then you go to the thoracic spine and flex the thoracic vertebrae. Finally, you flex the cervical spine and look down towards your thighs. From there, you reverse that, starting from the bottom again. Go into anterior pelvic tilt and then extend through the lumbar spine.
This is where it’s really important. Extend the thoracic spine one vertebra at a time. Do not rush it. You should keep your head down as you’re working up the thoracic spine, slowly, segment by segment, until you get to the cervical spine. At that point, you can look up.
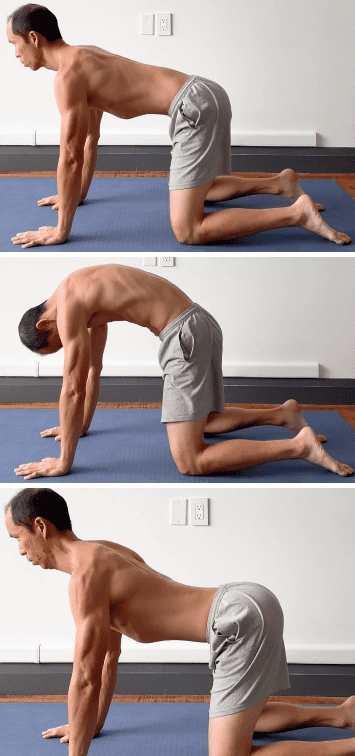
- Start on all fours with your back flat and butt pointed into the air
- Round downward, starting at your tailbone, one vertebra at a time
- Look at your thighs as you flex the top of your spine
- Starting at your tailbone, flatten your spine one vertebra at a time
Do 2 sets of 3-5 reps.
This exercise is going to restore this segmental movement that is fundamental to a healthy spine. It’s also going to activate the multifidus muscle, which is the muscle responsible for extending the thoracic spine in a segmental fashion. That will help stabilize this area so that the shoulder girdle and all those muscles that attach to the thoracic spine have a stable point from which to work.
It’ll also restore good posture, so you’re not impinging the bursa and the rotator cuff tendons when you lift your arm overhead.
Movement 3: Chin Tuck
The next move to master is what I call the Chin Tuck. It’s a combination of different movements of the body of the cervical spine. If you just think of tucking the chin, that is going to get you to do the movement that you need to do.
This movement activates the deep cervical flexor muscles. By activating these muscles, restoring the alignment, and lengthening through the cervical spine, you’re helping to shut off muscles like the sternocleidomastoid that runs on the side of the neck. You’ll also shut off the upper trapezius and levator scapulae, which run down the back of the neck.
When these muscles are overactive, they create a lot of tension through the shoulder joint and can hike the shoulder up. They also can contribute to that anterior tilt of the scapula.
All of these things are going to result in excess wear and wear. They’ll put more force through the shoulder and can lead to those problems we’ve been discussing, like subacromial bursitis or rotator cuff impingement.
Exercise 3: Wall Chin Tuck
To work the chin tuck, we’ll do an exercise called the Wall Chin Tuck.
Start with your back and your head flat against the wall. Take your head off the wall and bring your chin to your chest. Then you’re going to think of lengthening through the cervical spine like your head is being pulled up to the sky from a rope attached to the crown of your head. Stick your chin in towards your neck, like you’re trying to make double chins.
From there, your head, ideally, is touching the wall. If not, that’s fine. But think of pushing the chin towards the neck and rotating the top of your head forward to lengthen the cervical spine. Hold that for five seconds. Then repeat.
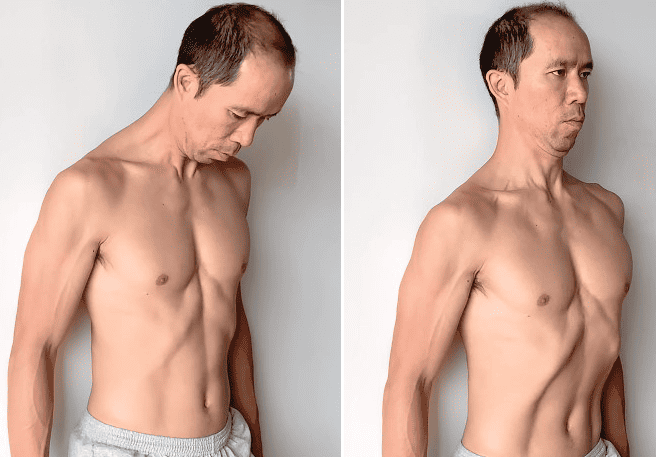
- Stand with your head and back against a wall
- Tuck your chin to your chest
- Rotate the top of your head forward
- Keep the back of your head against the wall if you can
- Hold for 5 seconds
Do 2 sets of 4-6 reps, holding for 5 seconds.
Movement 4: Axial Rotation
The fourth move to master is called Axial Rotation.
Now, you might have heard of internal and external shoulder rotation, but a lot of times, when people try to perform these, the movements are coming more from the forearms or more from the shoulder girdle and not from the rotation of the humerus in the socket. Or, in fancier terms, the head of the humerus isn’t properly rotating in the glenohumeral joints.
This exercise helps restore this movement and helps activate the internal and external rotators in the proper type of movement – a clear, pure axial rotation, keeping the head of the humerus centered in its socket as you move around.
It’s really important to maintain what we call joint centration. If you don’t have good joint centration when you move the arm around, you’re going to put excess stress on something. It could be the rotator cuff tendon, like we’ve talked about. Or it could be excess stress on some aspect of the joint capsule, depending on what position your arm is in when you’re moving.
This is really important for restoring a good, clean movement pattern of the shoulder.
Exercise 4: Shoulder / Forearm Rotation Dissociation
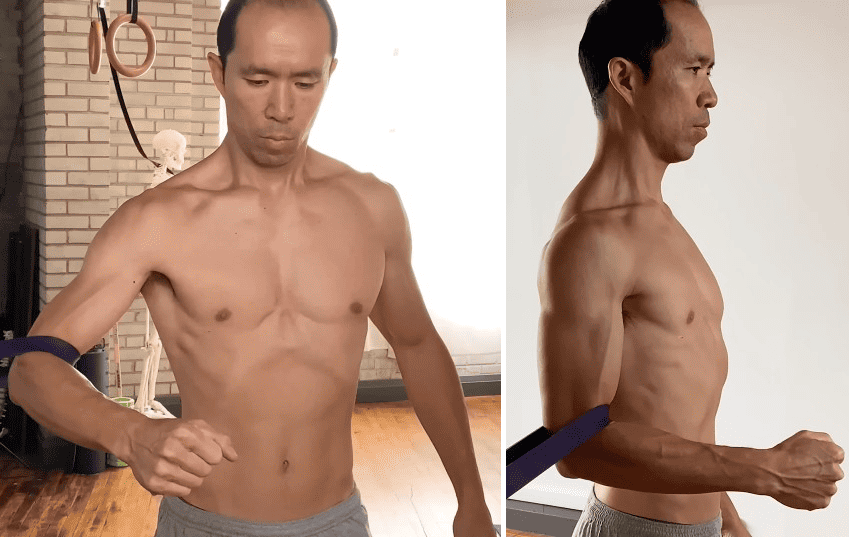
An exercise that we like to train this is the Shoulder / Forearm Rotation Dissociation. This one really opens people’s eyes to what might be lacking with their shoulder rotation.
For this technique, put your arms out to the side and forward slightly, about 20-30 degrees. From here, think of external rotation as much as you can from the bicep. You’re trying to turn the bicep up and backward into your end range of motion. From there, you maintain the position of the bicep, that doesn’t move, and then you rotate the fist and the forearm down as much as you can without moving the bicep. Hold that for 5 seconds.
Fight yourself trying to rotate the bicep more, so external shoulder rotation and rotate the fist and the forearm down and pronation. You’re fighting those two movements after about 5-10 seconds, turn the bicep down. Focus on bicep rotation down the forearm, and the fist will follow. Once you’re at the end range, keep rotating the bicep down as you open up the fist in the forearm.
It’s that internal shoulder rotation, fighting against supination, so your muscles are fighting against each other. That’s how they’re going to get stronger.
- Hands in fists, raise your arms out to the side, and 20-30 degrees forward
- Rotate the bicep so your inner arm moves toward the ceiling
- Rotate your fist and forearm down, holding the bicep in place
- Hold for 5 seconds
Do 2 sets of 3 reps per side. You can do both sides once you’re good at it. Hold each activation for 5 seconds.
Now, you can do this exercise one arm at a time if you need to focus on the movement and restore this movement. But once you get good at this movement, you can do both arms at the same time, just to make it a little more time-efficient.
Movement 5: Reversing
The fifth and final move to master for strong, stable, and pain-free shoulders is what I call reversing. This is a postural type of movement for shoulder girdle alignment. It’s going to activate the serratus anterior, the rhomboids, the mid-trap, and the lower trap.
When you master this movement, it’s going to help to decrease the activation of your pec minor and your biceps in pulling-type exercises. It could be an exercise like a one-arm row, a chin-up, or a pull-up. You can apply this movement to all pulling exercises like those when you get this movement down.
The movement itself basically looks like pulling the shoulder girdle back.
Exercise 5: Lower Trap Activator
You can really practice this when you do rowing exercises, but the exercises I like to use to teach this is called the Lower Trap Activator.
For this technique, you need a band set up at about elbow level. Stick your arm in the band with it resting just above your elbow. Line up sideways to the band, get nice and tall, good posture, and pull your elbow down towards your side. This is going to help to activate the lower trapezius muscle.
From here, you’re doing that reversing motion of the shoulder. It’s like a row, but you’re thinking posterior tilt and pulling the whole shoulder girdle back. Don’t let any downward rotation of the shoulder occur. Pull the shoulder back, hold it for 5 seconds, then slowly release.
- Place the band just above your elbow so the anchor is to your side. Good posture
- Pull the shoulder back
- Hold for 5 seconds
- Slowly release
Do 2 sets of 4-6 reps, holding each rep for 5 seconds.
Again, this exercise and this movement can be applied to any pulling movements that you do.
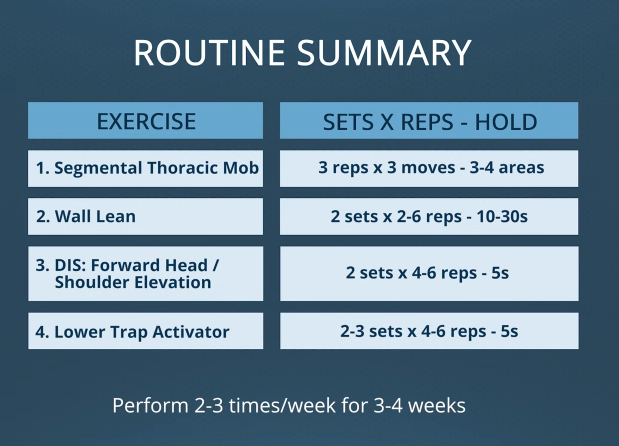
Routine Summary
Next Steps to Healthy, Strong, Pain-Free Shoulders
Our approach is a little bit different. It seems to be pretty successful because the average client I see these days has been in pain for six to seven months, and in that time, they’ve tried a number of things before they finally make their way to me. At that point, we’ve got to get to these fundamentals and work on them before we can do anything else.
If you like this approach and what you learn in this article, we have a couple of other articles on shoulder mobility for you.
My shoulder pain is no longer an issue. I play pickleball two to three times a week with no problems. I do strengthening and pushups and various exercises from the program. I am so pleased. I had a 40-year shoulder injury from volleyball and now I can do whatever I want. Thanks for all that you do. – AlisshaI wanted to report to you regarding the Shoulder Pain Solution.
4 Shoulder Impingement Tests to Differentiate from AC Joint Injury – learn how to self-test whether you have shoulder impingement or AC joint dysfunction.
3 Top Exercises to Activate and Strengthen Your Serratus Anterior – your serratus anterior plays a big part in shoulder strength and stability. Learn how to wake up this critical muscle.
5 Exercises to Fix Forward Head Posture that Actually WORK – stretching and “posture correctors” won’t activate the deep muscles that let you hold good posture effortlessly, all day.
How to Fix Rounded Shoulders – 3 Easy Exercises – good shoulder posture, as we covered, means you’re not pinching tissue every time you raise your arm.
We don’t just look at the painful area, but we look at all of the adjacent areas and muscles that could cause the compensations. We’re looking at the reasons behind the wear and tear pain. If you like this approach and want us to lay this out for you step-by-step with what you should do next based on your current level of shoulder pain, then take our free Shoulder Pain Assessment.
Thanks for joining me here today. I hope you learned something new and valuable. See you next time. Peace.