
Learn four exercises to improve shoulder mobility and their progressions and wake up muscles you’ve never worked before that give you lasting gains.
Consistently increasing your range of motion and your strength at your new range of motion is the key to achieving mobility gains that last.
Hey, this is Coach E, and today I think you’re going to really understand why we’re called Precision Movement. We’re going to go through a number of different exercises where you’ll be taught various cues. As you go through the video and the exercises a number of times to repeat the routines that I’m going to share with you, you’ll feel the difference in how the exercise challenges your body and how the exercise feels after you’re done.
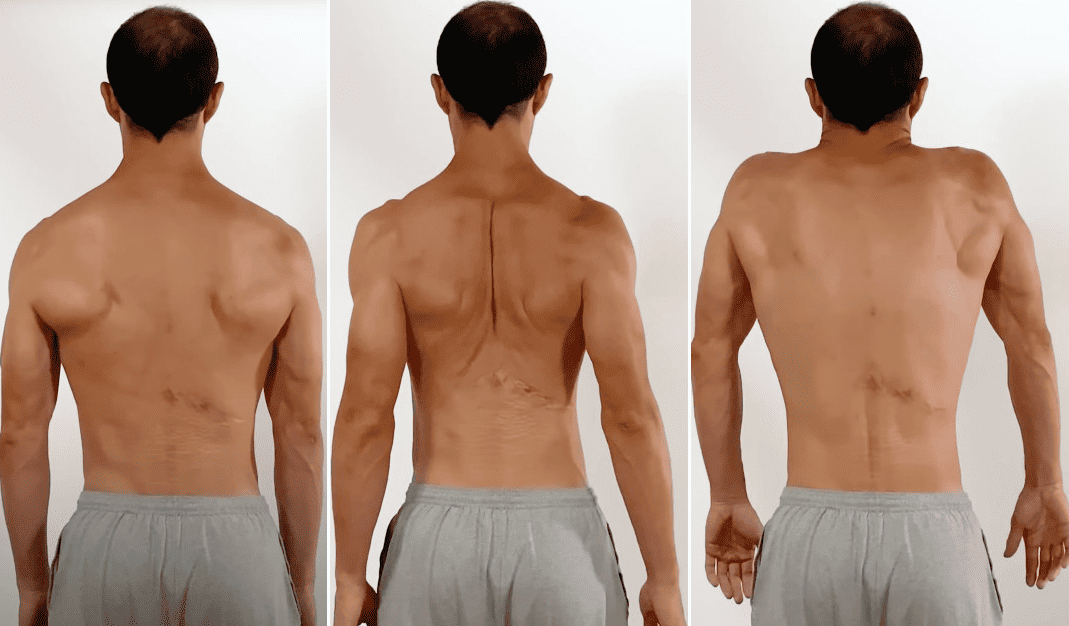
This article is really important, especially for people who suffer from shoulder pain or pain in their body and want to improve their mobility, their function, and their ability to do different techniques, whether it’s in sports or recreational activities.
But when they think of mobility or flexibility, they think of static stretching. That’s the common go-to for people.
I can’t tell you how many clients that I’ve seen come in here with pain that hasn’t been resolved over months. The average amount of time someone has been in pain before they come to see me is around five to seven months. Whenever I go through their history and look at what they have done between when the pain or the injury first happened and when they’re seeing me, I inevitably find a number of static stretches in their rehab programming, which is problematic.
Let’s think about it for a minute.
If a tissue, muscle, or tendon is already torn and you just pull on it for 30 or 60 seconds, trying to go for an uncomfortable stretch, what do you think is happening to that tear? How do you think the irritated or damaged tissue is responding to the stretch?
Well, the chances of it becoming more irritated, more damaged, more torn are pretty high.
Active exercises are what we predominately prescribe. That’s like 99% of the exercises in our ROM Coach app. There are over 200 exercises there, and we have maybe three static stretches out of all of those.
Even if static stretching did improve your flexibility, it’s not improving your strength, joint stability, or joint control. You’re missing out on these other elements that are required for function. If you’re just sitting there, stretching, and it relieves the pain a little bit, then more power to you. But if you’re going out and playing tennis, running, doing CrossFit, or whatever it is that you’re doing, you need your muscles to be controlling your body and providing stability to your joints so you don’t get injured and so that joints don’t get further damaged.
Exercises to Improve Shoulder Mobility
If you want to follow along with the shoulder mobility exercises and their progressions watch 4 Incredible Shoulder Mobility Exercise Progressions on YouTube.
Exercise Progression 1: The Pinwheel
The first exercise we’re going to cover is the pinwheel.
The Pinwheel is great because it trains a range of motion most people don’t go into, which is behind the body. It also gets the internal and external rotators doing axial rotation and really focuses on the retractors and the reversers.
Now, if you’re not too familiar with those last few terms, we’ve got an article called The 5 Fundamental Movements to Prevent Shoulder Pain . Take a look there for in-depth explanations.
For the Pinwheel, start off standing in good alignment and good posture. You’re going to bring one arm up overhead and the other arm down below. Try to touch the hands behind your back. This is also known as the Apley’s Scratch Test.
From here, you’re going to straighten your elbow out, and then you’re going to move the shoulders through – rotate, straighten, and switch arm positions. Move nice and slow. Maintain good posture.
Make sure you’re not hyper-extending your lumbar spine. Keep your lumbar spine relaxed. Keep your chin tucked to maintain that good alignment. Keep going back and forth.
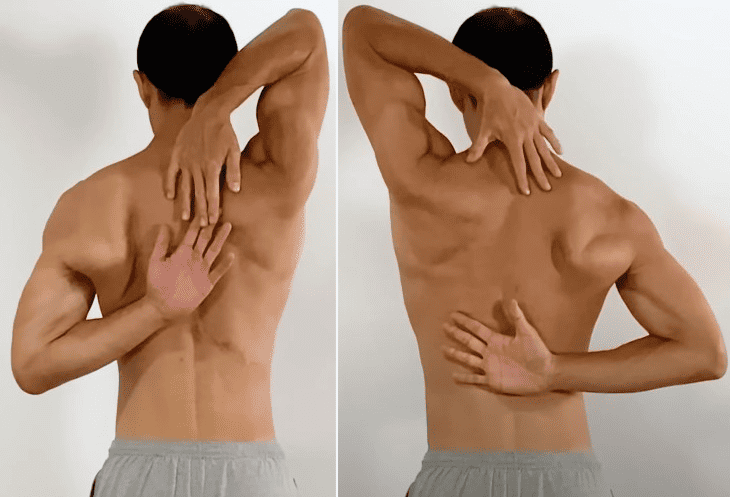
- Stand in good posture
- Raise one up arm and lower the other
- Bend at the elbow and try to touch your hands behind your back
- Straighten the elbows, rotate, and switch which arm is up and down
- Bend at the elbow and try to touch your hands behind your back again
Do 2-3 sets of 3-5 reps.
The progression of the Pinwheel is the Prone Pinwheel.
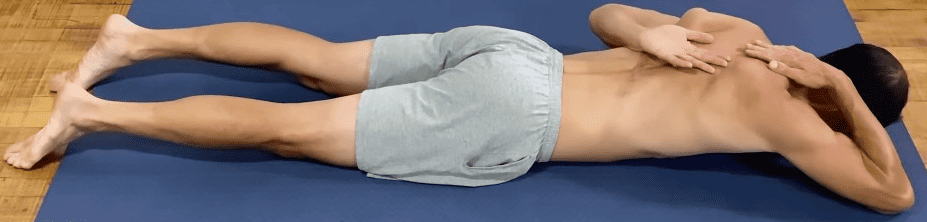
Prone means lying down on your stomach, face down on the floor. The difference with this exercise is now we’re using gravity to achieve greater activation of the retractors and the reversers. The one difference here is you’re really trying to drive your arms up away from the floor the whole time as your hands are behind your back and when your arms are switching positions.
You may have noticed that your hands didn’t necessarily touch behind your back on both sides for both progressions. Don’t worry about this. Just try to go through your full range of motion and work to push that range of motion.
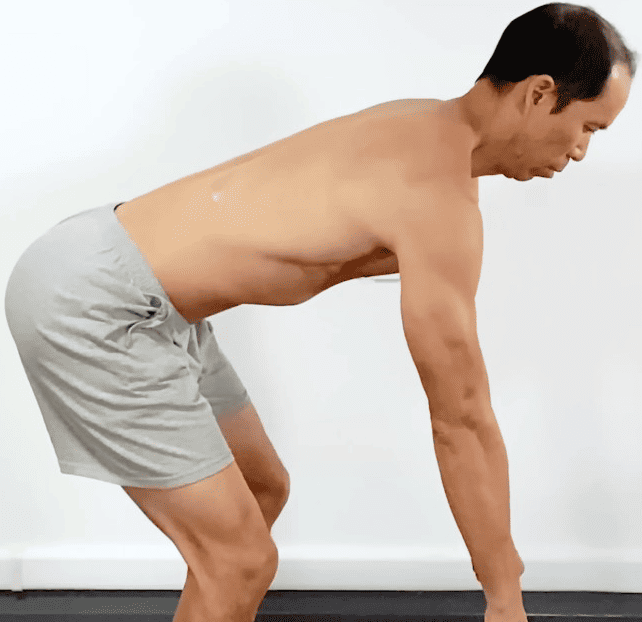
Exercise Progression 2: Rollout
The next group of exercises is great for integrating the shoulders with the core. We’re starting this one off with the wall rollout. It’s kind of like doing an ab wheel rollout, but on the wall.
For this technique, you start off putting your hands on the wall if you have enough space to slide your hands up and down. Start off with your hands flat on the wall in front of you and lean into the wall slightly. Step your feet back a little bit. From here, engage the abs to keep the rib cage down. Avoid that rib cage flare. You’ll maintain this throughout the exercise with straight elbows.
Raise the arms up slowly. Slide the arms up overhead as far as you can while maintaining the core stability and preventing that rib cage flare. Go back and forth, making sure that you’re breathing naturally, which is really important to train with core stability. You’re avoiding any movement at that lumbar spine.
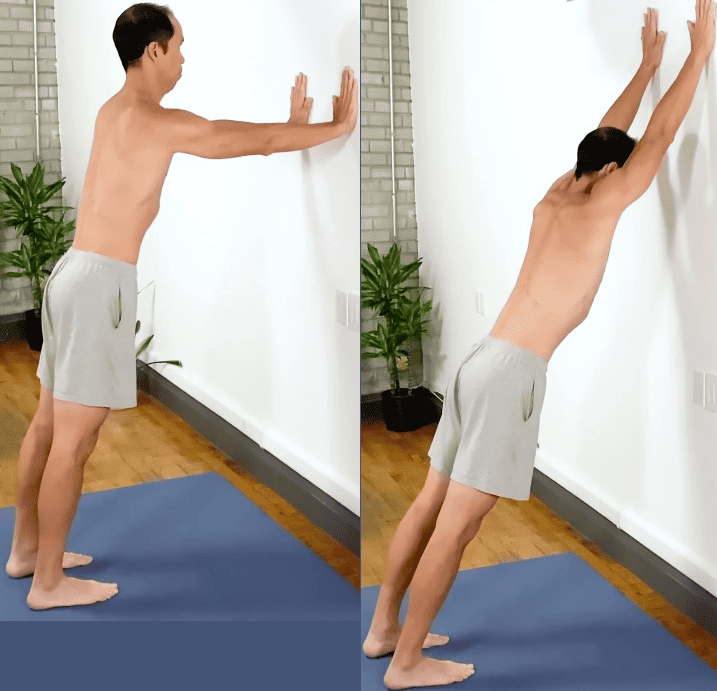
- Start with your hands flat on a wall in front of you, leaning in with your feet 2-3 feet away
- Engage the abs
- Slide your arms up the wall as far as you can
- Slide your arms back down in front of you
Perform 2-3 sets of 6-10 reps.
Now, this exercise is great because a lot of times, people who lack shoulder flexion range of motion compensate through their lumbar spine. Then, they end up with low back pain because they’re hinging so often at the thoracolumbar junction. That’s where the thoracic spine meets the lumbar spine. When they go to treat their low back without dealing with the shoulder range of motion, it’s never going to be stabilized or fixed.
To progress this exercise, we’re going to use the stability ball and do the Stability Ball Roll Back.
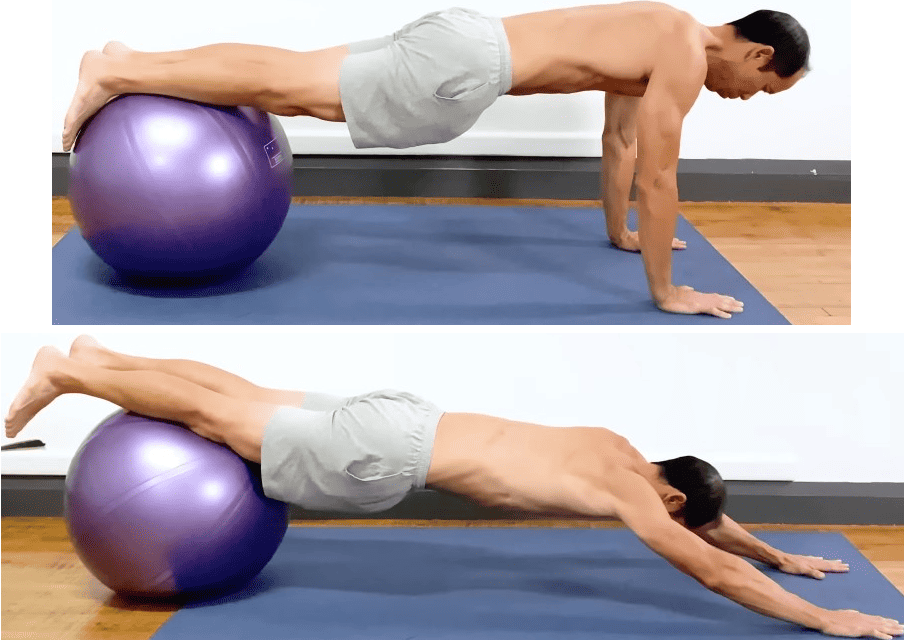
This takes it up a notch. Again, we’re going to this prone position, but here, we’re going to have our hands on the floor and our feet up on the ball or our legs up on the ball. It’s a little bit easier if you put your legs on the ball compared to your feet. From here, the same rules apply. Engage the abdominals to prevent that rib cage flare. Keep your elbow straight and then push your body back so you become flat, which is the same arm movement, which is shoulder flexion, to get the full range of motion you can get to without losing stability through the core and without bending the elbows.
Then, slowly pull yourself back to the start position. Keep going back and forth while breathing naturally throughout. Again, try to train your ability to breathe while maintaining core stability.
Now, this variation not only increases the load because of gravity, but it increases the challenge due to the instability of the ball. That’s going to help wake up other muscles that aren’t used as much when you’re on a stable surface like the wall.
Exercise Progression 3: Scap Circles
The third group of exercise progression are Scap Circles.
Now, this one has a number of different variations that you can do. It’s not necessarily that one variation is better than another.
It’s just that each one is going to target the muscles and the shoulder girdle in a specific way because of the orientation of the body.
The base technique is starting off and making sure you’re in good posture and alignment. Pay attention and avoid changing the spinal alignment as you perform the exercise.
Oftentimes, the head will want to jut forward. Avoid doing that.
The goal of this exercise is to make the scapular movements as big as possible.
Start off retracting, pulling the shoulder blades back together. Again, make sure you’re not moving your spine. Lift them up as high as you can while keeping them back. From here, you keep them up high as you protract the move forward. Then, keep your shoulder girdle as forward as possible as you go down and depress the scapula. Finally scrape the bottom, keeping the scapulae down as you go back and retract.
Repeat.
You’re making the circle or the square. You can think of four sides of a box as big as possible. One set will be doing this in one direction and one in the other direction.
- Stand in good posture
- Retract – pull the shoulder blades together
- Lift – move them up
- Protract – move forward
- Depress – move them down
Do 1-2 sets of 3-6 circles per direction.
Now, we’re going to quickly go through four variations.
Remember the key techniques and form cues we discussed and apply them to these four different positions.
The first position is the hinged position. Start from standing and perform a hip hinge. You’re going horizontal or trying to make your torso as horizontal to the floor as possible. This will put greater emphasis on the retractors and the posterior shoulder muscles and less emphasis everywhere else.

Next up, you could go with your hands on the floor, either in a four-point stance or a front support, like a push-up position. Here, a greater emphasis is on protraction because you’re pushing away from the floor, and you’re fighting gravity. That’s going to work muscles like the radius end here more than the retractor muscles, like the rhomboids and the low and middle trapezius.

The next variation has you inverted or hanging. Whether it’s under a bar or a set of gymnastics rings. Again, we’re going to put more emphasis on the retractors, just like the hinged version. However, this time, you’re fighting against your body weight, so it will be more challenging because there’s a greater load as opposed to when you’re hinged and just lifting the weight of the arms.
The fourth and final variation is the neutral support position. This one you can do with your hands on a chair behind you, or you could do it on a set of gymnastics rings. You’re supporting your whole body weight this time, which makes it infinitely more challenging than if you’re doing it on a chair behind you and your feet are resting on the ground. But again, the same rules apply.

Maintain a neutral and quiet spine so it doesn’t move as you perform the exercise, and make those circles or squares with your scapula as big as possible.
The one variation you might be thinking about after I’ve gone through those previous four is an overhead variation. Whether you’re holding weights up overhead or you’re in a handstand position, this is one that I wouldn’t necessarily recommend just because you’re putting a lot of load on your shoulder girdle. You’re also going into an impingement position, which would be scapula and shoulder blades down and back with the arms overhead.
This is a common error. People are often taught by trainers or coaches to keep their shoulders down and back when they’re doing exercises like presses or handstands. That’s just going to cause some impingements in the shoulder and can irritate the rotator cuff tendon, the biceps tendon, the labrum, or the bursa.
Let’s avoid that variation. We’ve got enough to play with to build strength, stability, and function in our shoulders.
The one great thing about all the variations here with the scap circles is that we’re training the same range of motion with different emphases on different muscles and different movements.
This is one way to solidify any gains of range you might make because your brain will realize, “Oh, I have strength and control throughout this full range of motion, all these muscles, and all these different patterns.”
That becomes really hardwired. It becomes difficult to lose. So once you get it, it’s really easy to keep it.
Exercise Progression 4: The Sword
The fourth and final shoulder mobility exercise progressions start off with the sword exercise.
The sword is a very common exercise prescribed in rehab where you’re training abduction flexion and external rotation.
Start off with a cable attached down low. Your arm is across your body like you’re about to unsheathe a sword. From here, you’re going to lift the cable up in a diagonal motion across the body until your palm faces forward.
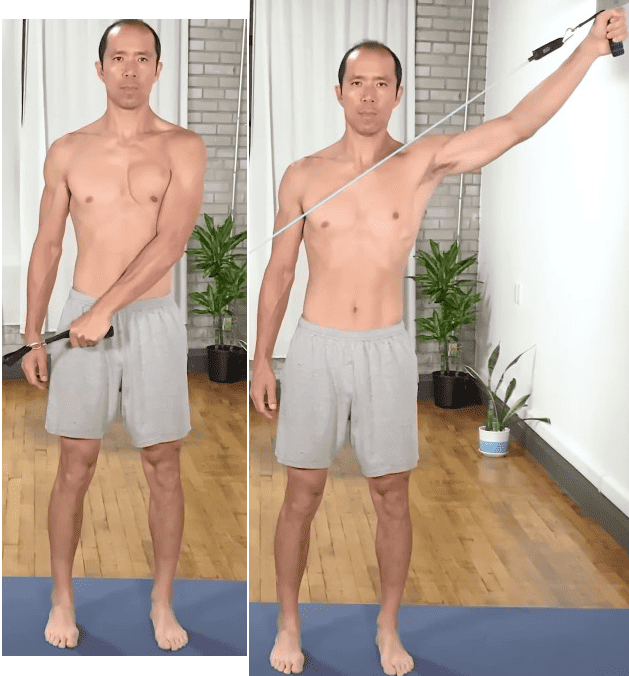
- Anchor a cord low and stand with your side to it
- Hold it low in the hand on the opposite side
- Raise your arm across your body, like you unsheathing a sword, until you’re holding the pretend sword above your head
Do 2-3 sets of anywhere from 6-10 reps on each side.
Throughout these exercises, maintain a neutral spine without rotating the body and staying really stable.

The progression to the sword is what I call the rotational sword. This is a full-body exercise that incorporates the rotational plane of movement.
For this variation, you’re starting the same way with your hand and the cable starting low. But now, you’re going to rotate and face the cable and put most of your weight on the foot that’s close to the cable.
From there, you’re going to do the same arm motion and unsheathe the sword. But then you’re going to shift your weight to your other foot and end up in a position where it looks like you’re holding an Olympic torch.
This exercise incorporates the full body and trains the rotational place of movement. It’s great for athletes like tennis players, baseball players, golfers, and anybody who rotates in their sport.
My shoulder pain is no longer an issue. I play pickleball two to three times a week with no problems. I do strengthening and pushups and various exercises from the program. I am so pleased. I had a 40-year shoulder injury from volleyball and now I can do whatever I want. Thanks for all that you do. – AlisshaI wanted to report to you regarding the Shoulder Pain Solution.
Next Steps
Those are four exercises to improve shoulder mobility and their progressions. I hope you got something new out of them.

Perform these routines for 3-4 weeks at 2-3 days per week for the best results.
Remember to pay attention to the form cues. That’s why we’re called Precision Movement.
If you want some more information on keeping your shoulders healthy, try these articles:
New Shoulder Mobility Exercise (My Current Fave) – if you’re only going to do one shoulder mobility routine, or you’re short on time, make it this one. It’s a single exercise.
The 5 Fundamental Movements to Prevent Shoulder Pain – these five moves will give you strong, stable shoulders and a foundation for everyday movement patterns.
Finally, if you want us to guide you through everything in a progressive fashion, check out free Shoulder Pain Assessment Quiz. This will help you identify whether you should focus on your pain or mobility and then give you the next steps to get you back to maximum function so you can live the active life you love.