
If you have bicep tendonitis, we will cover four simple exercises to address the issue before it reaches the worst-case scenario of tendon rupture.
The good news is that this routine won’t just help prevent the worst-case scenario. You will also strengthen the supporting muscles to get back to pain-free shoulders for good.
This article will specifically cover the underlying causes of proximal bicep tendonitis.
Let’s start.
With proximal bicep tendonitis, most people have pain in the front of the shoulder. You can often feel the tendon. Look for the division in the deltoid in the front of your shoulder. Place your thumb in the division, then hold your elbow at a roughly 90-degree angle and rotate your forearm back and forth. You will feel the groove where the tendon sits.
If you touch it and it’s painful, that indicates that some work needs to be done to restore pain-free movement.
Focusing on preserving the long head of the biceps against wear and tear can help provide a speedier recovery after shoulder surgery and the ability to restore normal shoulder mechanics.
Symptom Management
Let’s say you’ve had a shoulder pain that keeps showing up. It is centered at the front of your shoulder and is starting to drive you nuts.
At first the pain would come and go, but now it’s becoming more constant.

The pain has alternated between dull and achy to sharp and focused. The sharp pain tends to really show up when you are reaching above you – say to grab some glasses out of your cabinet or shoot a basketball at the hoop.
You first try to ice the tender area, holding an ice pack to the front of your shoulder as you relax at the end of each day, but nothing really changes.
So you switch to heat, hoping a heating pad will help ease the pain. Unfortunately, you don’t have much luck.
You try stretching the area – doing your basic shoulder and upper arm stretches to no effect. You start popping some over the counter pain meds, but whatever brief relief these give you never last.

You’ve tried everything to treat this site of pain, but sustained relief never comes.
Why? Because the pain you’re trying to treat is biceps tendonitis and is actually a symptom of a more complex issue. And trying to treat that symptom without addressing the root cause isn’t going to get you very far.
Bicep Tendonitis Basics
Bicep tendonitis (or biceps tendinitis as it is sometimes spelled) is inflammation and aggravation of a tendon connecting your biceps muscle to your shoulder.
This inflammation can cause pain at the front of the shoulder, plus other symptoms like tenderness and weakness.
The pain may be sharp or dull, and it might radiate down the arm or the neck [1]. The pain and weakness may get worse after or during activities, especially those that involve overhead motions like throwing or lifting.
There are two upper tendons of your biceps – the long head and the short head. The short head originates from the coracoid process of the scapula and the long head originates from the supraglenoid tubercle. The long head of the biceps tendon is usually the culprit in biceps tendonitis.
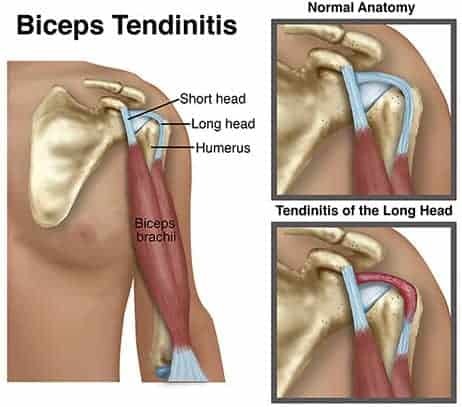
Image by www.moveforwardpt.com
Excessive or improper forces on the tendon (which may be caused by a variety of reasons that we’ll get to later) can lead to this initial aggravation.
At first, your tendon starts to swell and the area becomes sensitive and inflamed. Over time, the tendon covering might start to thicken and enlarge, further aggravating the area [2].
It’s important to understand that the inflammation itself, or the tendonitis, is more of a symptom than anything. It is NOT in and of itself the real root cause of the pain.
In some cases, all of this irritation and swelling can eventually lead to a tear of the tendon. However, that is a pretty extreme case, and not what we are going to focus on here.
Instead, let’s focus on getting this inflammation under control before it gets to that point. To better understand the situation and what can go wrong to cause bicep tendonitis, let’s take a deeper look at the anatomy of the area.
Biceps Biomechanics
There are three bones that come together to make up your shoulder joint – your scapula (or shoulder blade), your collarbone (or clavicle), and your humerus (or upper arm bone).
The round head of your humerus sits into a shallow cavity in your scapula, called the glenoid cavity. These two parts make up the “ball” and “socket” of this ball-and-socket joint.
Along the front of your humerus sits the biceps muscle. The muscle works mainly to flex the elbow and supinate (or rotate outward) the forearm. However, the muscle also helps to provide some flexion at the shoulder joint [3].
As we’ve touched on, the biceps originates at two different parts of the scapula. As the muscle runs upwards, becoming the biceps tendon, the tendon separates into the two distinct branches. The short head attaches to the coracoid process on the front of the clavicle.
The long head runs up the bicipital groove of the humerus. It then crosses over the head of the humerus before attaching the very top of the shoulder joint, at the glenoid cavity.
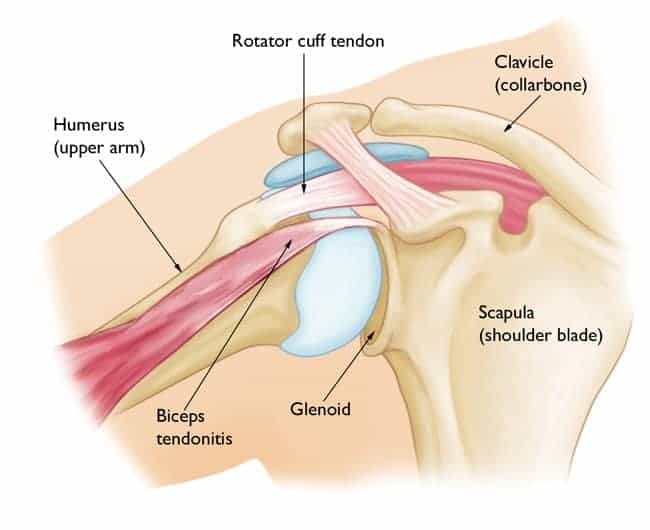
Image by www.orthoinfo.aaos.org
At the distal, or far end, it crosses the elbow and inserts onto your radius, in the forearm. However, it is the origin of the long head of the biceps tendon, at such a crucial spot, that sets the tendon up for vulnerabilities to inflammation.
Getting to the Root of Bicep Tendonitis
Because both heads of the biceps are connected to your shoulder blade, the position and functioning of these two structures are very closely tied.
If your biceps is tense and tight, it can produce a pulling force on the scapula, interfering with its position and functioning.

And conversely, if scapular positioning is out of whack, the biceps tendon might start to get impinged, pinched, or otherwise aggravated by the surrounding structures.
This brings us to the real, root causes of bicep tendonitis – the causes you will have to address if you want to see results, and not end up like the frustrated symptom-treater at the beginning of this article.
There are 3 main causes we are going to focus on: scapulohumeral rhythm, poor posture, and rotator cuff dysfunction.
1. Scapulohumeral Rhythm
One common cause of bicep tendonitis is trouble with scapulohumeral rhythm – how the shoulder blade and upper arm move and function together.
This is important in both overhead and horizontal movements like pushing and pulling.
To lift your hand up to throw a ball or grab something off a high shelf, these two bones have to move together harmonically.
The scapula has to rotate the whole glenoid cavity upwards, at which point your upper arm can move freely overhead.
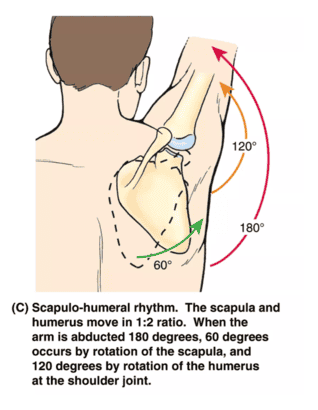
Image by www.physio-pedia.com
The two work in something close to a 2:1 ratio – for every 2 degrees of elevation coming from the humerus in the glenoid cavity, there is 1 degree of rotation coming from the scapula [4].
If your scapulohumeral rhythm is not functioning properly, impingements and pressure can result, causing excess tension and stress on structures like the long head of the biceps tendon.
2. Poor Posture
Poor posture is also intrinsically related to biceps tendonitis, although this connection may not seem very obvious at first. It all comes back to how posture affects the position of the scapulae, which as we’ve seen, affect the functioning of the biceps tendon.
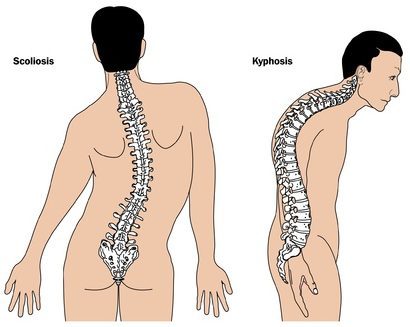
Having an upper back that is hunched forwards (also called thoracic kyphosis – a condition all too common in the modern age) means that your shoulders are constantly rounded forward too. The posture creates improperly positioned scaps and all sorts of trouble [5].
This rounded back creates a less than ideal surface for scapular movement – in turn increasing the likelihood of issues with scapulohumeral rhythm and other dysfunctions at the shoulder joint.
3. Weak Rotator Cuff / Dysfunction
If the rotator cuff is weak or dysfunctional, then the biceps or other ill-suited muscle has to pick up the slack. Most commonly, your biceps will help attempt to maintain the dynamic alignment of the movement patterns or joint centration of the shoulder.
But the biceps can’t do as good of a job as your rotator cuff when it’s functioning well. So the biceps gets sore and overworked doing a job that it isn’t great at in the first place. That results in inflammation which turns into pain over time. It’s working more than it should and doesn’t get the recovery time required for the work it’s doing.
Exercises for Bicep Tendonitis Rehab
First, if you’re in acute pain, say 5 out of 10, the simplest thing to do is ice the area for 15 minutes, three times a day.
Acute Pain Pendulums
- Bend over at the waist
- Let your arm hang with gravity doing all of the work
- Gently sway your arm or swing it in a clockwise then counterclockwise motion
- Repeat for 5 minutes every hour
Performing pendulums and gentle isometric contracts (hold the wrist of your sore arm, then push and hold against your hand for 5 seconds) can really settle that acute inflammation. It won’t take your pain entirely away, but it should move the intensity from a 5/10 to around a 3/10.
Once you’re in that lower pain range, you’ll be ready to move on to the four exercises that will restore proper function and get your shoulder out of a wear and tear habit.
Quick Recommendations Before Diving In
If you know you have rotator cuff issues, skip over to our rotator cuff video and give those exercises a try first. They’ll put you on the road to recovery faster because you’re addressing the root cause.
Second, forward head posture can mess with your shoulder alignment. That stems from sleepy muscles around your spine, usually combined with sitting for hours at at time. Give these exercises a try for good spine health and getting your shoulders back in alignment.
Even if you don’t do them right now, you can use the save button on YouTube to bookmark the videos and try the exercises when it’s more convenient.
#1) ASMR: Biceps
This first exercise will release the short and long heads of the biceps. It’s crucial that the biceps tendon can glide properly. The short head of the biceps (the one that comes off the coracoid) can become tight. Over time that tightness will bind the long head of the biceps and prevent it from gliding the way it should.
- Place your thumb at the junction between your pec and your biceps
- Start with your arm curled, then slowly straighten it
- While uncurling your arm, move your thumb down a little toward the elbow
Repeat for 1-2 minutes, moving your thumb down your arm as much as you wish.
You may feel tender because your thumb is putting pressure on the long head of your biceps. You will also notice that at full extension, your shoulder moves back as you extend your arm. That will put a slight extra stretch onto the long head of the biceps, which can further help release tension in the area.
#2) Active Overhead Stretch
The active overhead stretch releases some tension on the biceps. At the same time, it also activates the rotator cuff muscle (the serratus anterior) so that the biceps doesn’t have to do all of the work of the shoulder joint sensation and stability on its own.
- Face a wall and stand close
- Place your arm on the wall above your head, you may have to lean toward the wall to get a little bit of a stretch through the biceps and lats
- Keep your arm straight and locked out
- Tuck the bottom of your scapula in toward your body (posterior tilting)
- If you can lift your hand off the wall, do so.
a. If you cannot, gently move your shoulder toward the wall to stretch the area and improve your ROM - Simultaneously, pull your humerus (upper arm bone) into the shoulder socket to activate the rotator cuff
- Hold for 5 – 10 seconds
Perform 1-2 sets at 3-6 reps each. Start slow and work up to 6.
#3) Extended Elbow Wrist Fl-Ex
The extended elbow wrist flexion-extension develops the strength of your biceps at the lengthened range of motion and terminal elbow extension. It also helps fire up your other rotator cuff muscles that contribute to the stability and centration of the joint.
- Begin with your arm extended in front of you, palm up, and elbow slightly flexed
- Ramp up activation of the biceps (focusing on the medial/inner aspect) and triceps
- Keep your muscles at full activation and slowly extend your elbow
- Continue extending your elbow to full terminal extension (not hyperextension)
- Flare your fingers and extend your wrist (hand moves backward) while maintaining elbow extensions
- Move to wrist flexion without changing elbow extension, and activate wrist muscles
- Hold for 10 seconds
- Release wrist flexion to neutral and slowly return your elbow to slight flexion, and release.
Repeat for 3 reps, and perform 1 or 2 sets.
Remember to breathe while doing this exercise. It’s normal at first to hold your breath while focusing on muscle activation.
Most people are weakest toward their terminal elbow extension. This exercise will strengthen those muscles and practice co-contraction of the rotator cuff muscles for the stability of your shoulder.
#4) Shoulder Circle Crossover
The shoulder circle crossover is one of Coach E’s favorite shoulder mobility exercises. So much so that he included it as one of the Fundamental Precision Movements.
For bicep tendonitis, the top half of the circle will net you the most benefit.
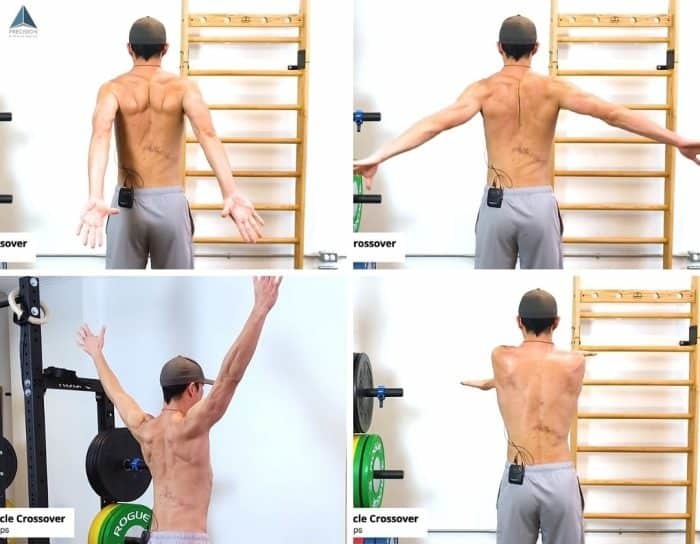
- Stand straight with your arms horizontally extended, palms facing forward
- Pull your shoulder blades together into extension
- Rotate your palms so they face backwards
- Bring your arms back behind you into further into shoulder extension
- Sweep your arms up as you rotate your palms forward until they meet at the top
- Focus on good spine posture and breathing
- When your hands meet at the top cross them in front of your body until they’re crossed horizontally in front of you
- Reverse the motion until your palms are behind you facing backward (step 4)
Repeat for 3 – 6 repetitions, and perform 1-2 sets.
This will get tiring fast because you’re maintaining constant muscle activation at full range of motion. Start slow and work up to the high end of sets and reps as your muscles strengthen.
Final Thoughts
Perform this routine 2-3 times a week for four weeks.
If you’re having some pain in the bicep tendon as you’re doing the exercise, that’s a great clue that you’re either missing activation, or you’re missing the alignment.
You can use two cues for yourself: try and pull the humeral head (maybe think of sucking the humeral head) toward the glenoid throughout the full range of motion. The second cue is to double-check that you’re getting the posterior tilt of your scapula.
These cues should alleviate any kind of impingement pain you might have going through this routine.
A helpful way to remember to do this is scheduling these routines in the free ROM Coach app.
It will send you a reminder, and there’s a helpful follow-along video. You’ll also get recommended progressions based on how many times you’ve performed the routine.
Thanks for reading. Performing the routine for a few weeks should help keep you doing whatever it is you love to do.