
Don’t stretch! You might make it worse. Instead, spend ten minutes doing these three exercises to relieve sciatica pain and learn the root causes.
I’m assuming if you’re here today, you’ve got a pretty bad pain in your leg, and that’s not fun.
Stick with us, and we’re going to review some of the steps that you can take to relieve your pain and get to the root cause of your sciatica.
Sciatica Symptoms
Sciatica is a syndrome, not actually a diagnosis.
The syndrome is pain in your buttock that radiates down the back of your leg, often into the calf or foot. It can be associated with numbness and tingling, again in the back of the leg, into the sole of the foot, and the toes.
It can also be associated with weakness in the muscles of your leg and sometimes paralysis.
The 2 Common Sciatica Causes
Sciatica occurs whenever there is pressure applied to the sciatic nerve.
The two most common causes for pressure on the nerve are either a herniated disc. If the central softer material from the disc herniates out of its normal location, it can put pressure on the sciatic nerve. You may have heard of this referred to as a slipped disc.
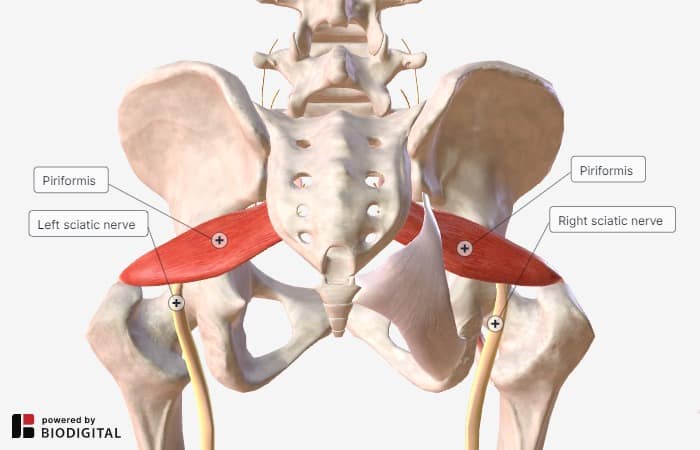
The second common cause is pressure on the sciatic nerve from a tight muscle, most commonly the piriformis.
The piriformis muscle can get too tight if other muscles in the pelvic floor, hip region, and core aren’t working properly. Then the poor piriformis has to take over and do too much work. It gets tight and puts pressure on the sciatic nerve.
The pressure on the sciatic nerve from a tight muscle or from a disc herniation can create pain down the leg with possible weakness and numbness.
If You Have These Red Flags, See Your Doctor
There are some important conditions to rule out if you do have the symptoms of sciatica. If you have anything on the following list, go to your family doctor to have an x-ray of your back and a physical examination to make sure that there is nothing more ominous causing your symptoms.
- Weight loss
- Fever
- Night sweats
- History of cancer (personal or family)
The second diagnosis that we need to be worried about is Cauda Equina Syndrome. If you have symptoms of numbness or tingling in your perineum or you lose bowel or bladder control, we consider this a surgical emergency. Go straight to the emergency room.
Should I Get Surgery for Sciatica?
Surgery is rarely necessary if you have sciatica. The main indication for surgery would be somebody with severe pain in their leg that can’t be managed with medication combined with significant paralysis.
This is a tough call.
In my experience, the disc will eventually shrink or atrophy. After about six weeks, the symptoms of leg pain usually resolve. If there is weakness it takes much longer for the motor function and strength to return to the leg.
There’s no question if you do have surgery to remove that piece of the disc, the next day, your pain is improved.
It’s variable whether or not your nerve will recover faster or not, but there’s some suggestion in the literature that it may.
What you have to do is weigh the risks of surgery, which could be:
- Infection
- Damage to the nerve root
- Cost
- Ability to actually get into surgery within six weeks(some places)
The downside really is that one year out from the operation or from having acute sciatic symptoms, your condition is going to be the same whether you’ve had surgery or not.
The only time that I consider surgery is in a young person who is very active with paralysis and severe pain that can’t be managed with medication.
It’s a very personal decision, and I think you should be reassured that if you can’t get access to surgery or you can’t afford the surgery, there are options that you can take to try and change your long-term outcome.
Ten years out from a disc herniation, the key factor is going to be whether or not you’ve addressed the root causes of why your disc herniated in the first place.

What Causes Sciatica Syndrome?
We’ve already discussed why you get irritation of the sciatic nerve, either a disc herniation or a tight muscle called the piriformis, but why does this happen? What is the root cause for this condition?
In my experience, the primary issue is poor core muscle and hip muscle function.
When certain muscles in your core and your hips are weak or shut off due to poor posture, prolonged sitting, or with repetitive activities that lead to imbalances of the muscles around your hips and core, eventually, you’ll get overload of the disc or overload of the piriformis muscle.
We need to address this by restoring our foundation for movement in the core and hip area to take the pressure off of the disc and allow the piriformis to relax.
What to Do for Acute Sciatica Pain?
If you have acute sciatic pain, here are some suggestions to relieve your symptoms.
- You can use ice and heat contrast over your buttock and lower back
- Sleeping position is important. You can prop a pillow underneath your legs or place the pillow between your legs if you’re a side sleeper
- Avoid sitting in one posture for prolonged periods of time
- When you’re moving, move with a neutral spine. You don’t want to be twisting or flexing through your back and increasing the stress on the disc and on the nerve
But what if you want to know how to fix sciatic nerve pain for good?
The most important thing to do when you have acute sciatica is to actually get the muscles in your core and your hip activated and working properly.
Next, we’re going to take you through some exercises to help you with all this.
3 Exercises to Relieve Sciatica Pain
The exercises that you are going to see here and that you’ll find elsewhere on the internet do not necessarily address the root causes. They’re more of a bandaid in helping you deal with those painful symptoms.
We’ll talk more about how to get to the root causes of sciatica after the exercises.
Exercise 1: ASMR – Posterior Hip
The first thing we’re going to do is to release the hip muscles focused on the glute max and the piriformis. If you remember from the background, the piriformis can often pinch on that sciatic nerve.
What we want to do is we want to use a massage ball or lacrosse ball. You do not want to put it right over a hot, painful area. You want to work around that area because if the nerve is trapped in the piriformis and you stick a hard ball on that, it’s going to irritate it even more.
Find a spot under the butt that is not super, super painful. If you do find a spot that is very painful, work around that. Think of a circle and working on the outside of that circle.
Sitting on the ground with your hands behind your for balance, put the ball under one butt cheek.

- With the ball pinning the muscle in position, move the leg straight out
- Bend the leg back in
- Repeat 3 times
- As you bend the leg back the third time, leave your foot next to your butt
- Drop your knee out to the outside, as far as it can go
- Hold for a couple of seconds
- Bring your knee across your midline as far as you can go, keeping pressure on the ball
- Hold for a couple of seconds
- Repeat 3 times
- Find a new spot for the ball and repeat
Do that for one to two minutes on both sides.
Even if you only have sciatica on one side, do both sides. That’ll help to prevent any future issues on the other side that you may encounter.
As you extend and flex, keep trying to relax the muscles over the top of the ball.
As you’re holding the leg at each end of your range of motion, try to get deeper, closer to the floor. Try to get farther across your body, even though there’s no movement happening. That’s an isometric contraction. That’s going to wake up the muscles there.
The ASMR or active self-myofascial release of the posterior hip. That’s going to release the glutes and the piriformis to help take some pressure off of that sciatic nerve.
At the same time, it’s going to activate the muscles like the hip flexors, the hip abductors, and the adductors to start to restore that hip stability that you need to avoid muscles like the piriformis overworking and causing tension and trapping that sciatic nerve.
Exercise 2: Pressup to Extension & Knee Hugs
For the second exercise there are actually two exercises, I call them 2A and 2B.
2A is to be done if you’re suffering from what we know as a posterior disc bulge or disc herniation. That’s when you bend down to tie your shoes, and you’ll throw out your back. Or you bend over to pick up a tissue off the floor, and you throw out your back.
This is often caused because of a posterior disc bulge or herniation. This is also known as flexion dysfunction. It’s something that I’ve talked about quite a bit, and I have courses for it.
But for now, think of your intervertebral disc as a jelly donut. You’ve got jelly in the middle, and every time you flex, you’re shooting the jelly out the back. That’s why you have a posterior or back disc bulge.
What we want to do is centralize that jelly and get it back into the middle of that disc.
That way that we’re going to do that is with the Pressup to Extension.

- Lay on the ground in the prone position like you’re going to do a pushup
- Press up with your hands raising your shoulders off the ground, but leave your hips on the floor
- Start pressing partway up
- Hold for two seconds
- Bring your shoulders down using your arms along, not your low back
- Next press, push your shoulders up a little higher
Do 10 repetitions, holding for two seconds at the top. Try to go a little bit further each time.
The first few reps, you don’t press up too high. Just press up just with your arms. Don’t use your back muscles to lift yourself up. Press just until you start to feel a little bit of resistance.
Hold for a couple of seconds and then bring it down under control, controlling the movement with your arms, not your low back.
Each rep, you go a little bit further, breathing, holding for 2 seconds at the top, and coming down until, at the very end, you’re at your full range of motion, whatever that may be.
It might be partway, or it might be fully extended. Either way, you want to try to increase your range of motion a little bit with each repetition.
Now one quick note on pain.
If you have pain that is five or less out of ten, and it goes up to a six or more through any of the exercises, we want to back it down a little bit. We want to keep the limit at six or lower.
Now, if you are starting with pain that’s ever higher, consider contrast therapy and changing your sleeping position to help you get down to a level where you can execute the exercises a little bit better.
That’s 2A, the Pressup to Extension.
2B is basically the opposite. This is for people who might be suffering from a condition known as stenosis, which is a narrowing of those canals that the nerve roots come out of in the spine. This typically happens for people who are 60 years or older.
So 2A, the Pressup to Extension, is better for typically younger people who are under 60 years old, guys my age in their 40s. But if you’re 60+, then this might be what you need more of.
2B is the Knee Hugs exercise. It’s basically the opposite of what you’re doing in 2A.
Here, you start laying supine, flat on the ground.

- Bring your knees to your chest
- Hug them up to your chest for 2 seconds
- Control it with your abdominals on the way down
Do this for 10 repetitions, holding for about 2 seconds at the top.
What we’re doing here is we’re restoring some of that space in the spine that’s lost due to that stenosis or the degeneration of the discs. We’re also activating the abdominals to control the movement. We’re waking up those abdominals which you need to be working throughout your day to help maintain that space in the spine so the nerve roots can pass through without being pinched.
Exercise 3: Sciatic Nerve Flossing
The third and final exercise I’m going to share with you today is Sciatic Nerve Flossing.
There are two variations I’m going to teach you. The reason why I’m teaching you two variations is because I found an interesting study that showed some different effects of these two variations. I’m also going to add some of my own clinical expertise and wisdom that I’ve gained over the years as to which version you should choose.
If you just look at the research, you might choose the one version because the results seem a little bit more powerful.
The title of the study is “Effective neural mobilization exercises in patients with low back related leg pain with peripheral nerve sensitization.”
This study looked at basically three different groups:
- A control group that just got the TENS machine
- The slider group that got the TENS machine plus the sciatic nerve flossing sliding variation
- The tensioner group which got the TENS machine plus the tensioner version of the sciatic nerve floss
The results showed that the tensioner group had the best results in decreases in pain and improvements in range of motion of the extension and hip flexion. The slider group also showed beneficial effects and significant results. [1]
The control group showed minimal to no results. That’s a TENS machine only.
The authors concluded that the patients in both the slider and tensioner exercise groups demonstrated improvements in pain and range of motion compared to those in the control group.
Now if you look at the actual data from the study, you can see that the tensioner group showed greater effects compared to the slider group.
You might be tempted to do just that exercise. But the thing is, the tensioner group puts more tension on the sciatic nerve. If you put too much tension on the nerve, you could irritate it. That irritation could set your recovery back a couple of days or even weeks.
Instead of that, what I recommend is you start with the slider version.
Do this for the first one or two weeks.
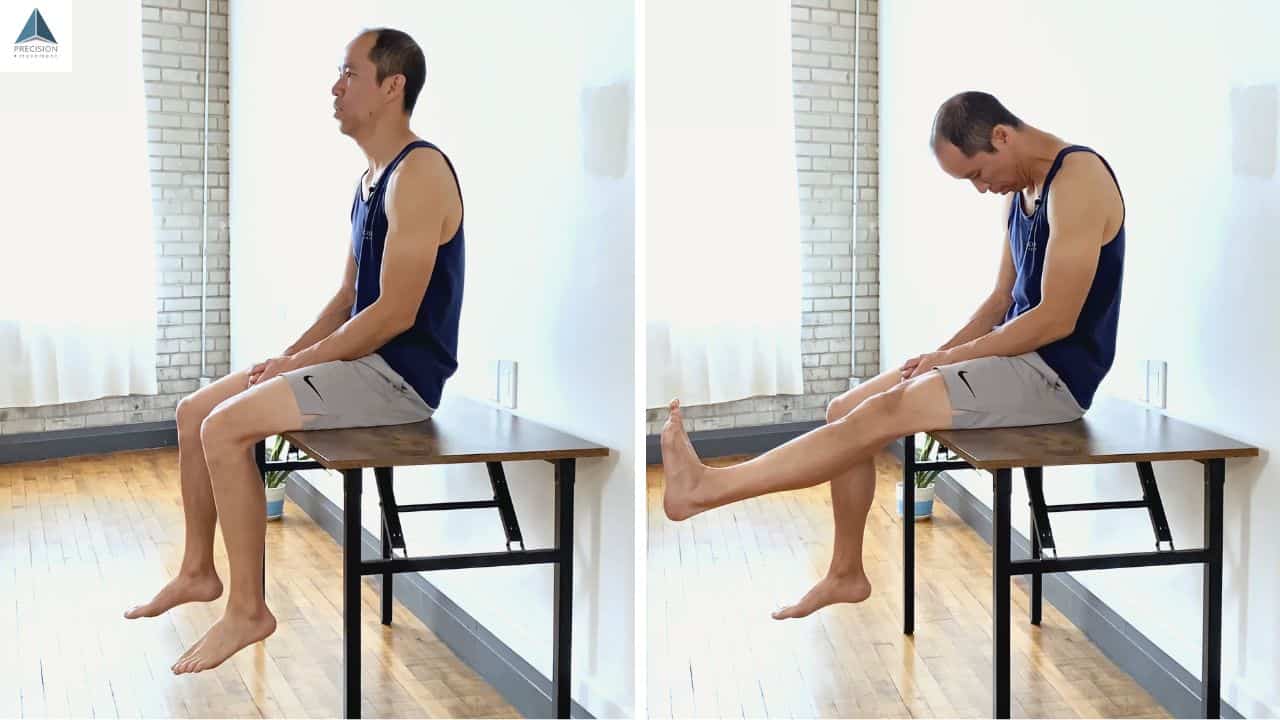
The slider version is basically where you start sitting in a slumped posture. Then, what you’re going to do is you’re going to extend the knee and dorsiflex the ankle as you look up. So you’re matching the rhythm of movement, and then you come back down, staying in the slumped position.

- Sit slumped on a table or high chair where your feet aren’t on the floor
- Extend the knee
- Dorsiflex the ankle (pull your foot toward your knee)
- Look up
- Bring back down under control
Do that for 10 repetitions in 2 sets.
Move slowly, pushing the range of motion as much as you can without irritating the nerve too much and causing too much pain.
It’s expected to add a little bit of pain and discomfort when you get the knee up, but you don’t want too much.
Now, after 1-2 weeks, you go to the tensioner version.
The tensioner version is the opposite head movement. You again start in the slumped position, but what you’re doing is you’re going to extend the knee, dorsiflex the ankle, bring your chin to your chest, and then you return.
- Sit in a slumped position
- Extend the knee
- Dorsiflex the ankle
- Drop your chin to your chest
- Return under control
Do that for 10 repetitions in 2 sets.
That just puts a little more stretch on that sciatic nerve. It has a great potential for positive results but also a greater potential for negative results.
That’s why I recommend you do the slider version for the first 1-2 weeks and then you do the tensioner version after that for anywhere from 2-4 weeks, depending on how long it takes to help with your acute sciatica pain.
Next Steps to Solve the Root Cause of Sciatica Pain
Those are the three exercises to relieve sciatica pain quickly and improve the surrounding musculature.
We covered some tips and tricks if your pain is too high to do any type of movement. Those will help bring that pain down to the point where you can do these exercises.
Like I said before, these are bandaids. These are not going to get to the root causes of sciatica.
If you want to learn more about root causes, you’ve got to learn how to improve the way that your hips move. That way, you’ll know what damages and irritates your lumbar discs. You’ve got to learn how to increase and improve activation of your core muscles so you don’t lose disc height. You should support your spine using your musculature as opposed to the passive tissues that wear out over time and can’t really come back.
To do that, we’ve got a couple of articles linked below to learn more about our approach to changing the way you move so that your muscles do the work, not your passive tissues.
5 Best Sciatica Stretches for Quick Pain Relief – quickly settle down your sciatica pain
3 Piriformis Syndrome Stretches to Ease Back Pain & Sciatica – read this next if you have a tight piriformis and think it may be the root cause.
Piriformis Syndrome vs. Sciatica & Tests for a Tight Piriformis – read this if you want to test to see if you have a tight piriformis.
Also, if you want to deal with this in a step-by-step fashion, check out our Low Back Pain Solution. That’ll walk you through our approach in a step-by-step fashion through many phases with lots of new exercises in a progressive and safe way to get you moving freely and without pain.
“Feeling so much better after years of chronic back pain, surgery and all sorts of therapies. It’s quite wonderful and empowering to be moving and feeling better, and I can’t wait to discover how I’m doing in a year!”
– Elizabeth