
A wrist injury can be a setback, but it can also be a chance to improve function. Let’s learn how to treat a sprained wrist with strength and mobility work.
The Dreaded FOOSH
While wrists aren’t as commonly sprained as ankles, I’ve sprained a few wrists in my day.
The latest one happened playing ice hockey, when I was tripped up and fell on an extended right wrist.

This type of injury is known as a FOOSH, which stands for “fall on outstretched hand”.
Luckily I didn’t fracture any of the carpal bones, but the sprain resulted in tightness that lasted for months afterward. That’s typically the problem that most people have after wrist sprains – a lingering deficiency in range of motion in the direction of the sprain.
You can sprain your wrist in any direction: extension (like I did), flexion, or ulnar or radial deviation.
But the most common by far is extension and if it’s not rehabbed properly, can lead to mobility deficits making any exercises where your hands are flat on the ground such as pushups difficult and painful.
The Inner Workings of Your Wrist
Your wrist is much more complex than it might seem with a quick glance down at your arm. In fact, there are 15 bones in the area from the end of your forearm to your fingertips [1].
In just your wrist alone there are 8 small carpal bones. Because each of these bones forms “joints” with the surrounding bones, the wrist can actually be thought of as a series of small joints [2].
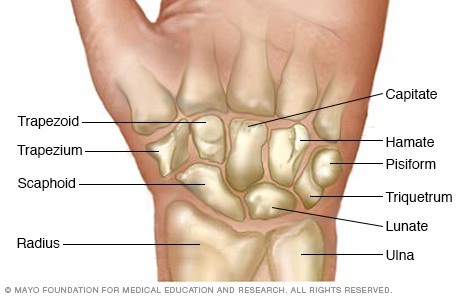
Image by www.mayoclinic.org
Your carpals connect to the metacarpals of your hand and the radius and ulna of your forearm. Your carpal bones are surrounded by a group of stabilizing ligaments that connect carpals to each other and to surrounding bonds of your hand and forearm [3].
A sprain occurs when one of these ligaments is injured and suffers a partial or complete pair – like might happen if you fall on your outstretched hand.
One particular ligament, the scapholunate ligament, is usually involved in those all-too-common FOOSH extension sprains. This ligament connects two carpals – your scaphoid and lunate.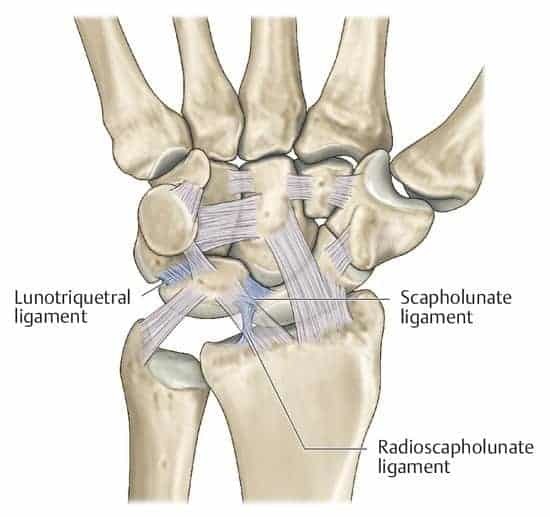
Your scaphoid sits just above your radius at the base of your thumb. Your lunate is next to the scaphoid and sits above the ulna, closer toward the center of your wrist [4].
With their location at the base of the wrist, these two carpals and the ligament that connects them tend to take the brunt of damage during an extension injury.
Sprained Wrist Symptoms & Severity
Let’s say you took a fall, but you aren’t sure if the aftermath caused a sprain.
If you sprained your wrist, you felt pain when you landed – not just soreness hours after. You’re also likely to feel some pretty consistent pain when you try to move your wrist around [5]. Tenderness, warmth, bruising, and swelling are all also common wrist sprain symptoms.
If you’re certain you do have a sprain, it is important to consider its severity. More severe sprains will require medical treatment, while mild sprains will usually resolve pretty quickly with a little TLC to get rid of lingering mobility issues.
Wrist sprains are usually divided into 3 different grades [6].
In Grade 1 sprains, the ligament becomes slightly overstretched, but the joint remains stable. Symptoms will probably be mild, the wrist will be tender, and certain movements will cause slight pain [7].
In Grade 2 sprains, the affected ligaments suffer a partial tear, which might lead to slight instability in the wrist joint. Symptoms like swelling, pain, and difficulties with wrist movements will be more intense.
In Grade 3, or the most severe sprain, the ligament is torn completely and the wrist is left with a lot of instability. The symptoms associated with this type of sprain will be pretty severe – expect a lot of pain, swelling and a ton of trouble moving the wrist properly.
If your symptoms are more severe, a Grade 2 or 3 sprain might be at play, and you’ll want to go visit a doctor.
Another important thing to consider is that it may not be a sprain at all.
If your symptoms are intense, or your wrist looks visibly deformed, you might instead have a fracture on your hands [8].
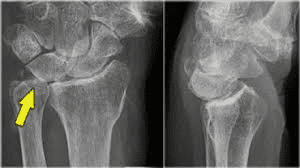
A fracture to the bone will require medical treatment. Ignoring it or allowing a fracture to go undiagnosed will only set you way back in the long run – leading to issues healing and sometimes surgery [9].
Learning how to treat a sprained wrist and moving forward with the exercises below will be of no use to you if you’ve really got a fracture. So if you’re in a lot of pain or if you’re uncertain about your sprain’s severity – sometimes what looks like a moderate sprain can really be a fracture [10]- , go see a doctor.
Some imaging should quickly determine what is causing your pain so that you can address the issue correctly.
Strained Activities
Unfortunately, a sprained wrist can really put a damper on your activities and movements you are used to performing with ease. There are a few key real-world movements that are particularly affected.
Lifting
General wrist weakness when lifting is common after a sprain. You’ll definitely find it difficult to work with the weights you normally toss around at the gym, and you will likely even have trouble when lifting things around the house or at work.
Lifting anything puts pressure on the wrist, so don’t be surprised to see this effect. Take it easy and keep it light until you’re able to rebuild strength.
Pushups
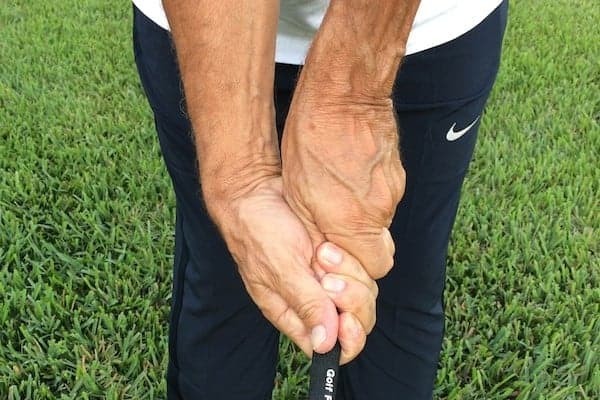
Pushups will also have to take a backseat during your workouts for a while – ESPECIALLY if you suffered an extension-related sprain.

That FOOSH hand positioning that happened during your injury is very similar to the positioning required during a pushup – full extension on the wrist with a lot of body weight bearing down. Back off the pushups while you heal as well.
Swinging a bat (or racket, or stick)
Thanks to that generalized wrist weakness with motions like lifting and a reduced range of motion, any sport where you use a racket, stick, club, or bat is going to prove difficult while you recover.
You’ll not only find it difficult to swing the bat around, doing so will probably be painful and can put you at risk for further injury. As much as it sucks to sit on the sidelines, you’ll want to hold off on these sports for a few weeks, until your wrist is stronger.
How to Treat a Sprained Wrist – Rehab Steps
Know that you know what you’re dealing with and what to expect, it’s time to learn the nitty gritty of how to treat a sprained wrist in a way that may even help you become stronger than you were before the injury.
Phase 1: Acute Phase
Immediately following your injury, you will need to take it pretty easy. Follow the RICE standards – Rest, Ice, Compression, and Elevation.
Give yourself time to heal and chill out while applying ice and/or compression for no more than 15 minutes at a time.
Consider natural anti-inflammatories – like bone broths, omega-3’s, PuraThrive, or other turmeric supplements – instead of painkillers. These natural approaches will do more to speed the actual healing process.

This phase will probably last a couple days and will depend on the severity of your sprain.
Phase 2: Post-Acute Phase
As your pain starts to fade, you can start to incorporate more movements back into your routine.
At first, stick with simple, open chain movements that work all ranges of motion in your wrist.
One great and simple exercise is closed fist circles. Simply stand with your elbows bent and hands in fists, palms down. Start to move your fists around in circles by moving at your wrist.
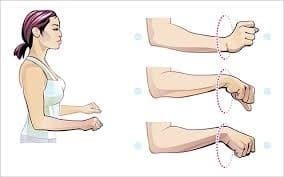
Image by www.experiencelife.com
Go slow and make sure to move in both directions, with the movement coming from the wrist. This exercise will help you rebuild strength and mobility over a large range of wrist motion.
Take care in the post-acute phase and don’t rush it. If something hurts, back off. Apply ice again if you notice pain returning.
Phase 3: Return to Sport/Work/Life
Once your simple movements have progressed and pain has subsided, it’s time to step things up. The sprained wrist exercises below will help you strengthen your wrist in a functional way, helping you return to your normal activities quicker.
Understanding how to treat a sprained wrist is just half of the battle. You’ve got to allow yourself time to heal, and you have to reintroduce exercises patiently.
Remember to really chill during the acute phase, and to see a doctor if you’ve got any concerns about a fracture or severe sprain.
But by following the steps to rehabs and incorporating exercises that will restore comprehensive wrist strength and mobility, your sprain will heal faster and before you know it, you’ll be back to swinging that tennis racket and knocking out pushups like a champ. Trust me – none of my wrist sprains have kept me off the ice for too long!