
In this article, you’ll learn three forearm pain exercises to get you feeling better and stop the root cause for good – whether that pain is in the front and the flexors, in the top (brachioradialis), or in the extensors of the forearm.
Plus, we’ll explain why stretching does not help and sometimes can even make things worse.
If you want to follow along with a video, click here to watch Forearm Pain? Stop Stretching & Do These 3 Exercises Instead on YouTube.
Root Causes of Forearm Pain
Why do we get pain in the first place? There are two main reasons.
One is desk work, computers, and phones. When doing that stuff, we’re often in the flexed wrist position. Holding that position for hours at a time means we’re overusing the flexors in the forearm. Those muscles get overworked and painful. Click here to read more on improving wrist mobility.
The other is if you’re a gym rat grabbing those barbells, dumbbells, the chin-up bar, or you play a sport like tennis, baseball, or golf – something where you’re gripping. Those muscles are going to be a lot stronger, creating an imbalance between the flexors and the extensors. It also can cause an imbalance between the ranges of motion at the wrist. You can read more here about improving elbow function and get elbow pain relief exercises.
We’re going to learn how to restore that muscular balance right now.
The most common advice that you’ll hear to deal with this pain is the standard wrist stretch. That looks like pulling your hand and fingers back toward your elbow in both directions.
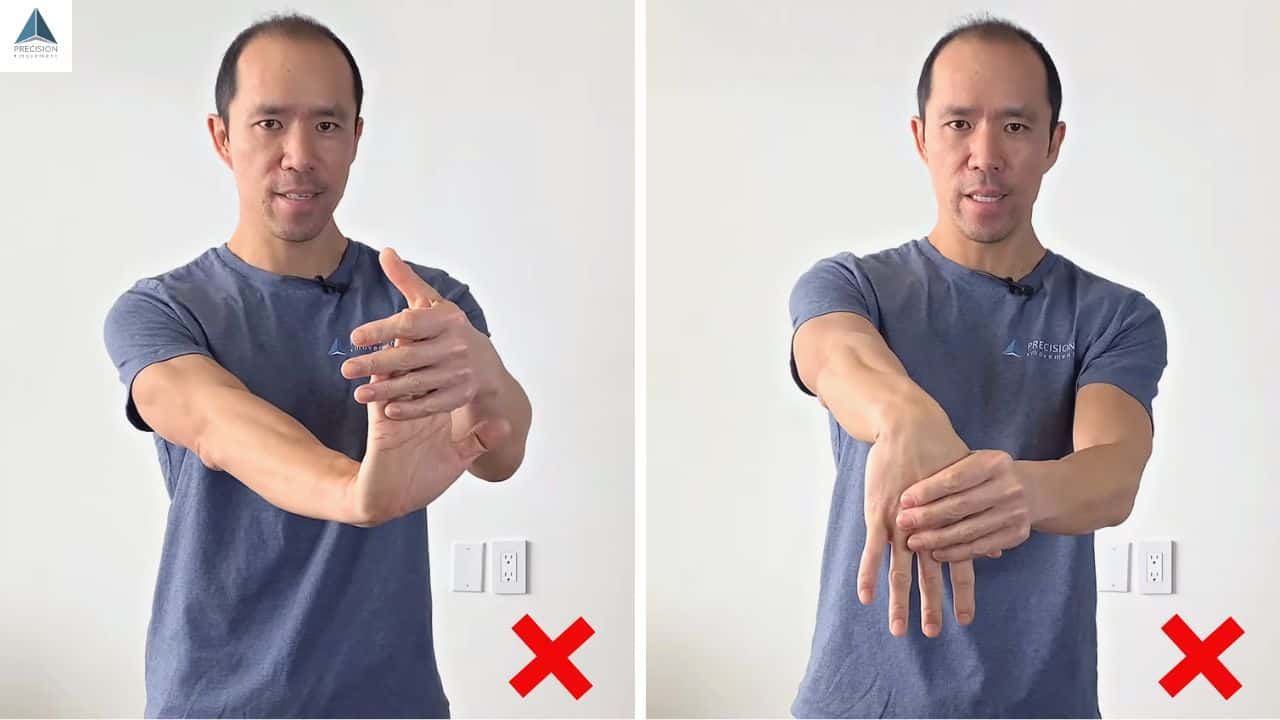
We don’t recommend that at all for this type of pain, and there are two reasons why.
First, scar tissue or adhesions between muscles, or between muscle and fascia, prevents proper tissue pliability. When you do a simple stretch, you’re only stretching the already pliable tissue. That scar tissue or knot stays the same because it’s already tight. It’s strong, and it’s not going to get pulled apart from this type of stretching.
Secondly, if you have pain because of microdamage in the muscles or tendons, the tissue is already extra pliable. It’s already damaged, so it’s not as strong. You’re only going to pull through that tissue even more, creating more damage.
The techniques we will cover today will not have those adverse effects. They also have more positive effects built in, like increasing stretching, range of motion, and improving tissue pliability without the negative side effects.
The other thing that’s often missing is the movements of pronation and supination. Pronation is when you turn your palm down. Supination is when you turn your palm up. Pronation down, prone. Supination up, supine. (Think yoga if that’s your thing.)
If these movements are lacking, you’re going to overuse some of the muscles. That means that some muscles aren’t working properly, and you’re not working through a full range of motion. Some other muscles are going to be overworked to compensate, resulting in wear and tear and pain.
We’re going to resolve all of those issues with the three exercises below.
Forearm Pain Exercises
Doing these exercises 3-4 times a week for several weeks will start building your pillars of movement longevity. You’ll improve tissue quality, strengthen muscles, lengthen muscle fibers, wake up sleepy muscles that aren’t doing their jobs, and retrain your neuromuscular system to use the right muscles and fire them up in the right order.
Exercise 1: Forearm ASMR
The first exercise is what we use to replace static stretching. That’s active self-myofascial release.
It’s basically giving yourself a massage with an active component. That works the tissue while breaking up scar tissue and adhesions.
If you’ve ever had active release techniques, this is just you doing it to yourself (no need to pay for a deep tissue massage.)
We want to work on three areas: the flexors, the brachioradialis, and the extenders. We want to work in between those tissues as well.
The goal is to release any knots in the muscle itself, but also make sure that the muscles are not stuck to one another, the goal is to get the tissues pliable and gliding smoothly.
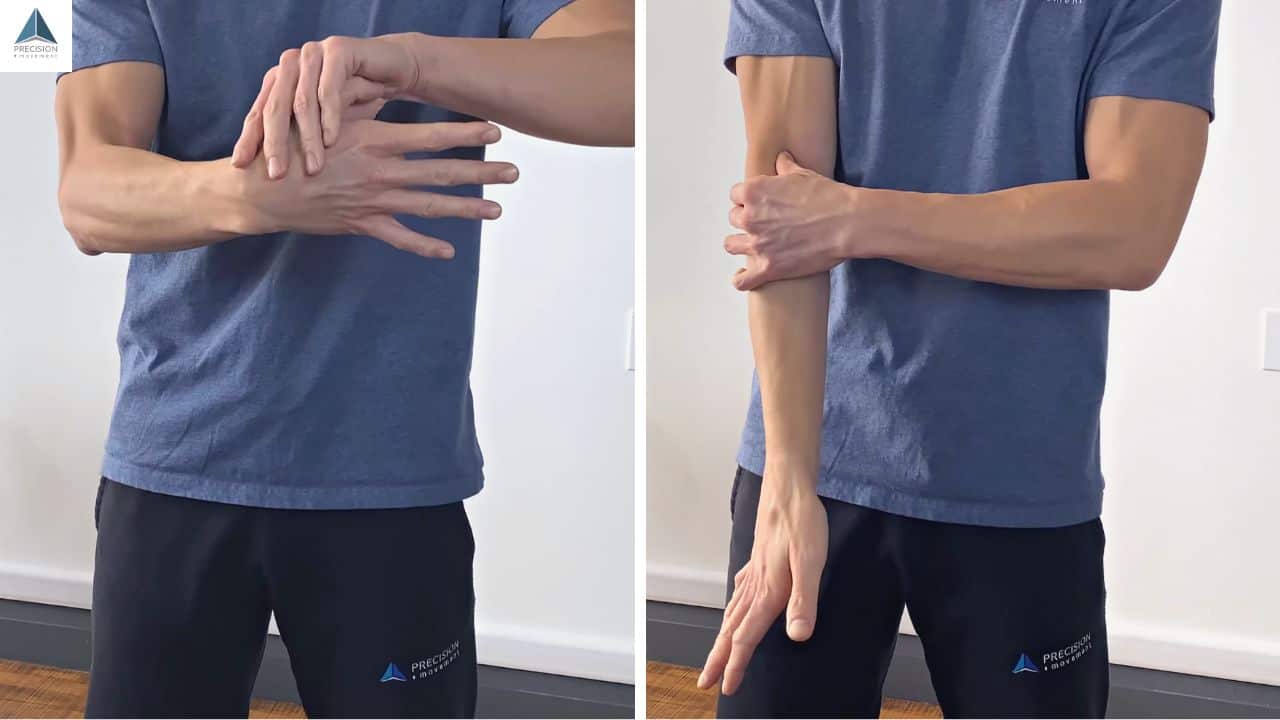
To start, we’ll do the flexors.

- Start with a flexed wrist
- Push your thumb into your palm, just above the wrist
- Slide your thumb up to your bicep while extending your wrist
- Reset by moving your thumb to a slightly different position on your hand and flex your wrist
Use a significant amount of pressure and repeat for 45 seconds to a minute on each arm.
Keep working on different areas of the flexors. Try to cover all of the flexor muscles around your forearm, elbow, and wrist.
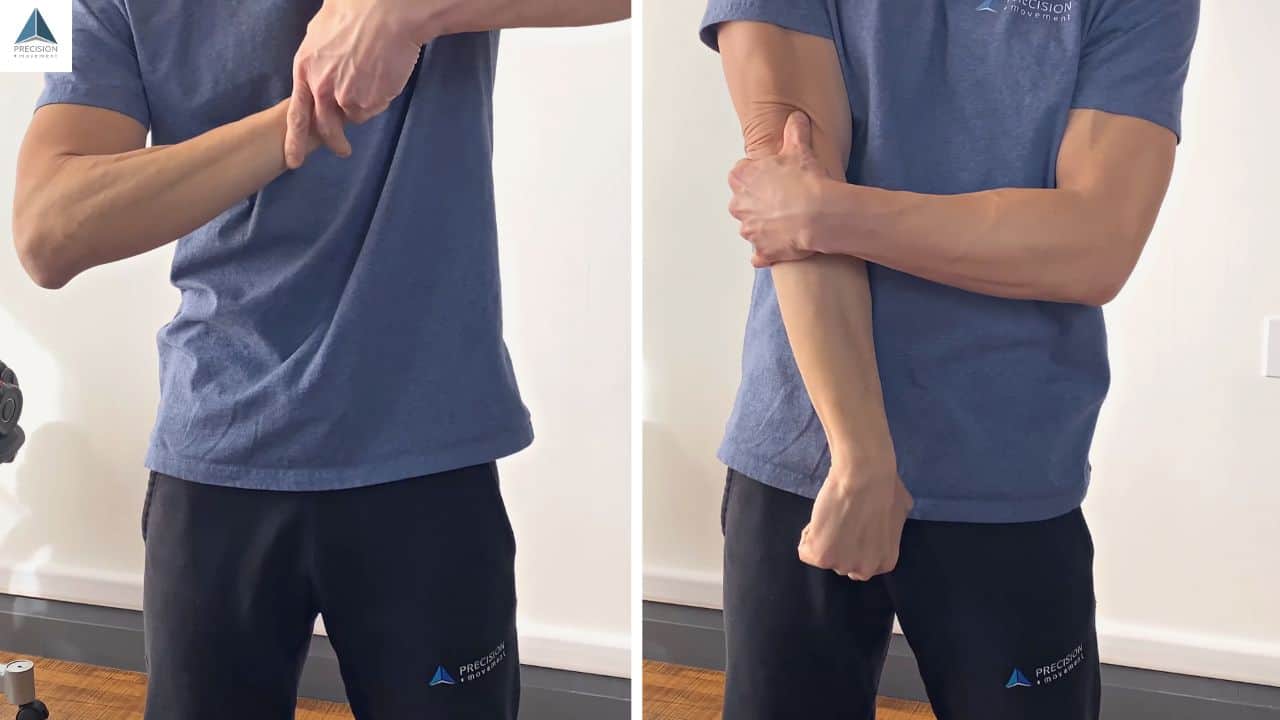
The brachioradialis is a muscle in the lateral forearm. It can often get painful since it’s responsible for elbow flexion, supination, and pronation of the forearm, depending on the position.
You will do the same thing as you did with the flexor, starting with flexed wrist and extending it as you slide your thumb up.
- Start with a flexed wrist
- Put your thumb between the brachioradialis and the flexors on your inner forearm
- Push your thumb up your forearm up to your bicep while extending the wrist and elbow
- Reset in a slightly different position and repeat
Work out from between the brachioradialis and the wrist flexors, to the top of the brachioradialis, to between the brachioradialis and the wrist extensors.
Do 45 seconds to 1 minute per arm.
Then you’ll do the wrist extensors, which run across the top of your forearm and attach to the lateral epicondyle. Same principles.
Instead of starting with a flexed wrist, you’ll start with an extended wrist.
- Start with an extended wrist
- Place your thumb on your wrist extensors
- Push your thumb up your forearm across the elbow while flexing your wrist and extending your elbow
- Reset in a slightly different position
Do another 45 seconds to a minute per arm.
Remember, we want to go from a shortened muscle position to a lengthened muscle position. When we do that, we can effectively release these tissues and break up some knots and adhesions. In short, we’re putting a stop to whatever is reducing your tissue quality and pliability.
Exercise 2: FF-EF Elbow CAR
Once we’ve done that, we want to activate these muscles. We will do that with what we call the Flexed Fist Extended Flare Elbow CAR.
For this technique, we do the two positions of that hand, fingers, and wrist. One is the flexed fist. The other is flared fingers.
We’ll start with flexion of the wrist. Make a fist, and make sure you’ve got even pressure through all of the fingers. We’re not trying to crush something to death, just a moderately gripped fist with a flexed wrist, good back and shoulder posture.
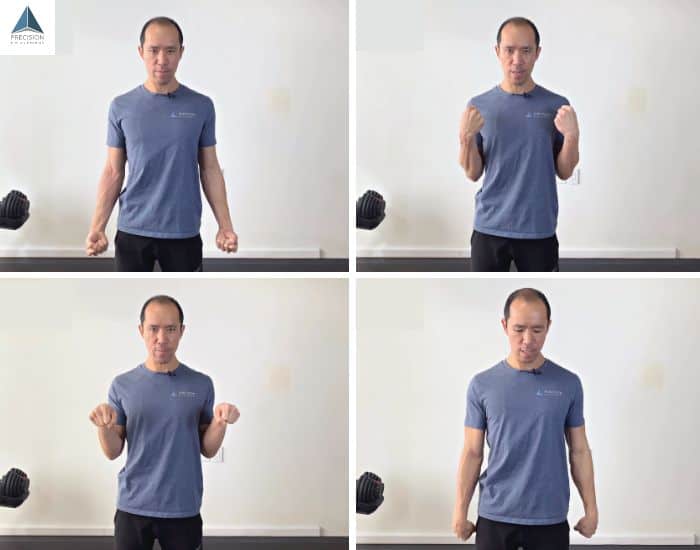
- Make a fist
- Flex the elbows with a bicep curl type of movement
- Turn the fists outward
- Extend the elbows all the way down
- Turn the fists back and repeat
Do 2 sets of 3 reps. You can alternate sides or not, your preference.
Remember to use even pressure throughout the fingers. People often grip harder with one side of their hand than the other (think index and middle grip or ring and pinky grip).
The second position will be the same elbow flexion and extension but with your fingers flared.
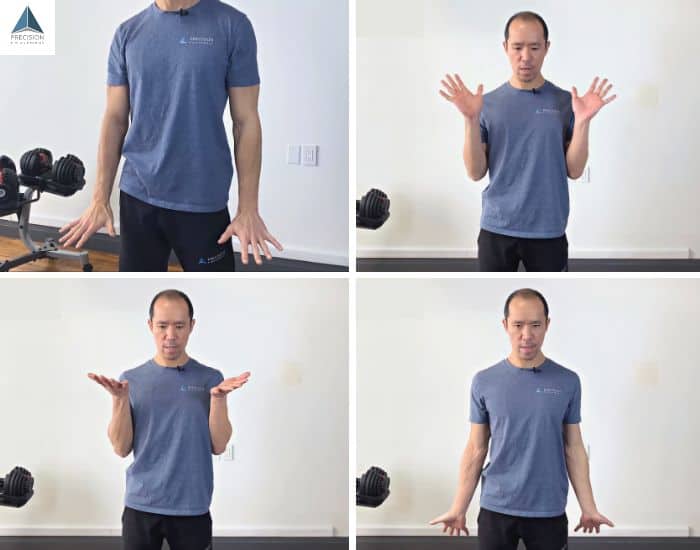
- Flare the fingers
- Flex the elbows with a bicep curl type of movement
- Turn the flared-finger palms outward
- Extend the elbows all the way down
- Turn the flared-finger palms back and repeat
Do another 2 sets of 3 reps.
What this is going to do is strengthen the muscles through their full range of motion.
The fully flexed fist will shorten the flexors and lengthen the extensors. Whereas the extended flare is going to fully lengthen the flexors and shorten the extensors.
These muscles cross all the way from the fingers and across the elbow. When we do these two positions of the hands and fingers, that lets us work through that full range of motion. It’s very unique in that way.
That’s how you’re going to restore that full length and strength for lasting forearm pain relief.
Exercise 3: Wrist Extension ERE
The last exercise we will go through is called the Wrist Extension ERE, or End Range Expansion.
This exercise restores both the range of motion of wrist extension and the strength of the wrist extensors.
It’s not just stretching, but we’re building strength in this range of motion so that your brain knows that you’re strong, you’re stable. At that point, your brain allows you to keep that range of motion because it’s not worried that you’re going to hurt yourself in that end range.
For this technique, get into the four-point position (hands and knees.) From here, go into a very, very, very slight passive stretch. The elbow stays straight the whole time.
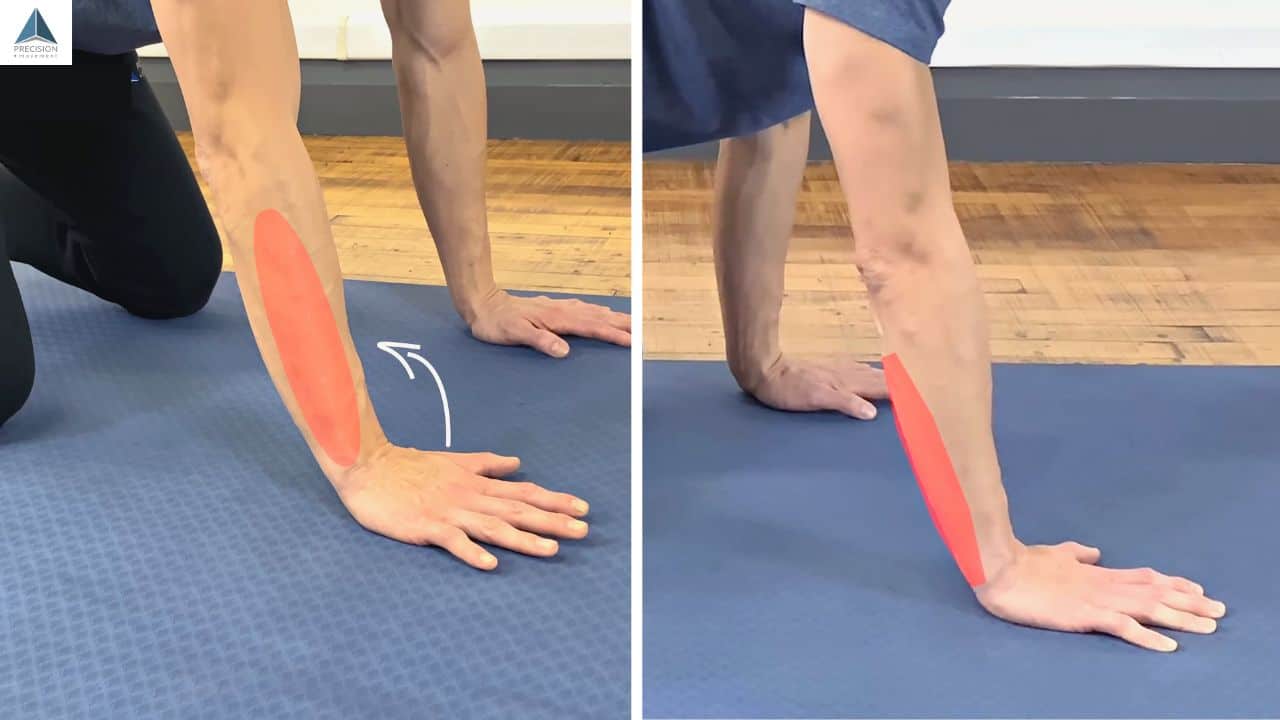
- Try to pull your palm up away from the floor, back toward your forearm, using the wrist extensors
- Hold for 10-15 seconds
- Rock forward just enough that your palm lays flat on the floor again with your extensors activated
- Press your hand into the floor using your wrist flexors
- Hold for 10-15 seconds
Repeat for 2-4 sets, working the full range of motion.
The key here is activating these muscles, firing them up. Doing that will build their strength.
Make sure you’re working all through the hands evenly, not just one side or the other, not just the thumb side or pinky side.
Once you’re done, gradually let everything go. You’re going to feel that working and people often find they have an imbalance between the strength of the flexors and the extensors. (Remember what we said about spending time in the gym or sports involving grip?) In life, we spend a lot of time grabbing things and not going the opposite.
We’re restoring the balance of strength and range of motion at the wrist and in those forearm muscles. That will help with your painful forearms.
Tips to Prevent Pain When Working Out
Those are the three exercises that are going to help with your forearm pain.
Here are a couple more quick tips about what we’ve seen countless times in people that prolongs forearm pain.
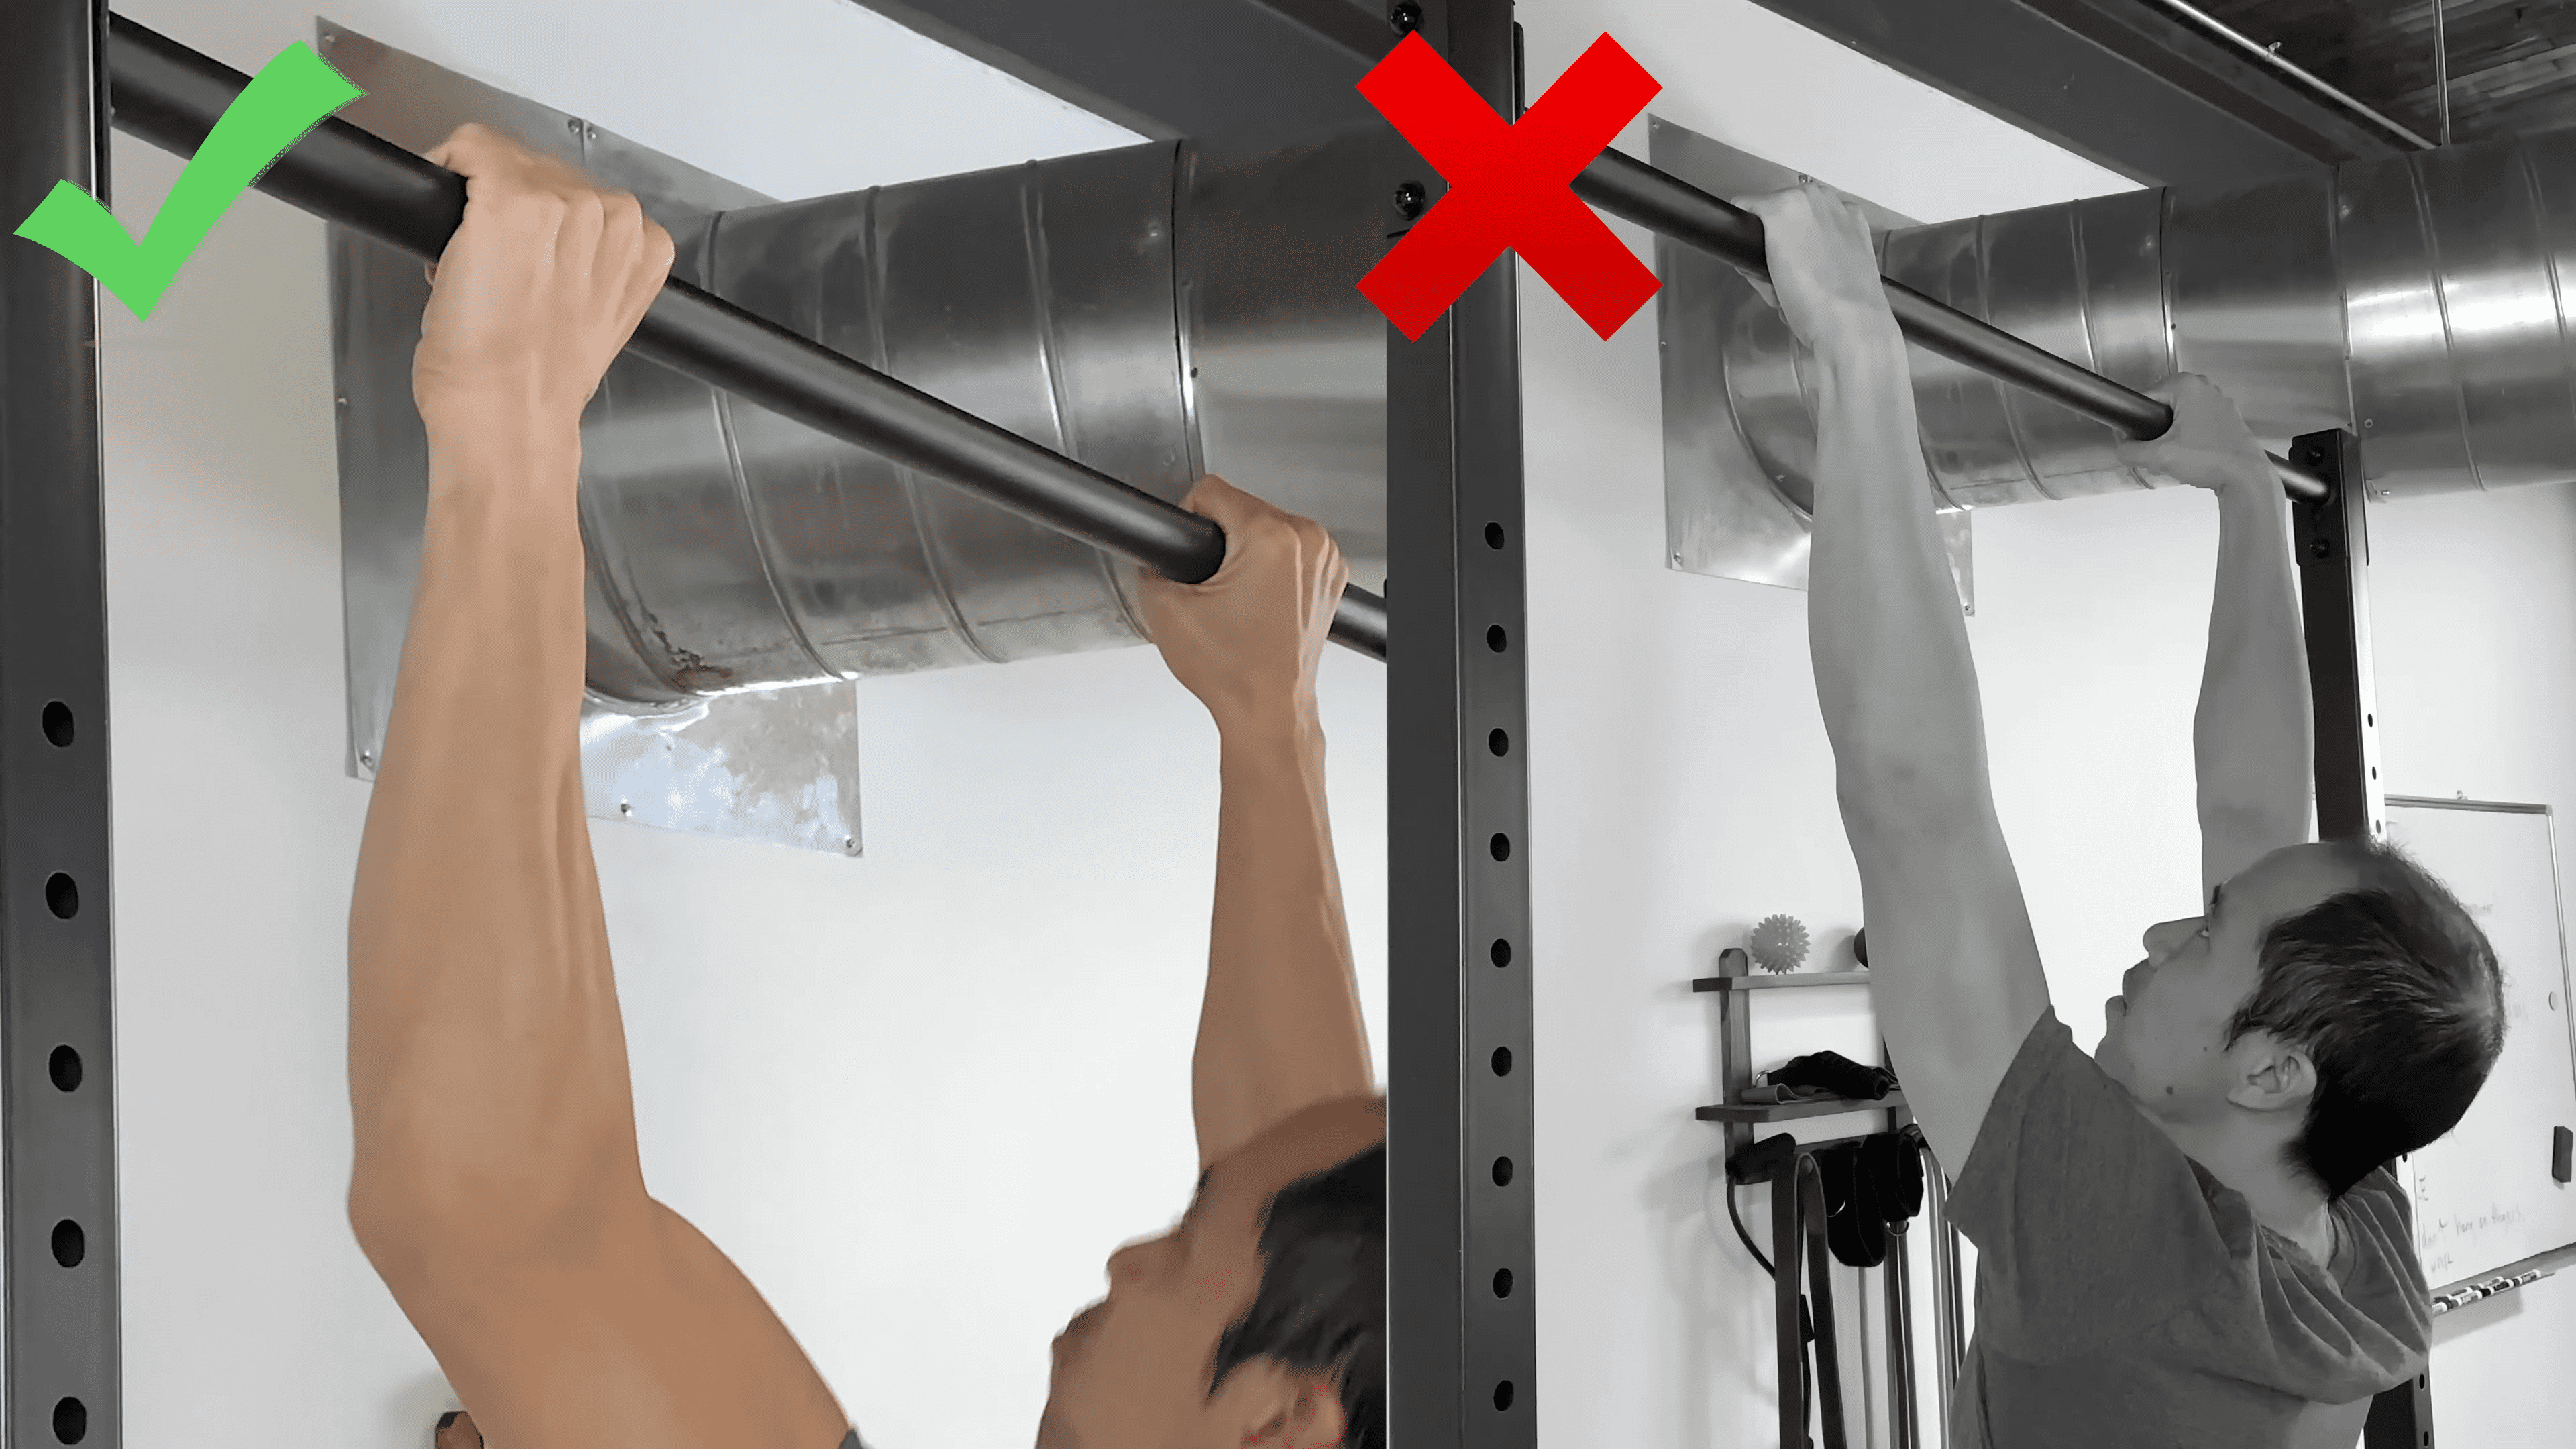
Number one is when you’re doing pull-ups and chin-ups, make sure you grab the bar with either a natural wrist or a slightly extended wrist. A lot of people grab it with a flexed wrist, and that’s going to overuse those flexor muscles. Over time, that causes extra stress on your forearm muscles.
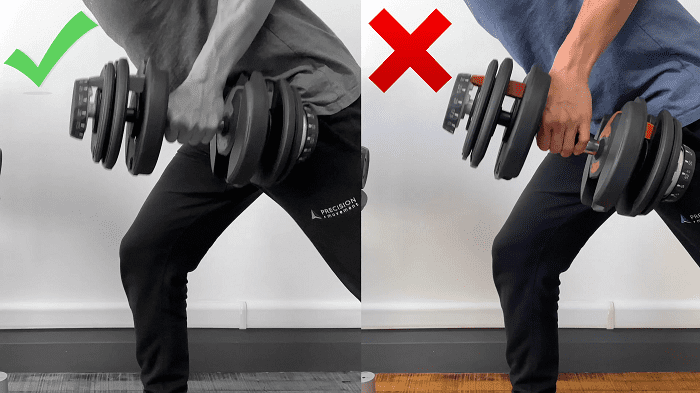
Second tip, when you’re grabbing weights, make sure you grab them with a full grip on the dumbbell or the barbells. You don’t want the weights or bar hanging from your fingertips, especially not hanging from maybe two or three fingers and not your whole hand. So grab that weight with a proper grip!
That’s going to go a long way toward preventing forearm pain from your gym activities.
Next Steps To Moving Freely &Without Pain
Now you have the forearm pain exercises and tips to get you back to what you love.
We have a couple of other articles that you may find helpful, with new exercises and strategies to build up the strength and range of motion in your elbows and wrists.
The absolute best option is to check out the Elbow Pain Solution. It’s going to walk you through exercises like this and get you strategies to repair that wear and tear damage starting from the pain level that you’re experiencing right now.
Just to get the tension released and feel strong again in my forearms and elbows was perfect.” Garry Johns, 43“I found the program very informative with great advice and it answered a lot of questions that I had. I learned so much about my forearms and how important grips are.