
Poor posture left unaddressed can have many serious long-term repercussions.
Your body adapts to the movements and positions you find yourself in regularly and many people don’t realize their posture deteriorating because it happens slowly over time.
A common example of this in today’s day and age is a Dowager’s hump aka thoracic kyphosis.
We’re going to take a look at the two types of dowager’s humps, examine what causes them, and some effective exercises to straighten and re-align your spine.
What are Dowager’s Humps?
Dowager’s humps are an excessive, and often painful, curvature of the upper thoracic spine.
There are two types of dowager’s humps:
Fixed deformity – most common among aging women (the most frequent sufferers of osteoporosis), and is related to osteoporotic fractures.
NOTE: Jumping regularly helps strengthen bone to ward off osteoporosis and ultimately, fractures that can lead to a fixed deformity dowager’s hump. Jumping creates vibration that stimulates healthy bone growth. And you don’t need much or to jump as high as you can – just a few minutes of little jumps per day will give your bones the stimulus they need to stay healthy and strong.
Flexible deformity – with this form of dowager’s hump, there is no direct damage to the spine. The spinal discs are healthy, but the misalignment is caused by gravity naturally pulling the upper thoracic spine downward.
The dowager hump is usually characterized by excessive rounding or flexion of the upper part of the spine known as the thoracic spine. It often comes along with pain in the upper back, neck and shoulders. Forward head posture is also commonly found along with Dowager’s hump. Some people with it even get visibly shorter as a result!
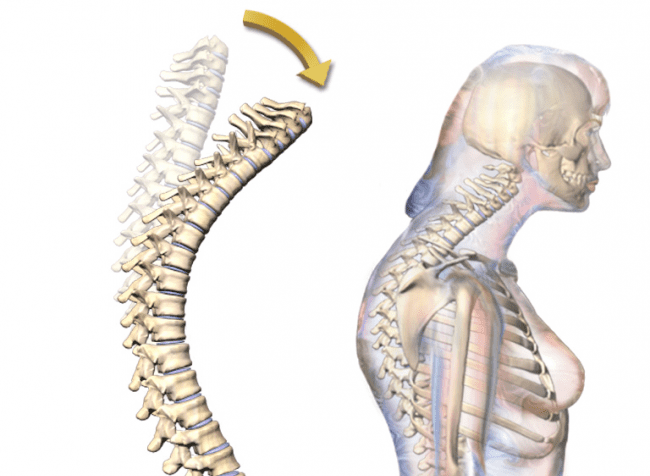 Image by BruceBlaus, CC BY-SA 4.0
Dowager’s hump can lead to complications like:
- Premature cervical spine disc degeneration
- Excessive tension in the neck and shoulder muscles
- Decreased inhalation volume
- Headaches/migraines
- Shoulder impingement syndrome
The fundamental root cause of dowager’s hump is poor posture. Slouching while standing up and sitting hunched contribute to this malalignment of the spine. Repetitive movements and positions can also lead to the formation of a dowager’s hump, for example, if your job requires positions that put you in poor posture e.g. a plumber always crouching down to work under a kitchen sink.
Dowager’s hump also gets worse with age, not because of the age itself, but because the proper steps to ward it off aren’t taken That’s why it’s so important to take steps to address problems now—you’ll prevent this issue down the road and you’ll feel better today.

Typical Recommendations for Dowager’s Hump
Spend a bit of time searching online and you’ll find the following as common recommendations to address dowager’s humps and poor posture:
Foam Rolling. Foam rolling extends the spine, which can help restore its natural curve.
“Stand up straight.” If the dowager’s humps are caused by poor posture (known as “postural kyphosis”), many recommend to simply stand up straight and there are now devices and gadgets that beep or vibrate when you slouch.
Static Stretching. Stretching is the most common recommendation to fix posture, but as we’re about to discuss, it leads to temporary results at best and can put you at increased risk of injury at worst.
The problem with these recommendations is that they don’t activate the deep muscles of the spine responsible for maintaining good posture all day long.
These muscles – primarily the multifidus and deep spinal extensors – are designed for endurance and control every segment of your spine.
But when you slouch all day long, they “shut off” and then when you try to straighten up you instead use the superficial long extensor muscles or rhomboids – muscles designed for powerful movements not the maintenance of a certain position for a long period of time.
Waking up and strengthening the deep muscles and addressing any underlying joint restrictions insufficiencies is the long-term solution.
The exercises we teach below will do exactly that. They’ll fix the root cause and not only restore good posture but give you increased range of motion.

- To begin, let’s start with “standing up straight” in a way that uses the deep muscles with a little drill to align the cervical spine. Start by slumping and jutting your chin forward.
- Pretend a finger is coming towards your chin and pull your chin straight back away from the finger.
- Hold for 2 seconds.
- Repeat this 3 times.
- On the third repetition, hold the head position and roll your shoulders slowly backward.
- Maintain the cervical spinal position while you roll your shoulders backward 5 times, then forward 5 times.
Repeat this a few times, then hold the position and make a few big circles with your shoulders keeping your spine in the aligned position.
This drill will exercise the deep cervical spine muscles that will help you maintain good standing and sitting posture throughout the day.
4 Best Exercises to Treat Dowager’s Humps
The most effective means of treating dowager’s humps is to activate the deep muscles surrounding your thoracic spine.
These exercises zero in on your cervical spine (the 7 vertebrae in your neck and upper back) and thoracic spine (the 12 vertebrae in your upper and middle back).
Perform the exercises daily for 7 days, and I bet you’ll notice marked improvement in both your posture and spinal structure. You’ll stick to them for the long-term (doing them 2-3 days per week) because they can combat dowager’s humps and keep your back—upper, middle, and lower—moving more efficiently.
Exercise #1: Supine Chin Tuck
The Supine Chin Tuck is an excellent activation technique that is amazing for forward head posture. It engages the deep cervical flexor muscles and lengthens the short cervical extensors, which is exactly what’s needed to combat forward head.
- Lie on your back then lift your head off the ground just a tiny bit by tucking your chin toward your chest
- you only need to lift your head high enough to slide a piece of paper beneath.
- Hold for 5 seconds and breathe naturally.
- Return your head to the mat and relax for 2 seconds then repeat.
- Perform 4-6 reps, rest for 30 seconds, then repeat for a second set.
Exercise #2: Thoracic Spine Extension ERE (End Range Expansion)
This exercise targets the deep multifidus muscles which are critical for maintaining good posture. It’s a segmental movement, meaning you only move on segment of spine at the time. It can be challenging at first as you might not feel the muscles we’re after, but keep practicing and eventually you’ll develop the mind-to-muscle connection.
- Start in the four – point position on hands and knees.
- Fully extend the spine and tilt your pelvis anteriorly.
- The first movement is to tilt your pelvis posteriorly (think “tucking your tail between your legs”)
- Then, flex the lumbar spine segment by segment until you reach the thoracic spine.
- Maintain thoracic spine extension then flex your cervical spine segment by segment.
- Focus on maintaining extension of the thoracic spine with the other areas in flexion for 1-2 slow breaths, or 10-15 seconds.
- Slowly return to the start position and repeat for 2-5 cycles
Again, when you start this exercise it may feel like you’re not doing it correctly – or doing anything at all – but stick with it and you’ll eventually get the deep thoracic spinal extensors woken up.
Exercise #3: Active Hands Behind the Head
The Active Hands Behind the Head exercise will help to solidify the cervical and thoracic spine posture, while also activating the shoulder muscles. It focuses on the scapular retractor, middle trapezius, rhomboids, deltoids, and external rotator muscles.
- Start by standing tall, with your spine in neutral.
- Place your hands behind your head (don’t move your spine!).
- Lift your hands backwards off your head, driving your elbows back.(again, don’t let your spine move)
- Keep driving the hands and elbows back for 5 seconds, and breathe naturally.
- Return your hands to the back of your head for a 2-count and repeat for 4-6 reps, rest for 30 seconds, then perform a second set.
Exercise #4: Wall Neck Side Bend
This dynamic exercise is excellent for actively lengthening the neck muscles and restoring lateral neck flexion. Because it’s matched to your breathing, it helps to relax the neck and shoulder muscles that are often so stiff due to poor posture and stress. It’s a great tension-relieving exercise that will have you feeling better and more relaxed in a matter of minutes.
- Stand with your back against a wall, hands relaxed at your side, feet spread shoulder width apart and a few inches away from the wall.
- Keep your head touching the wall throughout.
- Slowly bring your right ear toward your right shoulder as you exhale.
- Hold for 2 seconds,
- Return to the start position as you inhale.
- Then slowly bring your left ear toward your left shoulder, as exhale.
- Hold for 2 seconds, return to the start position and repeat for 3-5 reps per side, with a 30 seconds rest you repeat a 2nd set.
Summary
Exercises | Sets | Reps/Hold Time |
|---|---|---|
1. Supine Chin Tuck | 2 | 4-6 reps, hold 5 sec |
2. T-Spine Extension ERE | 2-5 | Hold 10-15 sec |
3. Active Hands Behind the Head | 2 | 4-6 reps, hold 5 sec |
4. Wall Neck Side Bend | 2 | 3-5 reps, 2 sec hold |
Perform this routine daily for a week then drop down to 2-3 times per week for at least 4-6 weeks.
Do this routine for just 2 weeks and it’ll lead to noticeable benefits in posture, neck and shoulder pain and even headaches! And this will give you the motivation to stick with it for the long-term, which will go a long way to making sure you can stand up straight – properly – for the rest of your life.