
A torn meniscus is a common occurrence in sports and every life, but the typical rehab and prevention strategies are missing some key elements. We will show you five torn meniscus exercises that hit these elements and start addressing the root cause.
Maybe you’ve torn a meniscus or suspect you have. We’re going to cover some new research and share recent studies that explore surgery and recovery, along with insights that align with real-world rehab experience for meniscus tears
What are Some Signs of a Meniscus Tear?
There are two key signs.
- Pain localized to the joint line
- Swelling in the knee joint
A medial meniscus tear occurs on the inside of the knee. A lateral meniscus tear occurs on the outside of the knee. Pain for these types generally occurs over the joint line if there’s a tear.
Swelling is the most sensitive sign that you may have a meniscus tear. It may not occur immediately because the meniscus does not have a good blood supply. But it could develop 12 to 24 hours after you’ve injured your knee.
Maybe your knee hurts, but how do you find the joint line?

The best way to find the inside or medial joint line (the most common side for meniscus tears) is:
- Sit down and put your leg up, slightly bent
- Put your thumb across the front of the femoral condyle
- Follow it back, and you’ll feel a little space between the tibia and the femur
Meniscus tears often show as tenderness as you feel along the joint line.
What is the role of surgery?
“There’s actually a much more limited role for surgery than what was commonly believed in the past. Twenty years ago, it wasn’t unusual for people with just a sore knee to end up in the operating room.
Now, if you have a bucket handle tear where the fragment is flipped into the joint and is preventing your knee from extending, meniscus tears associated with ligament injuries, and meniscus tears that are traumatic in young people through what we call the red zone – that’s where there’s a blood supply and potential for healing – you are a potential surgical candidate.
Degenerative tears are not generally well treated with surgery.”
There’s also new medical research supporting the changing attitudes of orthopedic surgeons on meniscus tears.
One study is a Cochrane systematic review performed in 2022 examining arthroscopic surgery for degenerative knee disease called “Arthroscopic surgery for degenerative knee disease (osteoarthritis including degenerative meniscus tears.” It looked at patients that may have osteoarthritis and degenerative meniscus tears. The study showed that arthroscopic surgery provided little or no clinically important benefit in pain or function. [1]
The second study, “Arthroscopic partial meniscectomy for a degenerative meniscus tear: a 5 year follow-up of the placebo surgery controlled FIDELITY (Finnish Degenerative Meniscus Lesion Study) trial,” is a five-year follow-up comparing meniscus surgery with placebo surgeries demonstrating that arthroscopic partial meniscectomy was associated with a slightly increased risk of developing radiographic knee osteoarthritis and no naturally accompanying benefit in patent relevant outcomes at five years after surgery. [2]
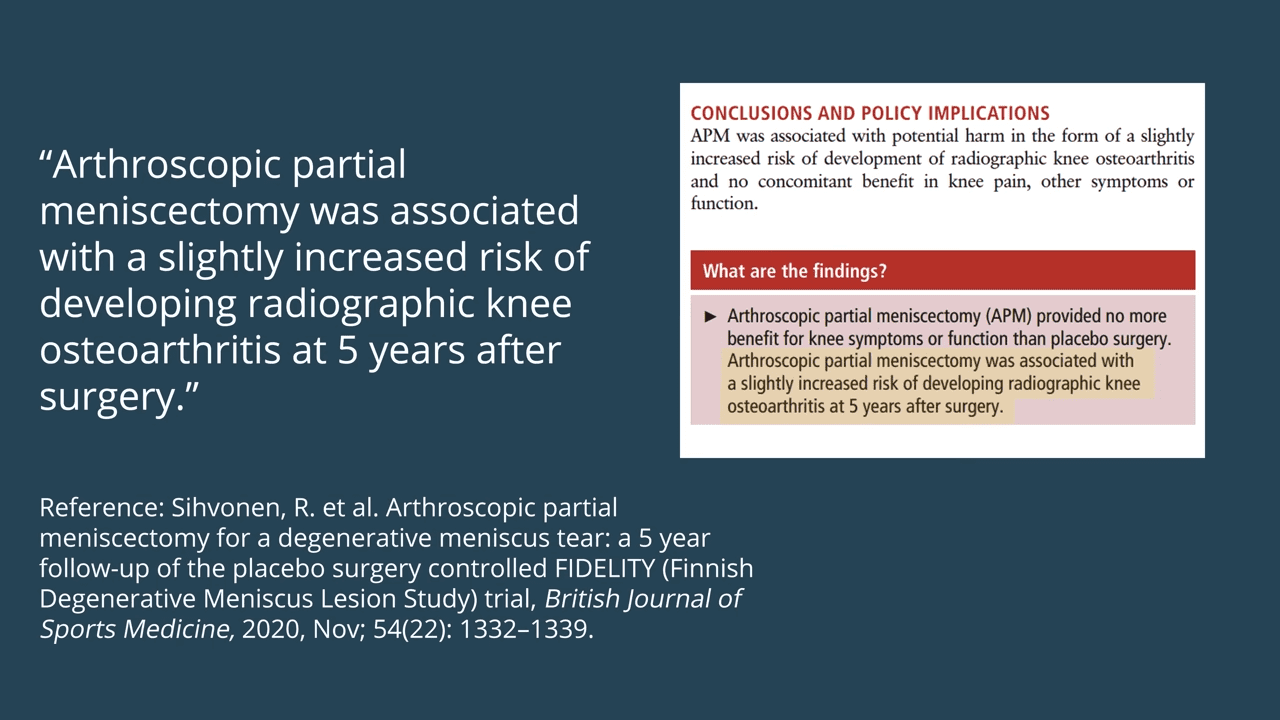
The fact that a patient’s x-ray shows more arthritis is concerning. But it’s also not the end of the world because it doesn’t mean there are symptoms that go along with the radiographic changes. While signs on an x-ray aren’t ideal, it doesn’t mean that you will have symptoms.
The bottom line is that meniscus surgery for patients who have degenerative tears and possibly osteoarthritis don’t really seem to benefit significantly from having surgery…AND the surgery does not address the root cause of why your meniscus tore in the first place.
What should you do when you suspect a meniscus tear?
Let’s say you’ve been running around. You hurt your knee, and you suspect a meniscus tear.
This is called the acute phase. It just happened.
What should you do?
Remember, joint line tenderness and swelling are the two signs of a meniscus tear.
The single most important thing is to get the swelling down because if you get the swelling down, your range of motion will come easily, and your pain will settle quickly.
That’s the first goal. But how do you get the swelling down?
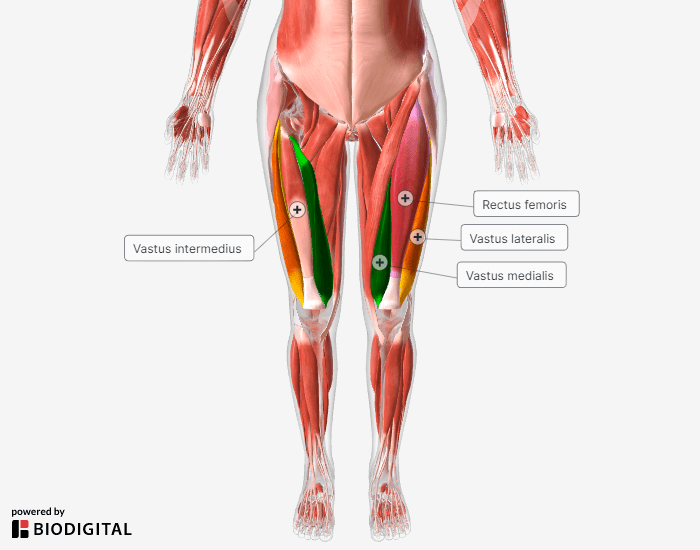
The best way that we know of is to activate the VMO (vastus medialis oblique). The VMO is part of the quadriceps muscle. Within 24 hours of having pain and swelling in your knee, that muscle can actually atrophy.
It’s crucial to get that muscle turned on.
Ensure you have what we call “terminal extension of the knee.” It will really help settle down your pain and swelling. Loss of terminal knee extension can be due to either swelling of the joint or a bucket handle tear of the meniscus, if when activating your VMO, the knee does not straighten out with minimal resistance you need to have the bucket handle tear ruled out by your physician immediately.
Then, there are ice and other modalities.
Ice is a fantastic thing to use when you’ve got swelling. Do 15 minutes 2-3 times daily and follow up with the exercises below.
It will probably take you 2-7 days to get your knee to settle down, depending on how swollen it is.
What about after the acute phase?
Once you’re progressing out of that acute phase, how do you properly go down the path to rehab without flaring it up again?
First, it’s important to understand what range of motion actually catches the meniscus tear.
What you can do is test your knee gently.
- Stand
- Bend your knees slightly
- Gently rotate your body, keeping your feet in place (it will look like your knees are shifting to point in different directions)
- If you don’t feel a sudden, sharp pain, do the next step
- Rotate your knees around independently until you feel a sudden, sharp pain
Once you learn where that vulnerable spot is in your range of motion and load, avoid it for a little bit.
Just keep aware of it. You don’t want to flare that up. It wouldn’t be the end of the world, but it will delay your recovery.
Root Causes of a Torn Meniscus
The important question to ask is, “why did the meniscus tear in the first place?”
The main reasons (root causes) for a lot of meniscus tears have to do with how you load your knee.
The things that really tend to overload the meniscus in your joint deal with the alignment of your knee.
Some people, for example, are more bow-legged or knock-kneed than others. It’s what we refer to as a static alignment. When you move, you may not have the strength and stability from your hips and feet.

That means, dynamically, when you lunge and squat, you may actually have your knees cave in. That can overload your meniscus, and then lack of mobility in the foot, ankle, and hip will lead to increased stress in the knee, particularly a lack of rotation in the hip can lead to increased rotational forces in the knee. That, in turn, will aggravate a meniscus tear.
We will cover that a little more specifically with these exercises to fix those root causes.
So next up are the exercises for torn meniscus without surgery to put you on the path to moving freely and without pain.
Torn Meniscus Exercises
If you’ve been with us for a while, you know that I almost always start with ASMR, then progress to isometrics, and then sometimes compound movements.
Do these exercises 3-4 times a week for several weeks, so you know that you’re taking steps to solve the root cause and not just addressing it enough to make the symptoms temporarily go away.
Exercise 1: ASMR Posteromedial Knee
The first exercise is auto-self-myofascial release posterior medial knee.
This comes from doing anterior cruciate ligament reconstructions. Often surgeons will harvest the semitendinosus tendon to replace the anterior cruciate ligament. The semitendinosus has some interesting anatomy.
Surgeons will make a little incision over the insertion of the semitendinosus (inside of the knee near the patella). Then they take a tendon harvester that you put subcutaneously through that little incision. If you screw up how you’re using that tendon harvester, you only end up with a little tiny piece of tendon. So there’s a slip of fascia that connects the semitendinosus and the gastrocnemius. You have to release that to allow for proper harvesting.
Patients who have osteoarthritis and or medial meniscus tears often have a lot of fibrosis in this area where the semitendinosus and the gastrocnemius muscle cross.
ASMR will release that area.
- Find the semitendinosus on the medial side of the back of your knee (it will feel like a cord)
- Place your fingers behind it up on either side
- Apply pressure and extend your knee
- Return to the bent position
- Change the position of your fingers
- Release
Do 1-2 minutes per side.
Move your fingers around the tendon to try and release that fibrosis that can occur in this area. It’s critical for allowing the capsule of the knee and the medial meniscus to glide properly within the joint itself, so you’re not trapping the meniscus and then loading it and tearing it.
Exercise 2: Extended Knee Ankle FL-EX
The second exercise is the extended knee ankle FL-EX (standing for flexion and extension).
We’ve talked about this exercise many times in these articles because it’s such an important exercise for anything to do with the knee. In particular, for a torn meniscus, it’s really beneficial because it’s going to get that VMO activated.
Plus, as we talked about earlier, the VMO can atrophy within 24 hours of swelling.
In short, if you have a swollen knee, do this technique as soon as possible.
The second reason we like it so much is that it works the ankle range of motion and it works that with a stable knee and at terminal knee extension.
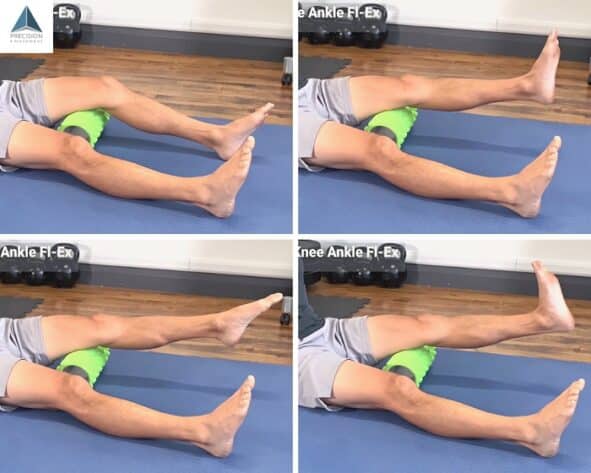
- Sit on the floor with something like a foam roller under your mid-thigh
- Ramp up the quads gradually over 5-10 seconds
- If you don’t see the VMO firing, tap on it
- Slowly extend the knee to terminal knee extension and hold
- Push down through your metatarsals for plantar flexion of the ankle
- Hold for 5 seconds
- Switch to dorsiflexion, pulling the foot up
- Hold for 5 seconds
- Return to neutral ankle
- Keeping the quads on, slowly lower down
- When you touch the ground, gradually ramp down quad activation
Do 2-3 sets of 3-5 reps with 5-second holds.
One cue, if you’re hypermobile, is that you want to make sure that you maintain a straight knee angle. Don’t go into that hyper knee extended position. It’ll be a little bit less than your full knee extension. Again, that’s only for hypermobile folks.
While you’re firing up the VMO, try to keep the rectus femoris muscle (it’s the top of your quad) as quiet as possible. It’ll start to kick in once you extend the knee.
Also, avoid curling your toes or pulling your toes up on the plantarflexion and dorsiflexion of the ankle. Moving the foot is what works the ankle, but sometimes toes get in the habit of moving too.
You will want to move super slow with this, controlling every degree of range here. That’s how you train for movement longevity and avoid injuries in the future. With good control and stability in this exercise and good ankle range of motion, you’ll set yourself up for a lifetime of moving your knees freely and without pain.
Exercise 3: 4-way MTP Slide
Next up is the 4-way MTP slide. This exercise is really beneficial for a torn meniscus because it works the intrinsic foot muscles. Those are the muscles that create an active arch.
When they’re not working well, you don’t have good force absorption. You also won’t have good proprioception (often called kinesthetic awareness) that tells the rest of the muscles how they should respond to whatever it is you’re doing. So more stress will go through the knee.
The MTP slide also works hip rotation range of motion and all ankle range of motion – plantar flexion, dorsiflexion, as well as inversion and eversion. If you don’t have inversion and eversion, you can suffer from ankle sprains, excess stress on the knees, ligament strains, and meniscus tears.
For this technique, you’ll be doing one foot at a time. Find something you can sit on nice and tall.
When you get in position, do the short and skinny foot. If you aren’t familiar, here’s how.
- With your foot flat on the floor, pull your metatarsals (the bones in the ball of your foot) closer together.
- Pull your metatarsals close to your heel
- Maintain pressure through the metatarsals on the ground.
That’s all there is to the short and skinny foot. It creates an active foot arch, which you want throughout this whole technique.

- Maintaining a short and skinny foot, slide your foot forward as far as you can go maintaining metatarsal pressure
- Hold for 5 seconds
- Slide your foot as far back as you can go
- Hold for 5 seconds
- Return to neutral – 90 degrees at the knee
- Slide your foot out using internal hip rotation
- Hold for 5 seconds
- Slide your foot in using hip external rotation
- Hold for 5 seconds
- Return to neutral
- Shake it out
That’s one cycle. Do 2-4 cycles on one side, then switch to the other for 2-4 cycles. Perform 2 sets.
By doing all the cycles on one side before switching, you’ll build up good endurance in the foot intrinsics and the different ranges of the ankle.
Do 1-2 sets of 2-4 cycles per side.
Then you’ve got all of those benefits that we just talked about.
Exercise 4: Prone Knee Flexion ERE
The fourth exercise is the Prone Knee Flexion Level 1 ERE.
Don’t worry, it’s easier to do than to say.
ERE stands for end-range expansion. It’s what we use to increase range of motion and mobility.
It’s an active exercise, so it builds strength at that end range of motion, giving you lasting results. Standard static stretching, on the other hand, only gives you temporary results at best.
For this technique, you want to use a strength band of some kind. If you don’t have one, don’t fret. You can use a rope, bungee cord, belt, or a pair of sweatpants.
Be careful. You don’t want to work this if it’s a painful range of motion. However, a little later on in your rehab process after a torn meniscus, you’ll need to restore knee flexion range of motion.

- Lay in the prone position (on your front)
- Loop one end of the strength band around your ankle, hold it with your other hand on the same side
- Bring your heel as close to your glutes as you can, actively using the hamstrings
- Hold for 10-15 seconds, no tension on the band
- Hold the band firmly in place, press your ankle into the band, activating the quads but maintaining the end-range knee flexion
- Hold for another 10-15 seconds
After one cycle, switch sides. Do the other hamstring and quad combo for that end-range expansion.
Do 3-5 cycles, holding for 10-15 seconds each.
Again, this is how you build lasting range of motion. You’re building strength there, so your brain tells itself, “Oh, I have strength. I have stability. I can work there and control that range of motion, so I’m going to let you keep it.”
Start with the hamstring contraction. Bring yourself into that range of motion actively, then you do the quadriceps contraction to extend the knee. You’ll end with that hamstring knee flexion contraction, and then you’ll switch sides.
It’s a great technique, and it’s going to help you restore (and improve) that lost range of motion.
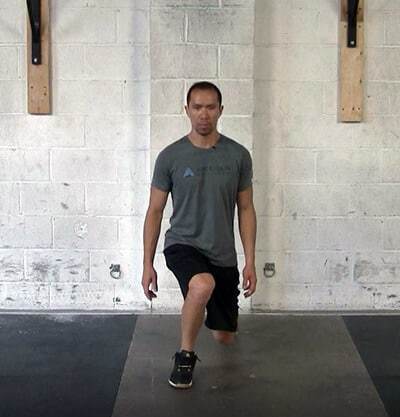
Exercise 5: Reverse Lunge & Twist
The last torn meniscus exercise we’re going to go through is the Reverse Lunge & Twist.
This is one that you don’t want to do until about two to four weeks after you’ve torn your meniscus and you’ve gotten rid of the swelling. Also, always do the previous exercises first because they build up into this one.
The Reverse Lunge & Twist is a functional movement pattern. We’re working multiple joints at once over different movements and different planes of motion.
It’s going to key in on metatarsal pressure. You’ll work those feet along with hip rotation, which will help reduce those rotational stresses off of the knee. Remember, it’s those rotational stresses that break down the meniscus, especially the ACL.
Start off with a short and skinny foot. Stay nice and tall throughout.

- Stand straight, feet shoulder-width apart
- Step back into a reverse lunge
- With your palms together pointed in front of you, twist your torso toward the outside of your front knee
Do 2-4 sets of up to 12 reps per side. Start off with 4 reps per side, working your way up to 12 as you build strength and endurance.
Make sure you keep your posture up, particularly during the twist. Make sure that the knee and the thigh point in the same direction as the foot.
What you don’t want to do is rotate, going on the edge of your foot so your thigh is pointing one way and your foot is pointing another. That will put that rotational stress we don’t want onto your knee.
When you step back, your knee and thigh point in the same direction – straight ahead. Use a mirror or get someone to spot you if you’re worried about it. Once you step back (maintaining that good alignment), most of your weight should be on your front foot, working that front foot and leg.
This is a great exercise to carry over all of the work that you’ve already done onto the field, ring, court, or any activity that you love.
Putting It All Together & Next Steps
Those five torn meniscus exercises get to the root cause of why you’ve overloaded and possibly torn your meniscus. Stick with them.
If you want the full solution, check out our Knee Pain Solution program. It will walk you from wherever you are – it could be a 10/10 pain – to ultimately zero pain with a customized course that starts where you are.
Thanks for joining us. Keep up the good work on staying active.
“Wow, thank you to Eric Wong and his crew.
I have been in sports medicine for four decades and have completed courses in Athletic Training, Exercise Physiology and Human Performance Assessment to name a few.
Eric’s insight, knowledge and professionalism have definitely helped me a lot in my recovery from a meniscus tear and shoulder injury I suffered while surfing.
He is an excellent teacher and I am looking forward to learning more from him. I hold a level two coaching certificate from USA Track and Field in sprints, jumps and hurdles. I am a three-time National Championship medalist and ten times USATF Masters Track and Field All American and surf coach.”
– Rick