
The typical snapping hip syndrome exercises you see don’t get to the real root cause of the problem. Today, we’re going to show you what you can do for your snapping hip. (Hint: it’s not surgery.)
What is a snapping hip?
There are two types of snapping hip.
- External Snapping Hip – the iliotibial band snapping over the greater trochanter
- Internal Snapping Hip – a tight iliopsoas jumping over a portion of bone
Today, we’re focusing on the internal snapping hip. What happens is when the psoas muscle becomes too tight, as you flex and extend your hip, the muscle flips or clicks over the front of your pelvis.
In the background research before putting together this routine, we found a great ultrasound video showing this phenomenon.

VIDEO: Dynamic Ultrasound for Snapping Hip Syndrome [1]
In the video above, you can see a pathologic example of internal snapping hip. The two abrupt movements as the leg goes into extension are what you feel in the snap/clunk.
Why does this happen?
If your psoas muscle is too short when you extend your hip, the muscle becomes trapped by a portion of it’s sister muscle, the iliacus and then has to jump over a portion of the bony pelvis.
The best way to determine whether or not your psoas is too short is the Thomas Test.
The Thomas Test
The Thomas test will tell you if you have internal snapping hip syndrome. You’ll feel the snap if you do. It’s an unmistakable experience.
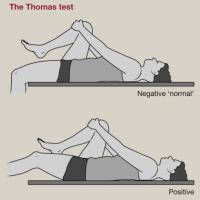
Image by www.orthogate.org/
- Place your butt right at the very end of a bed or bench.
- Lie back and bring both thighs up onto your chest
- Hug your knees
- Lower one leg into extension
If your hip snaps into extension, you have snapping hip syndrome. You should be able to lower your leg parallel to the bed/bench while keeping your other thigh up against your chest.
If it’s not parallel, you have a shortened psoas.
If you can get almost parallel, the limited shortness may be that your rec fem is a little bit short.
So the real question becomes, what do we do about it?
Snapping Hip Syndrome Exercises & Root Cause
Coach E ironed out the root cause while working on Hip Control (the precursor to Hip Pain Solution). It comes down to good neuromuscular control over eccentric hip flexion.
What does that mean?
Eric shares a great example. He says:
“I actually discovered the root cause kind of accidentally for snapping hip because my hip used to clunk like crazy. It was like going over a speed bump, and you got no shocks in your car. It’s just like boom.
I used to do that whenever I would lower my leg doing a leg-lowering type of exercise.
What I found was to work the eccentric, which is the lengthening of the psoas, but use active control, so the psoas is contracting when it’s lengthening at the same time.
When I did that exercise, my leg didn’t clunk when I lowered it, and then I kept that psoas on. During the leg lowering and again, it didn’t clunk.
So what I discovered was the real root cause was not just the shortness or the limited range of motion of the psoas, but it was the lack of control, especially as it was lengthening as the psoas was getting longer.
If that muscle wasn’t working properly, then the clunk would happen, and I could reproduce it really, really easily.”
We always like to comb through the literature when filming videos and writing these articles. In one study called “Understanding and Treating the Snapping Hip,” the researchers found that excessive muscle activation increases the tension in the muscle, then the intervention is directed at modifying neuromuscular control to allow muscle lengthening while still maintaining eccentric control. [2]
This failure to appropriately relax the muscle is commonly seen in patients with snapping hip syndrome.
So why do we get a shortened or uncoordinated psoas muscle?
By far and away, the most common cause is sitting!
When we sit, the psoas goes into a shortened position, and many of the muscles in the core fall asleep. Plus, for women, pregnancy/childbirth can create a clunking hip.

What About Surgery?
Many patients are being offered surgery now to lengthen the psoas muscle. This can be something occasionally needed. A concern is that just lengthening the muscle doesn’t address the root cause – the ability to control the contracting of the muscle as you’re lowering your leg or as the muscle is lengthening.
If you’re contemplating surgery, try these exercises first. Hopefully, it’ll address the issue, and we think you’ll find results really quickly once you follow these exercises.
The snapping hip syndrome exercises aren’t very fancy, but it’s the cueing and how you do them that’s most important. You might find that the clunking hip you had just kind of disappears when you get the psoas muscle turned on.
So let’s get to the exercises.
Exercise 1: ASMR Iliopsoas
The first exercise we’re going to do is active self-myofascial release of the iliopsoas.
You might be wondering why we don’t start with stretching.
We love active self-myofascial release because it releases the muscle allowing us to then activate it better.
You’ll need a ball for this technique. A lacrosse ball or massage ball works well.

- Lay on your back and place the ball in the area just between your belly button and your hip bone
- Apply pressure
- Slow flex and extend your leg
- Move the ball around every couple of flexes
- Continue for 2 minutes
- Switch sides and do another 2 minutes.
You shouldn’t be causing yourself a lot of pain, but you want enough pressure to break up any adhesions (this helps release the Psoas from the Iliacus muscle so that it can glide properly). If you’re just starting out with ASMR, start at one minute and see how it feels.
If you find a spot where it’s a little tight, do a couple extra repetitions of the flexion and extension.
If you feel like you’re not able to put enough pressure with just your hands, you can take a weight and put it on top of the ball. Otherwise, just use the pressure of your hands.
Now we’re ready to activate the psoas.
Exercise 2: Hip Extension ERE Technique
Hip Extension ERE stands for end-range expansion. This will activate the hip flexor muscles in their lengthened position.
First, we lengthened it and got rid of any adhesion/scar tissue. That kind of stuff can limit a muscle’s ability to lengthen.
Now we’re going to activate the muscle in the lengthened position. Then we’re going to go on and activate it in the shortened position through the full range of motion.

- Lie on your side, you’ll be working the bottom leg
- Use your glutes to get your bottom leg into full hip extension by bringing the foot back and your leg behind you without overextending your lumbar spine
- Fire the glutes as hard as possible
- Hold for 10-15 seconds
- Put your other foot onto your knee
- Drive your knee into your foot
- Hold for 10-15 seconds
- Fire your glutes back up to bring your foot and leg behind you again
- Hold for another 10-15 seconds
That’s one cycle. Switch sides and do the next cycle on the other side before performing the exercise with this leg again. Try to breathe naturally and not hyper-tense your shoulder or lower back.
Start with 2 cycles on each side. Then work your way up to 4 cycles on each side.
If you find that your hamstrings are getting too tight while activating your glutes, you can straighten the leg out a little bit, and it’ll get more glute activation without too much tension in the hamstrings.
Exercise 3: Slumpy Psoas Activator
The next exercise we’ve got for you is called the Slumpy Psoas Activator. This does exactly what it’s named for – activating the psoas muscle.
Starting out in this shortened, sitting position is really important because when you’re sitting down, oftentimes, you’re slouching. That’s when the psoas shuts off. But because it’s in a shortened, shut-off position, it gets restricted to boot. It doesn’t know how to work in this position.
So now, we’re going to wake it up while seated so that we can use it through the full range of motion.
In the previous exercise, we activated it in the lengthened range. Now we’re covering the shortened range. Then we will put it all together.
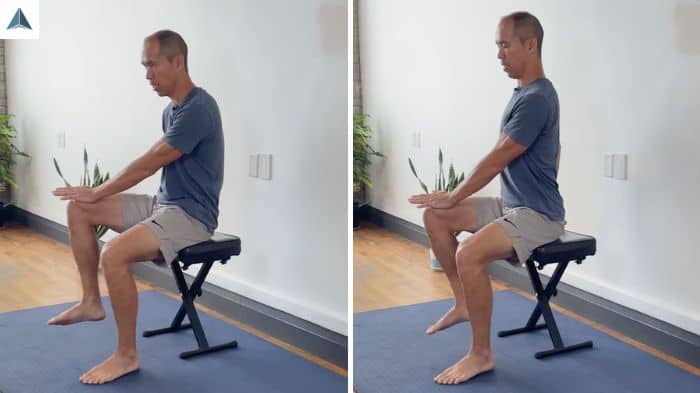
- Sit on something stable in a slouchy position (think horrible posture)
- Lift one foot off the ground
- Press the opposite hand into the knee of the lifted foot
- Maintain the pressure while slowly straightening your back
- Sit up nice and tall and stick your butt out a little
- Hold for 5 seconds
- Gradually lower your foot back to the floor
Do 2 sets of 4-6 repetitions.
It’s really important here that you pay attention to what this exercise feels like. Develop that mind-to-muscle connection because we’re going to use this for the next exercise.
Lifting the foot turns on the psoas at the same time that it turns off the tensor fasciae latae.
As you’re doing the Slumpy Psoas Activator, the muscle is going to fatigue. You’ll feel the lactic acid build-up. That’s good! That’s what we want you to feel. Because once the psoas is activated, now we can use it through the full range of motion.
Which is ultimately how we’re going to get rid of the snapping hip syndrome.
Exercise 4: Iliopsoas Control I
This final exercise puts everything together to help you control the iliopsoas through its full range of motion – a key to reducing hip clicking and snapping hip syndrome symptoms.
You’ll start in a similar position as the Slumpy Psoas Activator, but this progression challenges your ability to maintain deep hip flexor engagement – especially as the muscle lengthens. It trains both stability and eccentric control, which are critical for preventing the “clunk” often felt when lowering the leg.
Tip: This is the first of three progressions. You can find the more advanced versions inside the ROM Coach app.

-
Lie on your back with knees bent and feet flat.
-
Press one knee into your hand and your hand into your knee – activating your iliopsoas.
-
Adjust foot and knee alignment slightly outward if needed to shift activation away from the TFL.
-
Keep even pressure under both sides of your pelvis – no tilting or leaning.
-
Maintain a neutral lumbar spine (just enough space to slide a hand under your lower back).
-
Keeping that muscle engaged, slowly lower the foot to the floor.
-
Slide the foot along the ground until the leg is fully straight – keep the iliopsoas engaged throughout.
-
Reverse the movement with control, using your hip flexors to bring the leg back.
-
Relax completely before switching sides.
Coaching Cues:
-
Move very slowly to control each degree of range.
-
Don’t let momentum take over – the goal is total muscular control.
-
If you feel a snap or clunk as you straighten the leg, go slower and focus on maintaining activation.
- Prioritize even pelvic pressure and neutral spine alignment throughout.
Routine Summary
This focused 4-exercise routine targets the underlying causes of snapping hip syndrome by releasing tight tissue, activating underused muscles, and retraining control through full range of motion. Each movement builds on the last to progressively improve hip stability and reduce the snapping or clicking sensation.
For best results, consistency is key — aim to follow the routine several times per week and track your progress over time. Below is a breakdown of sets, reps, and frequency for each exercise.
| EXERCISE | SETS X REPS – HOLD |
|---|---|
| ASMR: Iliopsoas | 1-2 min per side |
| Side Lying Hip Extension ERE | 2-4 reps per – 10 sec activations |
| Slumpy Psoas Activator | 2 sets x 4-6 reps per – 5 sec hold |
| Iliopsoas Control I | 2 sets x 4-6 reps per |
Key Takeaways
- Snapping hip syndrome often results from poor iliopsoas control and muscle imbalances, not just tightness or structural issues.
- Effective relief requires a targeted approach combining tissue release, muscle activation, and slow, controlled strengthening exercises.
- Maintaining even pelvic pressure and a neutral spine during exercises is essential to retrain proper hip mechanics and reduce hip clicking.
- Consistency matters – performing the routine 3-4 times per week for 2-4 weeks typically leads to noticeable improvement.
- This concise, home-based routine focuses on restoring hip stability and neuromuscular control to address the root cause of snapping hip symptoms.
What’s Next?
These snapping hip syndrome exercises should make a big difference in how your hips feel. You might find your hip is still clunking but stick with the routine. Keep practicing and developing that mind-to-muscle connection.
But what if you still have stiffness or pain in your hips even after they’ve stopped snapping?
Hip Pain Solution targets the major hip dysfunctions and compensations (like iliopsoas tendonitis) but is tailored to meet your level of pain. Correct the root causes of hip pain in only 20 minutes a day.
—
This article was published on Jan 24, 2023 and updated on July 28, 2025