
Is your lower back keeping you up nights? Has suffering lower back pain right above tailbone level forced you to eat NSAIDS like jellybeans?
Do you wake up every morning with a sensation like broken glass in your lower back?
Don’t lose hope, keep reading to learn the 4 steps you can take that will soothe the pain, resolve potential causes of your low back pain and put you on the road to recovery.
What Causes Lower Back Pain Right Above The Tailbone?
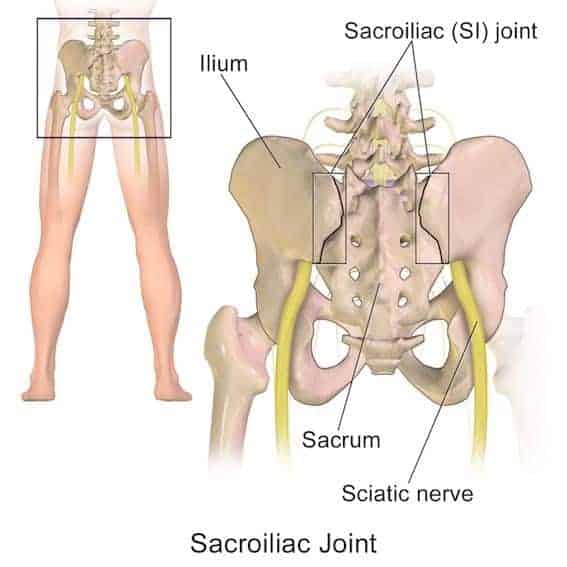
Typically pain in this area is caused by problems between the 5th lumbar and 1st sacral [1] vertebrae; the 2 bones that are located just above your butt-crack.
Lower back pain in this area typically comes from one of 2 sources:
- Flexion (bending forward)
- Extension (bending backward)
If sitting is painful and lying down brings relief; you’re likely suffering from flexion related L5/S1 pain. You may also have a bulging, slipped or herniated disc [2].
On the other hand, if your pain is worse when you’re standing or walking and you feel a radiating pain that is relieved by sitting down, you have extension related pain and might have:
- Foraminal stenosis: a narrowing of the passageway in the lower spine where nerve roots leave the spinal cord and enter the legs (likely)
- An anterior disc bulge/herniation (not as likely, but possible)
For both types of pain, your core needs to be functioning properly to protect your back using both static and dynamic lumbar stabilization which you can read more about later on this post.
The Spine
Your spine is made up of 24 bones called vertebrae; the vertebrae come in three types: cervical (neck), Lumbar (back), and sacral (butt crack territory).
These bones are separated from each other by intervertebral discs. These are the soft, gel-like pads that keep the vertebrae from rubbing against each other and act as shock absorbers [3]. Your discs have 2 components:
- A strong, fibrous outer ring called the annulus
- A soft jelly interior called the nucleus pulposus
When something causes damage to the annulus, the nucleus material can bulge out (slip) or squirt just like stepping on a jelly donut, with the jelly shooting into the surrounding area (herniate) impinging local nerves and potentially causing extreme pain.
When this occurs in between the L5 and S1 vertebrae the L5/S1 nerve roots that feed into the sciatic nerve (the long nerve that extends from the lower back down each leg) will become pinched and you will experience lower back pain right above your tailbone. Ouch.
In a healthy spine the spinal nerves travel through the spinal canal and radiate out to the body through bilateral foramen (small passages).
If any of these passages in your spine become constricted, the nerves will be pinched or compressed. When the foramen between your L5/S1 vertebrae narrows it will impinge on the sciatic nerve [4], creating excruciating lower back pain above the tailbone, and:
- Tingling
- Cramping (anywhere from hamstring to calf)
- Numbness that can extend from the lower back to the bottom of the foot
Double ouch.
Here’s the first step to fixing the pain in your lower back:
Step 1 – Flexion and Extension Mobilization
To relieve flexion related pain you can perform extension mobilizations to coax the disc back into position. Mckenzie exercises are an effective way to do this:
The Mckenzie method, also called mechanical diagnosis and therapy (MDT) was developed by New Zealand physical therapist Robin McKenzie in 1981 and is based on repeated movements and sustained positions to centralize and eventually eliminate lower back pain.
Flexion mobilization is how we’re going to stabilize the disc in extension related back pain:
These movements aren’t exercises; they’re ways to gently manipulate a protruding disc back into the neutral position, relieving pressure on the nearby nerves.
Flexibility is an important factor in injury prevention and rehabilitation, which brings us to step 2.
Step 2- Restore Hip Mobility and Movement
Building up and maintaining a good level of flexibility is a great way to relieve lower back pain right above tailbone level. Here are a couple of techniques to open your hips and restore your mobility and flexibility.
The Lateral Hip Stretch
Start by lying down on your back and cross an ankle over your knee – now bring your raised knee and ankle down to one side while keeping your back flat on the ground and your face up. Hold the stretch for 20 or 30 seconds and bring your leg back up and repeat on the other side:
The Supine Hip PNF
Finally, we have what might be the best hip flexibility exercise, the Supine Hip PNF.
Lie down on your back, lift one leg while internally rotating the foot and extend that leg to your full range of motion on the opposite side. From that position, you’ll move your leg up and around in a circular motion that will bring your leg down and extended on the other side of your body. Now continue describing a large internally rotated circle with your leg. To complete the stretch; reverse the motion and rotate the leg and hip externally to activate and stretch the entire hip.
Watch me as I perform the movement:
After addressing mobility, you must hit the muscles of the core, which act like a natural weightlifting belt keeping your spine stable and preventing injury.
So let’s go on to step 3 and learn how to stabilize our core.
Step 3- Core Stability
There was a time years ago when I was trying to address “butt wink”, which is when your pelvis tilts posteriorly at the bottom of a squat.
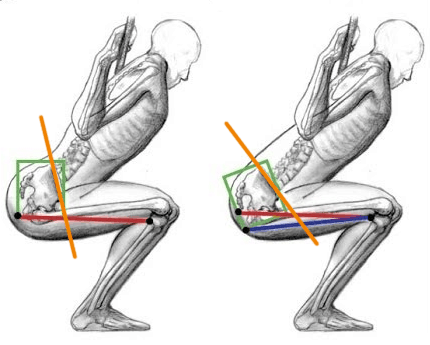
I was always under the impression that butt wink was a function of hamstring length and to fix it, you’ve got to stretch those hammies out. Well, I did that, for a long time, without much success.
But I needed to fix this issue because it kept me on a plateau so I kept thinking, researching and experimenting and after a while I discovered the importance of psoas strength to prevent butt wink, particularly at end range of motion. The psoas is a hip flexor, but when you look at the anatomy, it also functions to maintain extension of the lumbar spine.
If it’s weak, the lumbar spine crumples like an empty bag of chips. But when it’s strong, it maintains extension of the lumbar spine, which helps to keep the pelvis in neutral and prevents butt wink.
The third step to fix lower back pain right above the tailbone is by improving your core stability, including the aforementioned psoas.
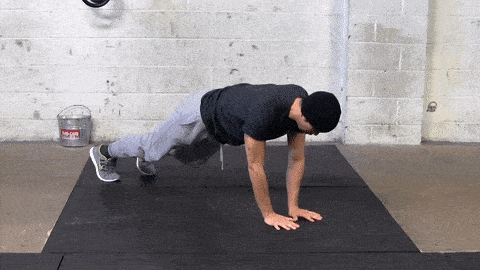
The Active Groiner is great because it trains not only the psoas at end range, but also the anterior core muscles, making it a great bang for your buck technique.
In addition, basic planks, side planks, glute bridges and birddogs are great ways to train core stability, especially if you’re in pain, since they’re low level but effective exercises..
Step 4- Decompress the Spine
Gravity is a constant strain on the spine; every day of our lives it compresses the discs in our backs pushing fluid out, making our discs dryer, stiffer and more liable to crack.
Spinal decompression is all about stretching your vertebrae apart, encouraging the discs to expand and absorb fluid to rehydrate, as well as undoing the damage gravity’s constant pull on us causes.
Hanging Spinal Decompression
Start with hanging spinal decompression to really loosen up. Simply grasp a chin-up bar with your hands shoulder-width apart and hang. It feels fantastic, and you don’t need to do anything more complicated than hold on. The important thing is to relax your lats and really feel the stretch. Hang for 1-2 minutes total, broken up into 10 second segments if necessary.
Prone Spinal Decompression
If you don’t have a chinup bar or the strength to hang from one, you can simply attach a strong resistance band to an anchor and lie prone (face down) while having the resistance band pull your arms. This simulates the decompression you get from hanging but can be done by anyone regardless of strength.
Be Diligent and Get Rid of the Pain
You’ve got all the information you’ll need to fix that lower back pain right above the tailbone. Follow each step consistently, and perform the movements exactly as I’ve shown them. If you’re careless, you’ll risk worsening the pain and lengthening your recovery time.
If you’re diligent about following this pain-relief routine, you’ll not only get rid of that back pain, but you’ll enjoy the benefits of increased hip mobility and a powerfully developed core.