
Do these three easy hip adductor exercises at home to strengthen and stretch them safely. These three exercises also transfer well to life and sports.
Hey, there. It’s Coach E, kinesiologist and movement coach over at Precision Movement. Today, I’m going to show you some exercises to lengthen and strengthen the adductor muscles, which are often referred to as the groin.
They are a group of muscles that go right in the inner thigh that are often tight.

One thing that’s also missed when it comes to this muscle group is that we need these muscles to be able to move around on the court, field, or ice, depending on what sport you play.
For example, right now, I’m predominately playing hockey and tennis. In tennis, there’s no better example of somebody who’s got great strength and flexibility of their adductors than Novak Djokovic, a recent U.S. Open winner.
In ice hockey, the position that you’re often skating in is with a wide base, and you need to be able to cross over quickly from one side to the other. To do that, you don’t need just length, but you need strength.
That’s one thing that’s often missing from a lot of the other videos and exercises that you’ll find on the hip adductors. Many exercises to stretch your adductors also irritate your knees or hips, because ou’re not building that strength, and you’re not building it in positions that will translate to where you need it, which is standing on your two feet, moving over, sideways, and around.
3 Hip Adductor Exercises for Strength & Length
We’re going to fix all that by showing you how to strengthen adductor muscles. You’re going to get three exercises that you can do easily at home to build the strength and length of your adductors.
If you want to follow along with the YouTube video, click over to 3 NEW Exercises for Adductor Strength, Length & Transfer to Sport.
Exercise 1: Frog ERE
The first exercise I’d like to take you through looks like something that you’ll see elsewhere, which is the frog stretch, but I call it the Frog ERE, which stands for end-range expansion.
I make that distinction very intentionally because I want you to know right off the bat that it’s different than just a standard frog stretch.
The first thing to do is to find your starting position. I like to start off on the hands. You can also go to the elbows, but starting on the hands is better because it’s a little bit easier, and you can get into a better position with your pelvis.
Then, we’re going to spread out and get a gentle stretch, maybe 60%. So, I’m not going to my max stretch yet. I’m taking it in a little bit.
Then, instead of pointing my toes out to the side with the arch toward the ground. I’m turning my toes in and stretching the big toe down. This position translates better to standing on your feet when you’re upright. Again, one of the goals here is to transfer the gains in adductor length to life and sport.
This is the start position.
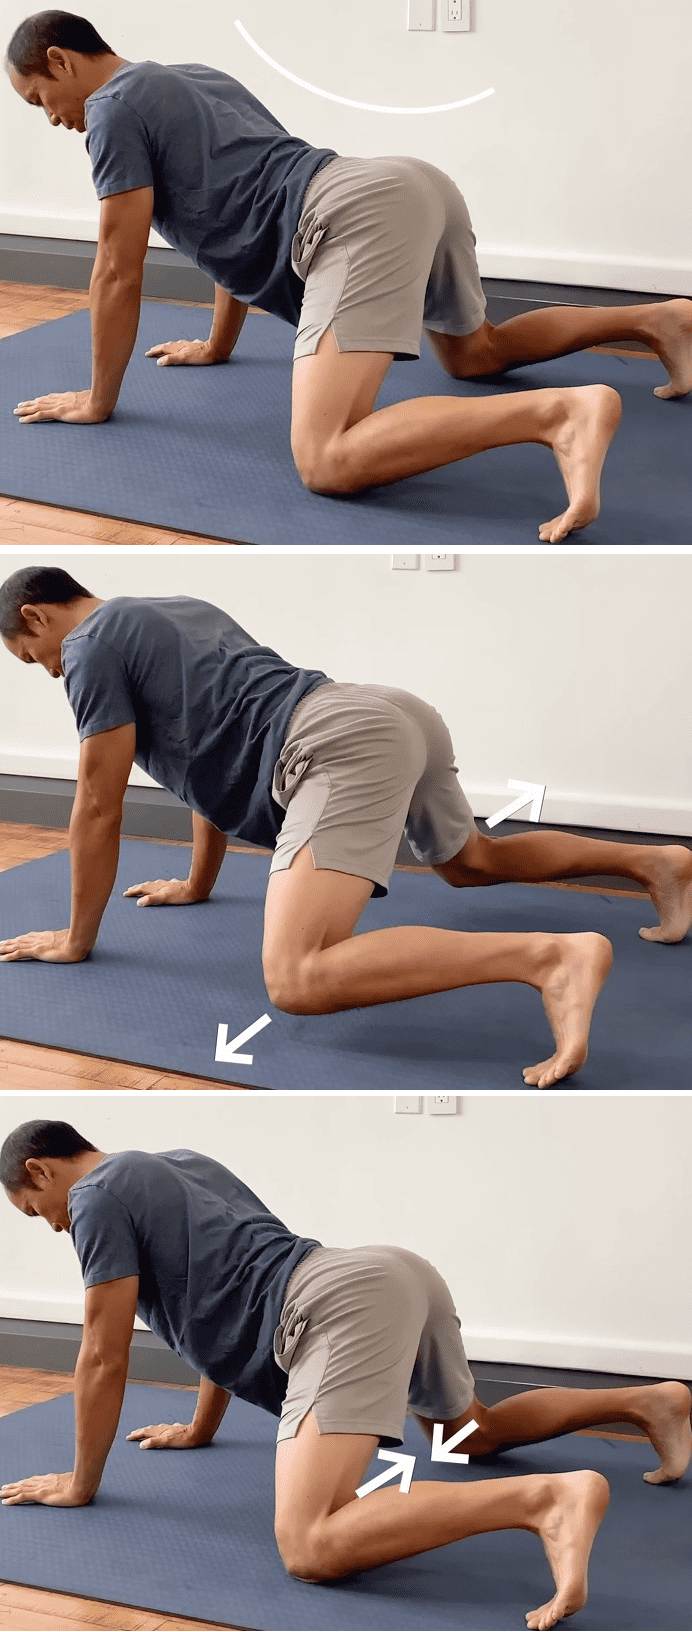
- Gentle stretch for 1 min
- Abduction (knees apart) hold for 10-15 seconds
- Adduction (knees together) hold for 10-15 seconds
- Internal rotation (thighs in) hold for 10-15 seconds
- External rotation (thighs out) hold for 10-15 seconds
- Abduction (knees apart) hold for 10-15 seconds
For this exercise, I like to do 2-4 repetitions. That’s what you need. Start at two and work your way up over time. A simple progression could be two for one week, three for the next week, and four the week after that.
That’s the activation sequence. By doing this, you’re building strength in a lot of different muscle groups in that position that we’re using, which is basically this skating position for me or stretching out a little bit, being wide, waiting for a tennis ball when somebody’s serving.
This is the position that’s going to translate to life and sport, and with the next couple of exercises, we’re going to increase the transfer even more.
Exercise 2: Adductor ISO Lunge
The next exercise I call the Adductor ISO Lunge.
To start, spread your legs out sideways from a standing position. We’re not going to go into a full split or as far as possible. Like, I could keep going down, down, down, to the point where I don’t have a lot of control here. I can’t really move anywhere from this position. That’s not where I want to be.
You want to be in a little bit closer. This is a position I would wait for a tennis ball. This is a position that I ski in. It’s the same position that you’d use in sports. From here, set yourself up so your feet are pointing straight ahead. They’re not turned out. They’re not turned in.

- Get in a wide stance, foot pointing straight ahead
- Squeeze the floor together (isometric)
- Shift slowly to one side
- Shift slowly to the other side
Do 2-3 sets of 3-5 reps going in each direction for this technique.
Now, this exercise is great for developing the strength you need to not only perform well but to prevent injuries. For example, you might stretch that leg out, reaching for a ball or something. But if you don’t have the strength there, that’s when the other passive tissues have to come into play. They can easily get ripped.
If we’re at our full range of motion and we don’t have that muscular control and stability at the range. This exercise is really important for preventing those adductor and groin strain injuries.
Exercise 3: Adductor Cable Lunge
Now, we’re in the third and final of the adductor strength exercises called the Adductor Cable Lunge.
This is similar to the Adductor ISO Lunge with a couple of key distinctions that increase its specificity to sport and life.
For this exercise, we need a cable set up about belly button height. From here, we’re going to stretch it out just so that we start off with a little bit of tension.

- Get into a wide stance, holding the band at belly button level
- Use the adductor to shift your balance and slide your inside leg away from the band anchor
- Bring the inside leg up into the air across your midline
- Balance for a couple of seconds
- Step back into a lateral lunge (the original position)
I like to do anywhere from 2-4 sets of 4-8 repetitions per side.
Increase the reps as you increase the speed of movement. If you’re going really slow and just dragging the cable, taking your time because you’re still figuring out the activation and the balance, then do around four repetitions. But if you’ve got a little more control and you’re able to pull yourself up with some speed, then do eight repetitions.
This exercise brings in the elements of speed and balance that any other exercises you see for the adductors you’re not going to get.
We’re strengthening it in the closed chain because when I’m playing hockey, I’m using this foot when I’m crossing over, and I’m pushing off that way. When you’re playing tennis, you’re running, you’re chasing the ball laterally. Oftentimes, that first step is a crossover step, and you need both legs to contribute to that. Not just the pushing off leg, the abductors. But the pulling yourself across with the adductors.
That’s why this exercise is so great if you play any of those sports or any other sports where you’re on your feet and you have to move quickly around to chase the ball or tackle somebody or whatever it is that you do.
Through 5 or 6 years, and before buying the Hip Pain Solution, I went to 1 Orthopedist, 2 physiotherapy centers and 2 osteopaths and none of them addressed the Root cause of my problem properly. Hip Pain has absolutely been what saved me from having a completely stiff hip at 25 years of age 🙂
– Maria
Next Steps
Those are the three hip adductor exercises that I’ve got for you. Just work it, depending on where you’re at.
Let’s prevent adductor strains. Let’s improve our performance, and let’s just have more fun because being able to play, being able to perform well is way more fun than not.
If you want to take the next step in strengthening your adductors and the surrounding muscles, Hip Pain Solution will take you from where you are, whether it’s constant pain or just a little tightness, through progressions to get your hips in top shape so you can keep moving freely and without pain.